13 DIY Garden Decor Ideas for a Feminine Outdoor Oasis
Your garden is more than just a collection of plants, it’s an extension of your home where your personality can truly shine. Creating your own garden decor not only saves money but also gives your outdoor space that personal touch that store-bought items simply can’t match. DIY garden projects allow you to upcycle materials you already have, reducing waste while creating something beautiful and unique. Ready to transform your garden into a magical retreat that reflects your style? Let’s dive into these 13 creative outdoor garden decor ideas that will inspire your next weekend project.
Why DIY Garden Decor Makes Sense
Before we jump into specific projects, let’s talk about why making your own garden decor is so rewarding. DIY garden projects offer three major benefits that make them worth your time:
Personalization
When you create your own garden decor, you can customize colors, sizes, and designs to perfectly match your outdoor space. Unlike mass-produced items, your creations will be one-of-a-kind expressions of your personal style.
Cost-Effectiveness
Store-bought garden decor can be surprisingly expensive. DIY projects typically use affordable or repurposed materials, allowing you to create beautiful decorations at a fraction of retail prices.
Sustainability
Many DIY garden projects repurpose items that might otherwise end up in landfills. By giving new life to old materials, you’re reducing waste and making environmentally friendly choices for your garden.
1. Whimsical Wind Chimes from Vintage Silverware
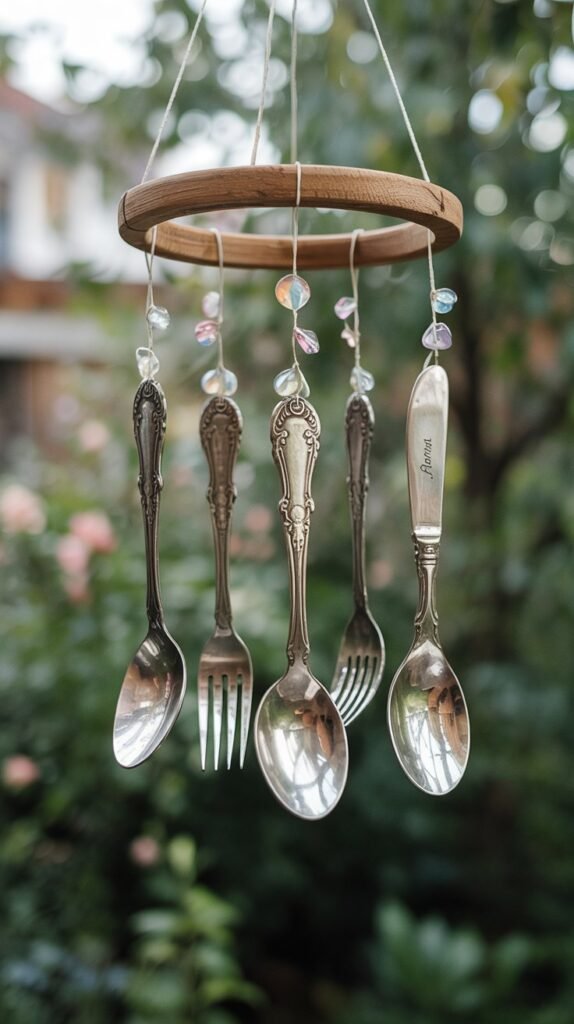
Transform old silverware into melodious wind chimes that add both visual interest and gentle sounds to your garden. This project is perfect for beginners and uses materials you might already have or can find at thrift stores.
Materials Needed:
- 5-7 pieces of vintage silverware (forks, spoons, butter knives)
- Small wooden or metal ring (3-4 inches in diameter)
- Fishing line or thin wire
- Drill with small bit
- Decorative beads (optional)
- Weather-resistant clear coat spray
Step-by-Step Instructions:
- Clean the silverware thoroughly and let dry completely.
- Drill small holes near the end of each utensil handle.
- Cut fishing line or wire into different lengths (varying from 4-8 inches).
- Thread the line through each hole and attach to the ring, spacing evenly.
- Add decorative beads to the lines if desired.
- Spray everything with weather-resistant clear coat to prevent tarnishing.
- Hang your wind chime from a tree branch or shepherd’s hook where it can catch the breeze.
The finished wind chimes will create a delicate tinkling sound when the breeze catches them. The vintage silverware adds a touch of nostalgia and elegance to your garden space while repurposing items that might otherwise be forgotten.
2. Mosaic Stepping Stones
Create a magical pathway through your garden with personalized mosaic stepping stones. Each stone becomes a unique work of art that adds color and character to your outdoor space.
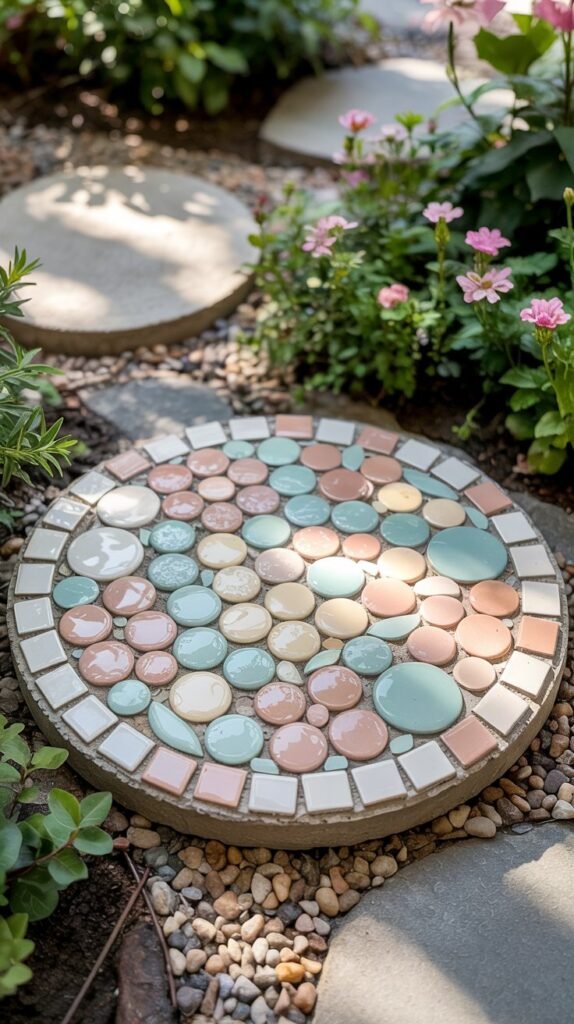
Materials Needed:
- Concrete stepping stone mix
- Plastic molds (round, square, or leaf-shaped)
- Broken ceramic tiles, colored glass, or flat marbles
- Grout (outdoor-rated)
- Grout sealer
- Rubber gloves
- Mixing bucket and trowel
Step-by-Step Instructions:
- Mix the concrete according to package directions until it reaches a thick, oatmeal-like consistency.
- Pour the concrete into your molds, filling them about 2 inches deep.
- Smooth the surface with a trowel and tap the mold gently to remove air bubbles.
- While the concrete is still wet, arrange your mosaic pieces in your desired pattern, pressing them slightly into the surface.
- Allow the stones to cure for 48 hours or according to package directions.
- Once cured, remove from molds and apply grout, working it into all the spaces between mosaic pieces.
- Wipe away excess grout with a damp sponge after about 20 minutes.
- After the grout has cured (24-48 hours), apply grout sealer to protect your stepping stones from the elements.
Placement Tip: Place your stepping stones where they’ll be both functional and decorative. Create a pathway to a focal point in your garden, or use them to guide visitors through your favorite plantings.
3. Fairy Garden in a Vintage Containe
Bring a touch of magic to your garden with a miniature fairy garden. This whimsical project is perfect for gardeners of all ages and can be created in almost any container, from an old wheelbarrow to a cracked teapot.
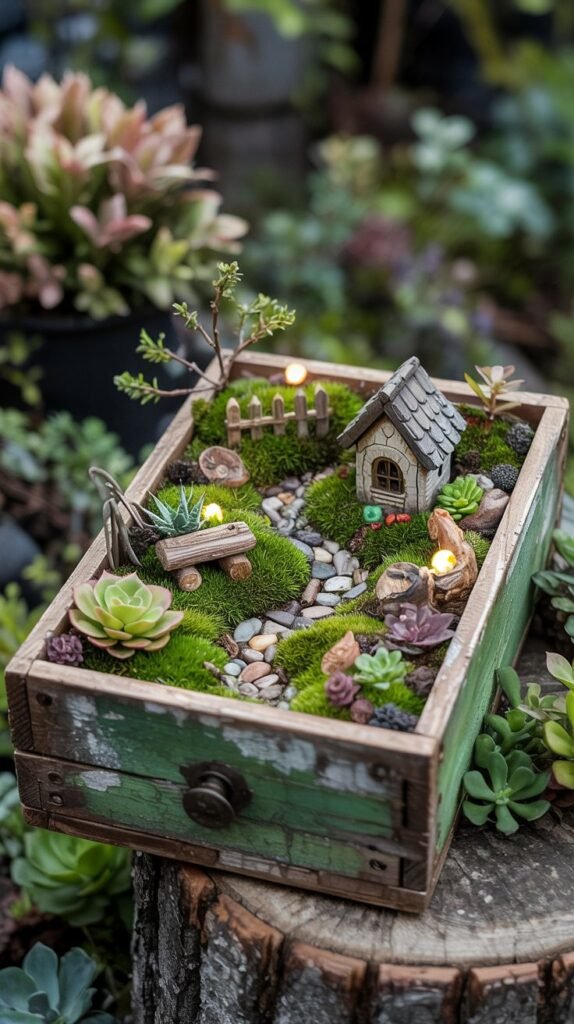
Materials Needed:
- Vintage container (wooden box, old drawer, teapot, etc.)
- Potting soil
- Small plants (moss, succulents, miniature herbs)
- Miniature fairy garden accessories (tiny house, furniture, figurines)
- Small pebbles or gravel
- Moss or small bark chips for ground cover
- Drill (if drainage holes are needed)
Step-by-Step Instructions:
- If using a container without drainage, drill several small holes in the bottom.
- Add a layer of pebbles or gravel at the bottom for drainage.
- Fill the container about 2/3 full with potting soil.
- Plan your fairy garden layout before planting.
- Plant your chosen miniature plants, leaving space for pathways and accessories.
- Create pathways using pebbles, small stones, or sand.
- Add your fairy houses, furniture, and figurines.
- Finish with moss or bark chips as ground cover between plants.
- Water gently and place in a location with appropriate light for your chosen plants.
Your fairy garden will be a delightful conversation piece that can evolve over time. Change the accessories with the seasons or add new elements to keep the magic fresh. Children especially love helping with this project and creating stories about the fairy inhabitants.
4. Solar Light Mason Jar Lanterns
Transform ordinary mason jars into enchanting garden lanterns that charge during the day and glow magically at night. These solar-powered lights require no wiring and create a warm, inviting atmosphere in your outdoor space.
Materials Needed:
- Mason jars with lids (quart size works well)
- Solar pathway lights
- Wire for hanging (optional)
- Frosted glass spray (optional)
- Decorative rocks or glass beads (optional)
- Shepherd’s hooks or branches for hanging
Step-by-Step Instructions:
- Disassemble the solar lights, separating the solar top from the stake.
- Trace the solar light top on the mason jar lid and cut a hole just large enough for it to fit snugly.
- Insert the solar light top into the hole in the lid.
- If desired, spray the mason jar with frosted glass spray for a softer glow.
- Add decorative rocks or glass beads to the bottom of the jar if desired.
- Secure the lid with the solar light onto the jar.
- If hanging, wrap wire around the neck of the jar to create a hanger.
- Place in sunny locations where they can charge during the day.
Weatherproofing Tip: Make sure the seal between the solar light and the lid is waterproof. Apply a small bead of clear silicone caulk around the connection point to prevent water from getting inside.
5. Vertical Herb Garden from Repurposed Pallets
Create a space-saving herb garden that doubles as beautiful wall art for your outdoor space. This vertical garden puts herbs within easy reach while adding a rustic, functional element to your garden decor.
Materials Needed:
- Wooden pallet (heat-treated, not chemically treated)
- Sandpaper
- Outdoor wood stain or paint
- Landscape fabric
- Staple gun and staples
- Potting soil
- Herb plants
- Screws and wall anchors for mounting
- Power drill
Step-by-Step Instructions:
- Sand the pallet to remove any rough spots or splinters.
- Apply wood stain or paint if desired and allow to dry completely.
- Cut landscape fabric to size, creating a backing and pockets for the plants.
- Staple the fabric to the back of the pallet, creating a solid backing.
- Staple additional fabric to create pockets between the slats of the pallet.
- Fill the pockets with potting soil.
- Plant herbs in each pocket, considering their sunlight and water needs for placement.
- Water thoroughly and allow excess water to drain before mounting.
- Mount the pallet securely to an outdoor wall using screws and wall anchors.
This vertical herb garden not only looks beautiful but also makes harvesting fresh herbs for cooking a breeze. The varied textures and colors of different herbs create a living tapestry that changes throughout the growing season.
6. Decorative Gazing Ball from Bowling Ball
Transform an old bowling ball into a stunning gazing ball that adds color, light, and visual interest to your garden. This project gives new life to something that might otherwise end up in a landfill.
Materials Needed:
- Old bowling ball
- Glass mosaic tiles or flat marbles
- Outdoor adhesive (like E6000 or outdoor Mod Podge)
- Outdoor grout
- Grout sealer
- Sponge and bucket
- Rubber gloves
- Decorative stand or bowl (optional)
Step-by-Step Instructions:
- Clean the bowling ball thoroughly and let it dry completely.
- Apply adhesive to a small section of the ball.
- Press mosaic tiles or flat marbles onto the adhesive, leaving small gaps between pieces for grout.
- Continue applying adhesive and tiles in small sections until the entire ball is covered.
- Allow the adhesive to cure completely according to package directions (usually 24 hours).
- Mix grout according to package directions.
- Wearing gloves, apply grout over the entire ball, working it into all the gaps between tiles.
- After about 15 minutes, use a damp sponge to wipe away excess grout.
- Allow grout to cure for 24-48 hours, then apply grout sealer.
- Place your gazing ball on a decorative stand or in a stable bowl in your garden.
Placement Tip: Gazing balls look stunning when placed where they can reflect the sky or surrounding flowers. They also make excellent focal points in garden beds or at the end of pathways.
7. Butterfly Watering Station
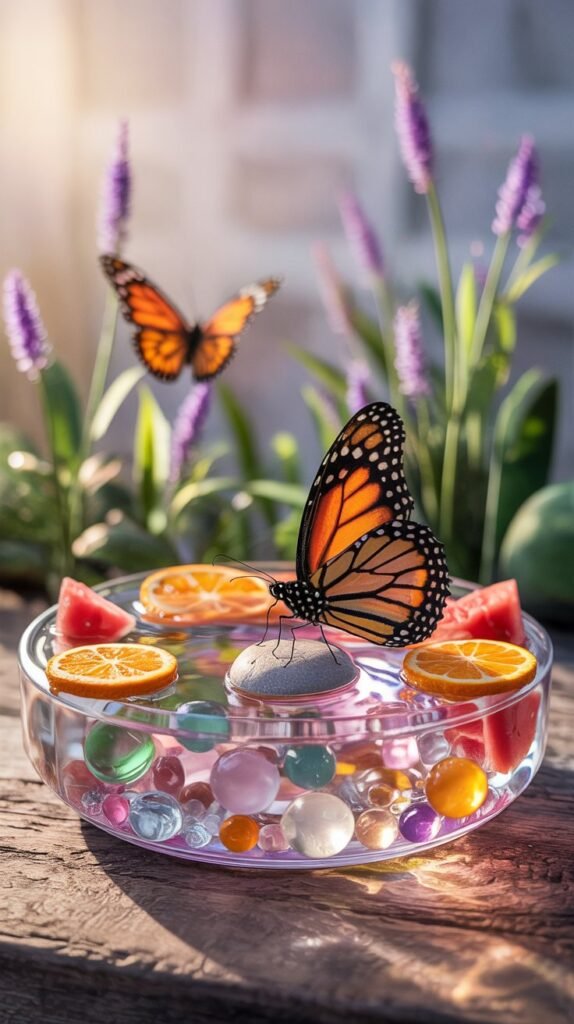
Create a beautiful oasis for butterflies that adds both decoration and ecological value to your garden. This simple project helps support local pollinators while adding a touch of whimsy to your outdoor space.
Materials Needed:
- Shallow, colorful dishes or plant saucers
- Decorative rocks, marbles, or glass beads
- Small pieces of fruit (oranges, watermelon)
- Sugar water solution (1 part sugar to 4 parts water)
- Decorative stake or stand (optional)
- Weather-resistant paint (optional)
Step-by-Step Instructions:
- If using plain dishes, paint them with bright colors that attract butterflies (reds, oranges, yellows, purples).
- Place decorative rocks or marbles in the dishes, filling them about halfway.
- Add water until it just barely covers the rocks (butterflies need the rocks as landing pads).
- Place small pieces of overripe fruit around the edges.
- Add a few drops of sugar water solution.
- Position your butterfly watering station near butterfly-friendly plants.
- Refresh water and fruit every few days to prevent mosquito breeding.
Your butterfly watering station will not only look beautiful but also provide essential hydration for butterflies, especially during hot, dry periods. The colorful dishes and visiting butterflies create a dynamic, ever-changing garden decoration.
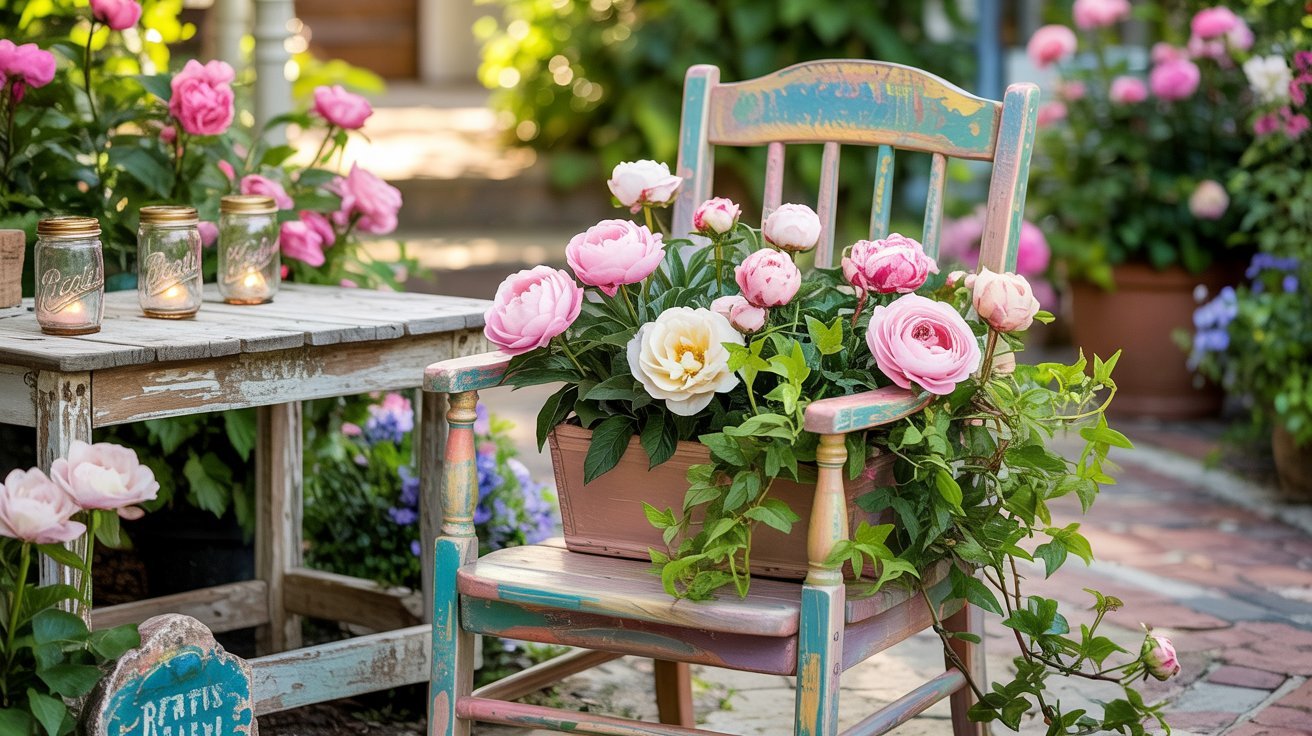
8. Vintage Chair Planter
Give new life to an old wooden chair by transforming it into a charming garden planter. This project combines vintage charm with vibrant flowers for a truly unique garden decoration.
Materials Needed:
- Old wooden chair
- Outdoor paint in your chosen color
- Sandpaper
- Paintbrushes
- Clear outdoor sealer
- Wire basket or plastic planter that fits the seat
- Potting soil
- Flowering plants (cascading varieties work well)
- Drill with small bit (optional)
Step-by-Step Instructions:
- Sand the chair to remove any rough spots or peeling paint.
- Paint the chair with outdoor paint in your chosen color.
- Apply a second coat if needed and allow to dry completely.
- Seal the painted chair with clear outdoor sealer for weather protection.
- If the chair has a solid seat, either remove it or drill drainage holes.
- Place a wire basket or plastic planter in the seat opening.
- Fill the container with potting soil.
- Plant flowers, arranging taller varieties at the back and cascading ones to spill over the front and sides.
- Water thoroughly and place in an appropriate location for your chosen plants.
Weatherproofing Tip: For longer-lasting results, choose a high-quality exterior paint and sealer. Reapply sealer annually to protect the wood from the elements.
9. Toad House from Terracotta Pots
Create a charming home for garden-friendly toads while adding whimsical decoration to your garden. Toads are beneficial garden residents that help control pests naturally.
Materials Needed:
- Terracotta pot (6-8 inch diameter)
- Terracotta saucer (optional)
- Acrylic paints designed for outdoor use
- Paintbrushes
- Clear acrylic sealer spray
- Small rocks or pebbles
Step-by-Step Instructions:
- Clean the terracotta pot and let it dry completely.
- Paint decorative designs on the outside of the pot. Consider mushrooms, flowers, or whimsical patterns.
- Allow paint to dry completely.
- Spray the painted pot with clear acrylic sealer to protect the design.
- Find a shady, somewhat moist area in your garden for placement.
- Place the pot on its side, partially buried in soil for stability.
- Create a small entrance path with pebbles leading into the pot.
- If using a saucer, place it nearby filled with fresh water for the toads.
Your toad house will add a touch of whimsy to your garden while providing shelter for beneficial toads. The painted designs make this functional habitat into a decorative garden accent that children especially love to discover.
10. Hanging Teacup Bird Feeders
Transform vintage teacups and saucers into charming bird feeders that add a touch of elegance to your garden. This project is perfect for repurposing mismatched china pieces into functional garden art.
Materials Needed:
- Vintage teacups and saucers
- E6000 adhesive or other waterproof glue
- Small eye hooks
- Decorative chain, ribbon, or strong twine
- Drill with small bit
- Birdseed
Step-by-Step Instructions:
- Clean the teacups and saucers thoroughly and let them dry.
- Apply adhesive to the bottom of the teacup.
- Place the teacup on the saucer, positioning it off-center to create space for birdseed.
- Allow the adhesive to cure completely according to package directions.
- Carefully drill a small hole in the back of the saucer (the side where the teacup is closest to the edge).
- Screw the eye hook into the hole.
- Attach your chain, ribbon, or twine to the eye hook.
- Fill the teacup and saucer with birdseed.
- Hang from a tree branch or shepherd’s hook where you can enjoy watching the birds.
Placement Tip: Hang your teacup bird feeders where you can see them from a window, but not too close to the house (about 10-12 feet away is ideal). This allows you to enjoy watching the birds without scaring them away.
11. Painted Rock Garden Markers
Create charming, weatherproof garden markers by painting rocks with the names of your plants. This simple project adds color and organization to your garden beds while helping you remember what you’ve planted where.
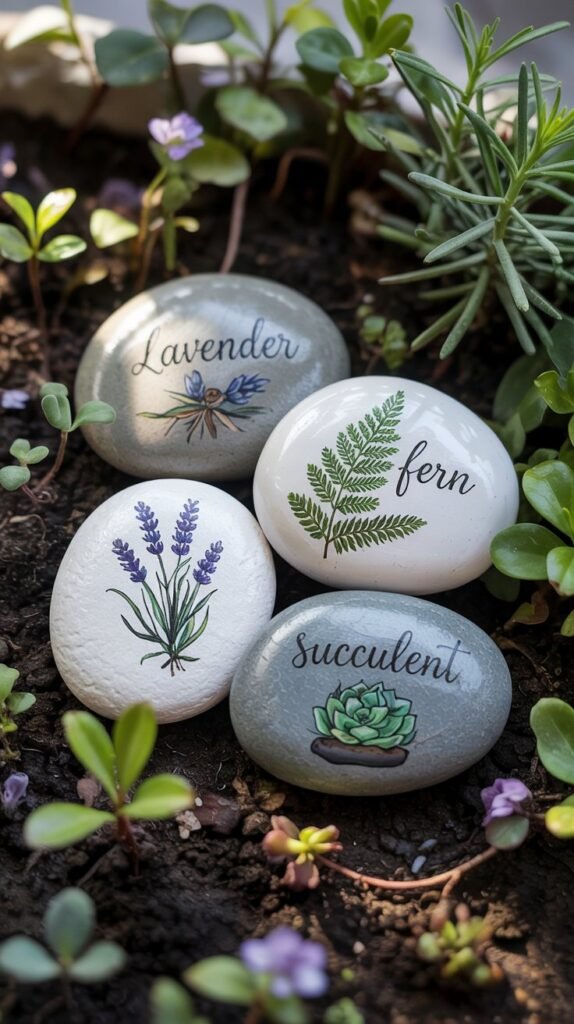
Materials Needed:
- Smooth, flat rocks (about 3-5 inches across)
- Acrylic paints in various colors
- Fine-tip permanent markers
- Paintbrushes in various sizes
- Clear acrylic sealer spray
- Pencil for sketching designs
Step-by-Step Instructions:
- Clean the rocks thoroughly and let them dry completely.
- Apply a base coat of paint to each rock and allow to dry.
- Sketch your design lightly with pencil on each rock.
- Paint plant names and simple illustrations on each rock.
- Allow paint to dry completely.
- Use fine-tip permanent markers to add details if desired.
- Spray each rock with clear acrylic sealer to protect from weather.
- Allow sealer to dry completely before placing in the garden.
These colorful garden markers add personality to your garden beds while serving a practical purpose. They’re especially helpful for identifying perennial plants during dormant seasons and for remembering which varieties you’ve planted.
12. Rain Chain from Vintage Keys
Replace ordinary downspouts with a decorative rain chain made from vintage keys. This functional art piece creates a beautiful water feature during rainstorms while helping to direct water away from your home’s foundation.
Materials Needed:
- 30-40 vintage keys of various sizes
- Heavy-gauge wire or small metal rings
- Wire cutters and pliers
- Decorative copper cup or basin (optional, for the bottom)
- Gutter clip or hook for attachment
Step-by-Step Instructions:
- Clean the vintage keys to remove any dirt or grime.
- Sort keys by size, planning to arrange larger keys at the top and smaller ones toward the bottom.
- Cut pieces of wire about 2 inches long, or open small metal rings.
- Connect keys together by threading wire or rings through the holes, creating a chain.
- Twist wire ends together securely or close rings with pliers.
- Continue adding keys, creating a chain long enough to reach from your gutter to the ground.
- Attach a gutter clip or hook to the top key for hanging.
- If using a basin at the bottom, place it under the rain chain to collect water.
- Install by removing a section of downspout and hanging the rain chain from the gutter opening.
Weatherproofing Tip: Vintage keys will develop a natural patina over time when exposed to the elements. If you prefer to maintain their current appearance, spray them with a clear outdoor metal sealer before assembly.
13. Glowing Garden Mushrooms
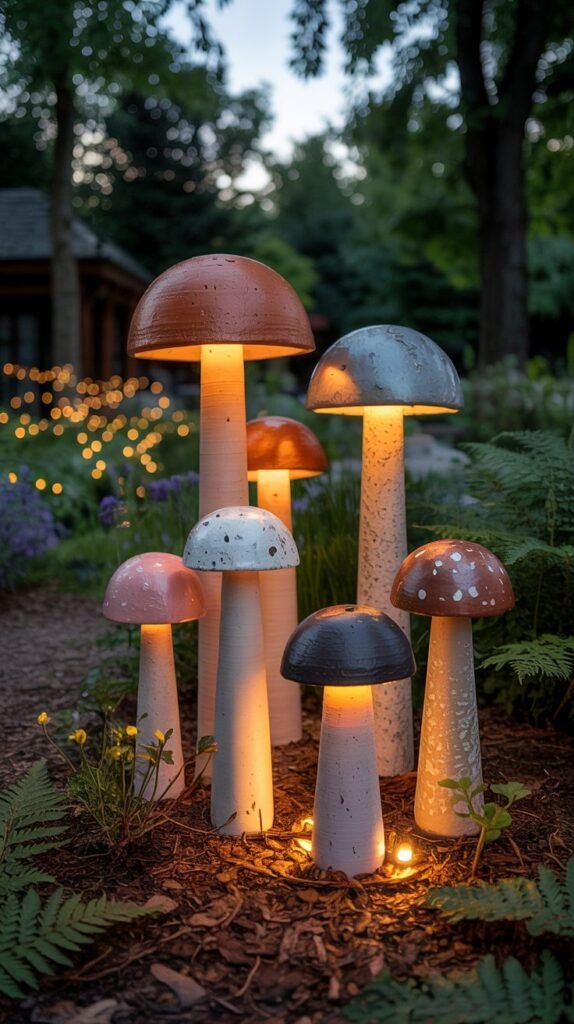
Create magical, glowing mushrooms that transform your garden into an enchanted wonderland at night. These whimsical sculptures add charm during the day and a magical glow after dark.
Materials Needed:
- Terracotta pots of various sizes (for mushroom caps)
- PVC pipes of various diameters (for stems)
- Outdoor paint in various colors
- Solar garden lights
- Waterproof adhesive
- Clear outdoor sealer
- Drill with various bits
- Sandpaper
Step-by-Step Instructions:
- Sand the terracotta pots to remove any rough spots.
- Drill a hole in the bottom of each pot large enough for the solar light to fit through.
- Cut PVC pipes to various heights for mushroom stems.
- Paint the pots and PVC pipes in your chosen colors.
- Apply a second coat if needed and allow to dry completely.
- Seal all painted surfaces with clear outdoor sealer.
- Attach the solar light to the inside of the pot so that the solar panel is on top.
- Use waterproof adhesive to attach the pot (upside down) to the PVC pipe.
- Allow adhesive to cure completely according to package directions.
- Place your mushrooms throughout the garden where they will receive sunlight during the day.
These glowing garden mushrooms create a magical atmosphere in your garden after dark. They’re especially enchanting along pathways or nestled among plants in garden beds. Children and adults alike will be delighted by their fairy-tale charm.
Maintaining Your DIY Garden Decor
Creating beautiful garden decor is just the first step, proper maintenance ensures your creations will last for years to come. Here are some essential tips for protecting your DIY garden projects from the elements:
Weatherproofing Tips
- Apply clear outdoor sealer to all painted surfaces annually
- Use marine-grade varnish for wooden items
- Choose rust-resistant hardware for any metal components
- Apply silicone caulk to seal joints where water might enter
- Elevate wooden items slightly off the ground to prevent rot
- Consider bringing delicate items indoors during harsh winter months
Seasonal Care
- Clean garden decor items thoroughly in spring
- Check for and repair any damage after winter
- Refresh paint or sealer as needed
- Remove fallen leaves and debris that can trap moisture
- Photograph your garden decor placement before winter for easy spring setup
- Store delicate items in a shed or garage during extreme weather
Pro Tip: Create a maintenance calendar reminder for your garden decor. Spring and fall are ideal times to inspect, clean, and reseal your creations to ensure they remain beautiful year after year.
Start Your DIY Garden Decor Journey Today
With these 13 creative outdoor garden decor ideas, you’re well-equipped to transform your garden into a personalized outdoor retreat that reflects your unique style. DIY garden projects not only save money but also provide a wonderful opportunity to express your creativity and add character to your outdoor space.
Remember, the beauty of DIY garden decor is that you can adapt these projects to suit your style, space, and the materials you have available. Don’t be afraid to experiment and put your own spin on these ideas. Your garden is a canvas for your creativity!