7 Simple DIY Christmas Tree Ideas
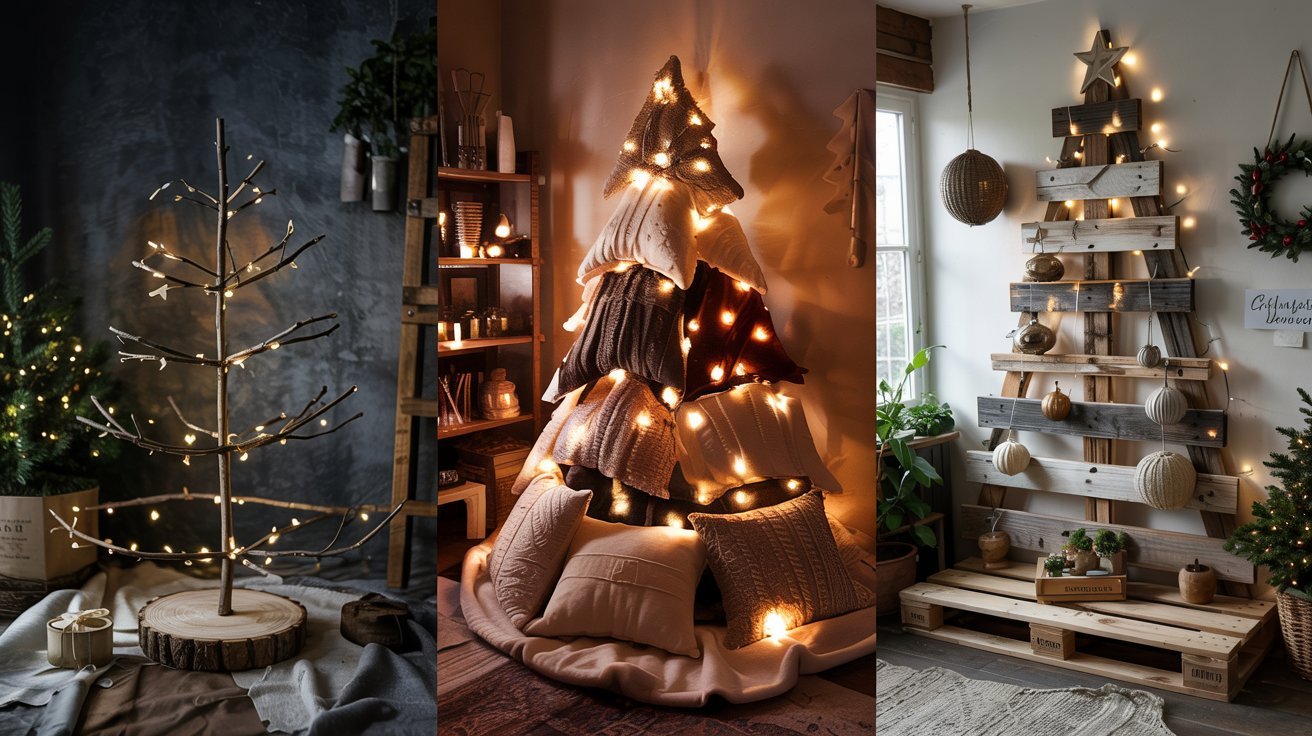
1.Rustic Twig Christmas Tree
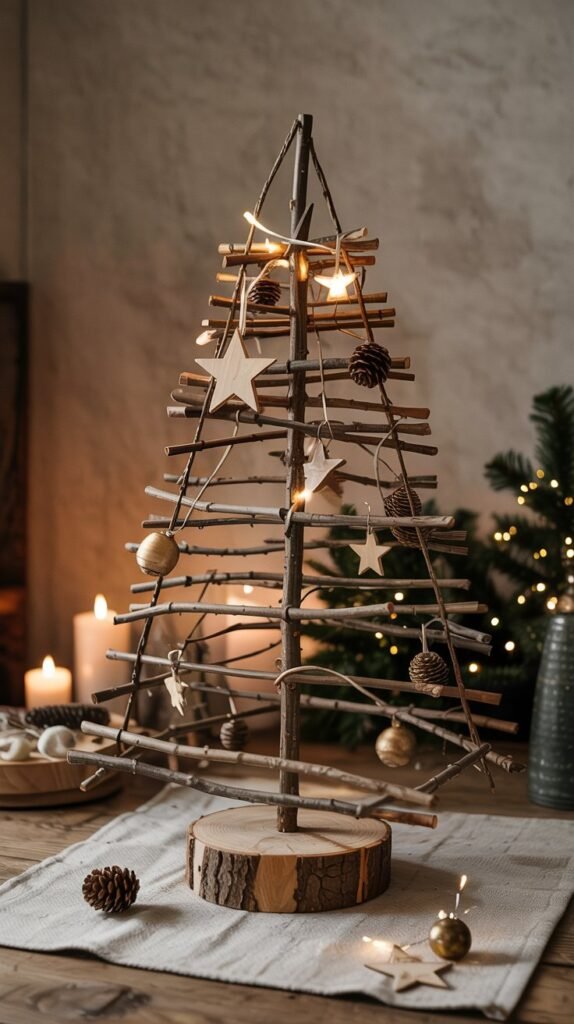
There’s something magical about creating a Christmas tree from simple things found right outside your door. A rustic twig tree brings the peaceful charm of the forest right into your living room — no plastic needles, no tangled lights, just pure, natural beauty. It’s the kind of decoration that feels timeless — cozy, handcrafted, and full of heart.
Supplies You’ll Need
- A bundle of twigs or small branches (various lengths, roughly 10–15 pieces)
- Natural jute twine or thin rope
- Scissors or pruning shears
- Hot glue gun (optional for extra hold)
- Small fairy lights or battery candles
- Mini pinecones, wooden stars, or cinnamon sticks for decorating
Steps
- Gather your twigs. Go for a mix of sizes — from long (about 18 inches) to shorter (around 6 inches). Make sure they’re clean and dry.
- Lay them out in shape. Arrange the twigs horizontally on the floor in the shape of a tree — longest at the bottom, shortest at the top.
- Tie it together. Cut two long pieces of twine (about 5 feet each). Start from the top and tie each twig to the twine on both ends, spacing them evenly. Adjust the shape until it looks balanced.
- Add a loop. Tie an extra loop of twine at the top so you can hang your tree on the wall or door.
- Decorate. Drape fairy lights across the branches, then glue or tie on tiny pinecones, wood ornaments, or even dried orange slices.
Cozy Tip
For a soft glow, weave a string of warm white fairy lights between the twigs. The light reflecting off the natural wood gives your space that gentle, candlelit warmth — perfect for snowy evenings with a mug of cocoa in hand.
2.Cozy Blanket Christmas Tree
If you’ve ever wanted a Christmas tree that feels like a warm hug, this one’s for you. The cozy blanket tree is all about comfort — soft textures, layered warmth, and that charming “fireside cabin” aesthetic. It’s perfect for anyone who wants a tree that’s simple, safe, and irresistibly snuggly. You can even build it around a small floor lamp for a glowing effect that feels magical at night.
Supplies You’ll Need
- A tall floor lamp, wooden pole, or sturdy stick (around 4–5 feet tall)
- 3–5 cozy blankets or throws (in neutral, plaid, or knitted textures)
- Twine or ribbon
- Small string lights (warm white)
- Mini ornaments or rustic accents (dried oranges, cinnamon sticks, or wooden stars)
- A small basket or crate for the base (optional)
Steps
- Build your base. Place your lamp, pole, or stick inside a heavy basket or crate to keep it steady. You can add stones or books for extra weight.
- Drape the blankets. Start with your largest blanket at the bottom, wrapping it loosely around the base so it pools like tree “branches.” Layer the next ones upward, overlapping slightly to create a triangular tree shape.
- Secure layers. Use small pieces of twine or ribbon at the back to gently tie each layer in place so it keeps its form without looking stiff.
- Add light. Wrap a string of warm fairy lights around the “tree,” tucking them between the folds for a soft, glowing look.
- Decorate sparingly. Stick to natural or fabric ornaments — mini stockings, dried fruit, wooden snowflakes — to keep that rustic, handmade charm.
Cozy Tip
Add a bundle of pinecones or a few candles (battery-operated) around the base to make it feel like a glowing woodland scene. This setup is especially lovely for bedrooms or living rooms where you want that extra dose of holiday comfort.
3.Rustic Pallet Christmas Tree
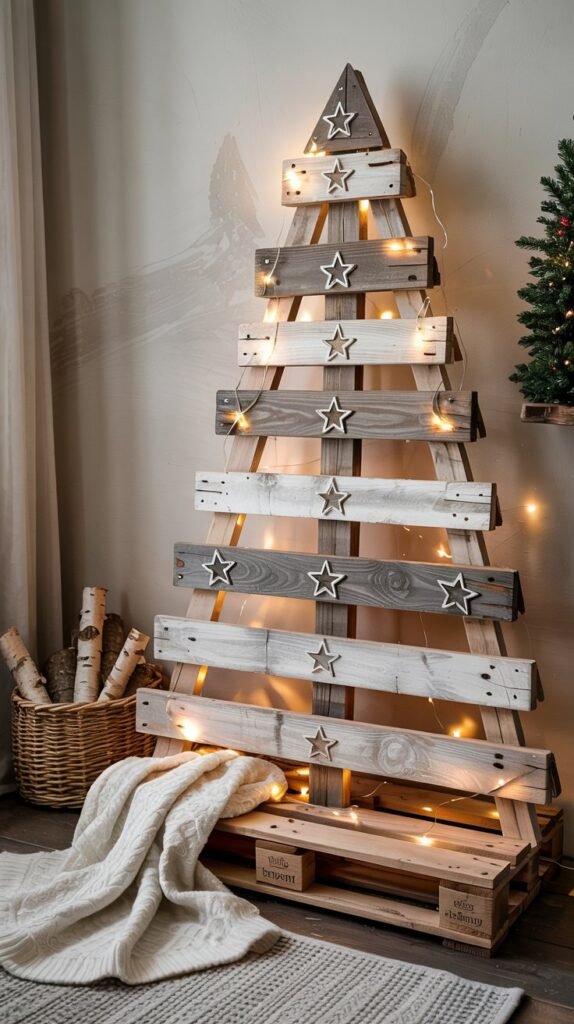
Why You’ll Love It:
If you adore farmhouse charm and handmade touches, this rustic pallet tree is a must-try. It brings the magic of Christmas to your home with reclaimed wood, twinkling lights, and a touch of nostalgia — like something straight out of a snowy countryside workshop. Best of all, it’s sturdy, sustainable, and can be reused year after year.
Supplies You’ll Need
- One wooden pallet (or reclaimed wood boards)
- Handsaw (if trimming is needed)
- Sandpaper
- Nails or wood screws
- Hammer or drill
- String lights (warm white or golden glow)
- Small pine branches, twine, and rustic ornaments
- Optional: white paint, stencil stars, or chalk paint for distressing
Steps
- Prep your pallet. Start by cutting the pallet into a rough triangular tree shape — wider at the bottom, narrower at the top. Sand down any rough edges to keep it splinter-free.
- Add structure (optional). If your pallet came apart during trimming, screw or nail the boards together at an angle to keep that tree silhouette firm.
- Decorate the surface. Paint the boards lightly with a dry brush of white or cream for a “frosted” look. You can also stencil stars, snowflakes, or simple lettering like “Joy” or “Noel.”
- Wrap with lights. Drape warm fairy lights from top to bottom, letting the wire follow the shape of your tree. Secure them gently with nails or small hooks.
- Add natural accents. Use small sprigs of pine, cinnamon sticks, or mini wooden ornaments tied with twine. The mix of natural texture and soft light gives it that perfectly rustic finish.
Cozy Tip
Lean the finished tree against a wall or place it on a console table for an instant holiday focal point. Add a cozy plaid blanket or a basket of logs at the base for that “mountain cabin” feel.
4.Branch & Twine Wall Tree
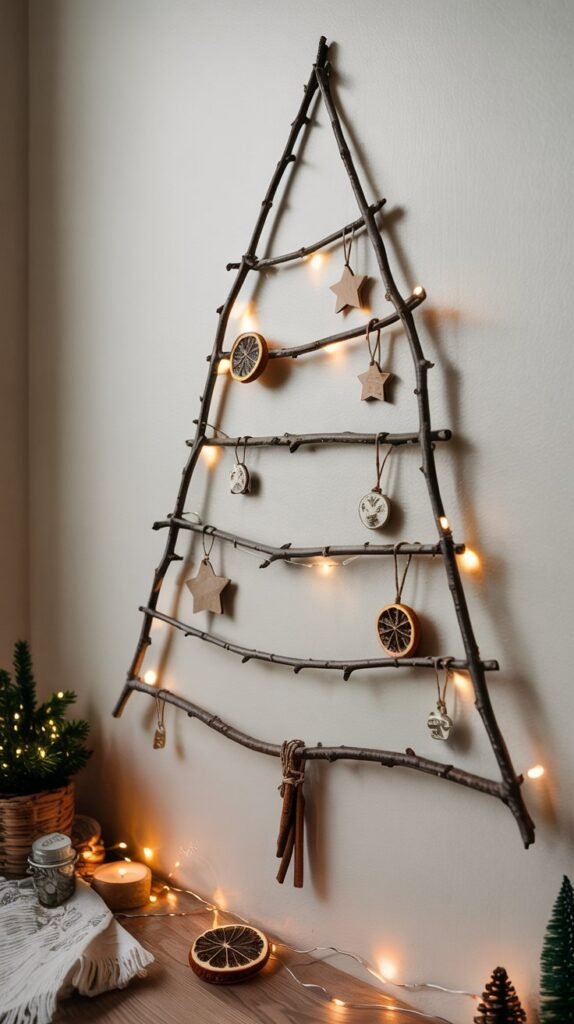
Why You’ll Love It:
This minimalist branch tree feels like something you’d find in a Scandinavian cabin — simple, earthy, and filled with handmade charm. It’s ideal for small spaces or anyone who loves natural textures. Each branch holds its own little piece of Christmas magic, creating a tree that feels light, airy, and personal.
Supplies You’ll Need
- 5–7 sturdy branches (varying lengths, roughly from 12″ to 36″)
- Natural jute twine or thick string
- Scissors
- Command hooks or nails (for wall hanging)
- Mini ornaments or wooden stars
- Warm white fairy lights
- Optional: cinnamon sticks, dried oranges, pinecones, or small bells
Steps
- Collect your branches. Look for straight, dry ones from your yard or a local park. Brush off dirt and trim to form a gradient — longest branch on the bottom, shortest on top.
- Lay out your tree shape. Arrange the branches on the floor in a triangle, spacing them evenly.
- Tie it together. Cut two long pieces of twine. Starting from the top, knot each branch to the twine on both sides, keeping the spacing even. The shape should start resembling a simple ladder or triangle tree.
- Hang it up. Use nails or command hooks to hang the twine loops at the top, allowing your branch “tree” to drape naturally against the wall.
- Add your rustic touches. Wrap the branches with fairy lights, then hang ornaments, dried orange slices, or pinecones. For a softer glow, weave tiny sprigs of pine or eucalyptus between the branches.
Cozy Tip
Spritz your dried oranges or pinecones with cinnamon or clove oil to make your home smell like a Christmas bakery. This simple wall tree looks beautiful above a console, bed, or cozy reading nook.
5.Branch & Light Floor Tree
Why You’ll Love It:
This full-size branch tree is simple, natural, and glowing — a perfect centerpiece for any cozy living room corner. With a few carefully chosen twigs and a string of warm lights, you can create a tree that feels magical without taking up much space. It’s rustic, organic, and perfectly fits that cabin-by-the-fire vibe we love at Christmas.
Supplies You’ll Need
- 6–8 sturdy branches of varying lengths (3–5 feet tall)
- Large vase, ceramic pot, or metal bucket for the base
- Rocks, sand, or floral foam (to hold branches upright)
- String lights (warm white or amber)
- Twine or thin ribbon
- Mini pinecones, wooden ornaments, or small baubles
- Optional: dried orange slices, cinnamon sticks, or small burlap bows
Steps
- Prepare the base. Fill your vase, pot, or bucket with rocks, sand, or floral foam so the branches will stand upright.
- Arrange your branches. Start with the tallest in the center, then place shorter ones around it to form a natural triangle shape. Adjust the angles to make it look full but airy.
- Secure with twine. Tie some branches together with twine if needed for extra stability — it won’t be noticeable under decorations.
- Wrap with lights. Begin at the bottom and spiral the string lights upward, tucking the wire along the branches so the glow spreads evenly.
- Add rustic touches. Hang mini pinecones, wooden ornaments, or small baubles from the branches. Add cinnamon sticks or dried oranges to enhance the natural cozy vibe.
Cozy Tip
Place the tree near a corner with a warm throw blanket and a few candles nearby. The soft lights reflecting off the rustic wood create a quiet, magical ambiance perfect for evenings by the fire.
6.Layered Log Christmas Tree
Why You’ll Love It:
This rustic, layered log tree brings all the warmth of a woodland cabin indoors. Using stacked logs or wood slices as “branches,” it creates a full, dimensional tree that’s perfect for a corner or mantel. With clusters of ornaments and a charming topper, it feels handcrafted, cozy, and entirely unique — a true statement piece that embodies rustic Christmas magic.
Supplies You’ll Need
- 6–8 flat wood slices or small logs (varying diameters, 2–6 inches thick)
- Wooden dowel or tall stick (4–5 feet) for the tree spine
- Drill (optional, to make holes for dowel)
- Twine or rope
- String lights (warm white)
- Mini ornaments, pinecones, and small rustic decorations
- Star or bow for tree topper
- Optional: dried oranges, cinnamon sticks, or small burlap bows
Steps
- Prepare the logs. If using wood slices, drill a hole in the center of each slice large enough for the dowel to slide through. Sand edges for a smooth, safe finish.
- Build the tree spine. Place the dowel upright in a sturdy base (a pot with rocks or a small wooden stand).
- Stack the logs. Slide each log down the dowel, largest at the bottom and smallest at the top, forming a layered triangle shape. Adjust spacing for fullness.
- Add lights. Wrap string lights around the logs and dowel, tucking wire carefully between layers.
- Decorate with clusters. Use small groups of pinecones, wooden ornaments, and mini baubles to add visual interest. Cluster them near the edges of the logs to highlight the layered effect.
- Add the topper. Finish with a rustic star, bow, or small wooden ornament at the top for that classic Christmas touch.
Cozy Tip
Place a soft blanket or burlap around the base and add a few small lanterns nearby. The layered logs catch the warm light beautifully, creating a cabin-inspired, glowing centerpiece.
7.Cozy Felt Christmas Tree
Why You’ll Love It:
For a soft, playful, and completely customizable tree, a felt Christmas tree is perfect. It’s ideal for indoor corners, small spaces, or even as a kid-friendly DIY project. This fabric tree brings texture, color, and warmth to your holiday décor without taking up much space. The simplicity of the design makes it a perfect finishing touch for your rustic-cozy Christmas theme.
Supplies You’ll Need
- Felt sheets in green, red, or neutral tones
- Scissors
- Hot glue gun or fabric glue
- Wooden dowel or sturdy cardboard cone (for structure)
- String lights (small battery-operated)
- Mini felt ornaments, buttons, or small wooden embellishments
- Star or fabric bow for the top
Steps
- Create the tree base. Use a cardboard cone or wooden dowel as your tree spine. Cover it with green felt for a smooth base.
- Cut felt layers. Cut triangles or leaf shapes from felt sheets to layer around the base. Start at the bottom and overlap upward for a full, tiered effect.
- Attach layers. Use hot glue or fabric glue to secure the felt pieces, ensuring each layer slightly overlaps the one below.
- Add lights. Wrap a small string of battery-operated lights around the tree, tucking them gently into the felt layers.
- Decorate with ornaments. Glue or sew mini felt ornaments, buttons, or small wooden decorations in clusters. Keep it simple to highlight the soft texture of the felt.
- Finish with a topper. Add a felt star, bow, or other fabric ornament to complete the tree.
Cozy Tip
Place the felt tree on a small table or shelf and surround it with pinecones, a few candles, or a knitted mini blanket. Its soft texture contrasts beautifully with natural accents, keeping your rustic-cozy theme intact while adding a whimsical touch.
Decorating a Christmas tree doesn’t have to be complicated — even the simplest materials can create a warm, rustic holiday centerpiece. From twigs and pallets to cozy felt, each DIY tree brings charm, texture, and heart into your home.
So gather your materials, light some fairy lights, and enjoy crafting a tree that feels uniquely yours this holiday season.