8 Thrift-Flips to Upcycle Into Statement Wall Art
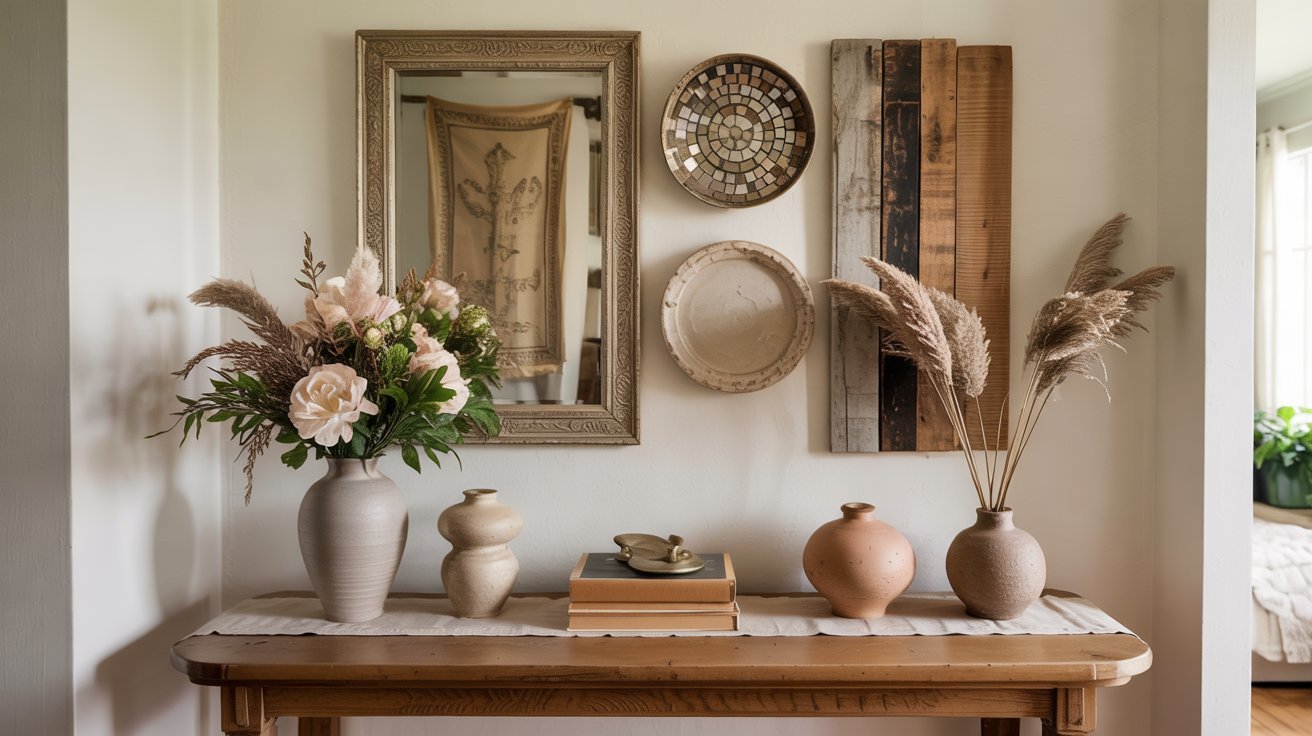
There’s something magical about transforming forgotten treasures into stunning focal points for your home. Thrift-flipping isn’t just budget-friendly, it’s a creative journey that brings character and story into your space. Those dusty frames, chipped plates, and worn textiles hiding in thrift stores are waiting to become conversation-starting wall art that reflects your unique style. Join me as we explore eight inspiring ways to breathe new life into second-hand finds, creating statement pieces that look anything but second-hand. The best part? Each project costs just a fraction of store-bought art while delivering that one-of-a-kind charm you simply can’t find elsewhere.
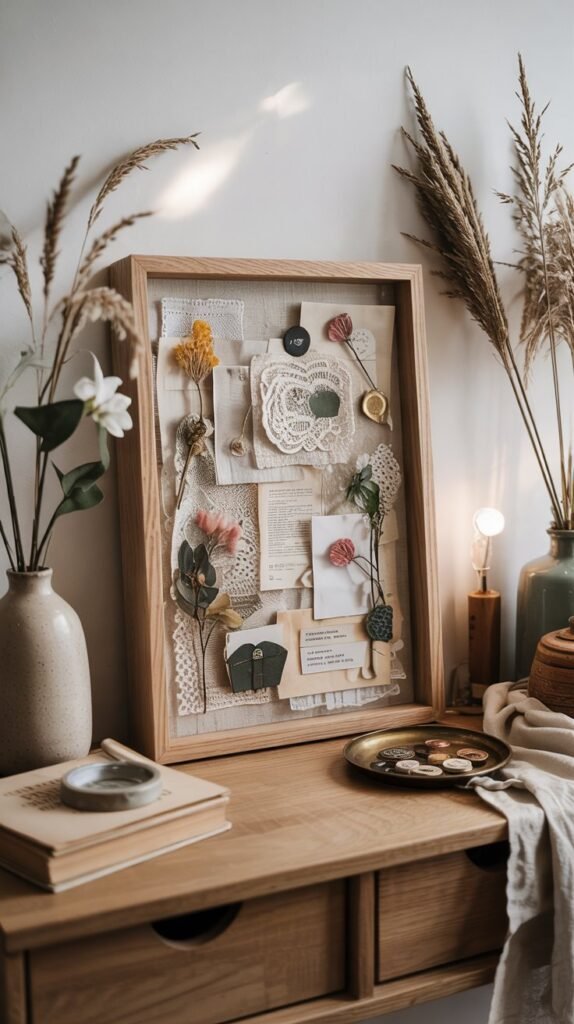
1.The Layered Collage Shadowbox
What You’ll Need
- Thrifted wooden or ornate frame (deeper frames work best)
- Shadowbox backing or foam core board
- Fabric scraps for background
- Small mementos, vintage trinkets, or decorative elements
- Craft glue or hot glue gun
- Scissors and craft knife
- Small wood blocks or foam spacers for dimension
Creating Your Layered Masterpiece
Start by giving your thrifted frame a fresh look. A light sanding followed by a coat of chalk paint, can transform even the most dated frame into something special. Choose a color that complements your home’s palette, soft whites, muted blues, or even rich blacks can create a stunning backdrop for your collage.
Next, cut your foam board to fit snugly inside the frame. This will serve as the base for your creation. Cover it with a fabric that speaks to you, perhaps a scrap of vintage linen or a textured burlap for rustic charm. Secure the fabric with glue, pulling it taut for a smooth finish.
Now comes the fun part, arranging your treasures. Lay out your items before gluing to experiment with different compositions. Create depth by using small wood blocks or foam pieces to elevate certain elements. Consider grouping items by theme or color for a cohesive look.
The beauty of a shadowbox lies in its story. Include elements that mean something to you, a snippet of lace from your grandmother’s collection, a vintage button, or a pressed flower from a special occasion.
Once you’re happy with your arrangement, secure each piece with glue. Start with the background elements and work your way forward to the most prominent pieces. Allow everything to dry completely before handling.
Design Tips
- Create visual balance by varying the heights and sizes of your items
- Incorporate small mirrors or reflective elements to add sparkle and dimension
- Consider a monochromatic color scheme for a sophisticated, cohesive look
- Leave some negative space to prevent your collage from feeling cluttered
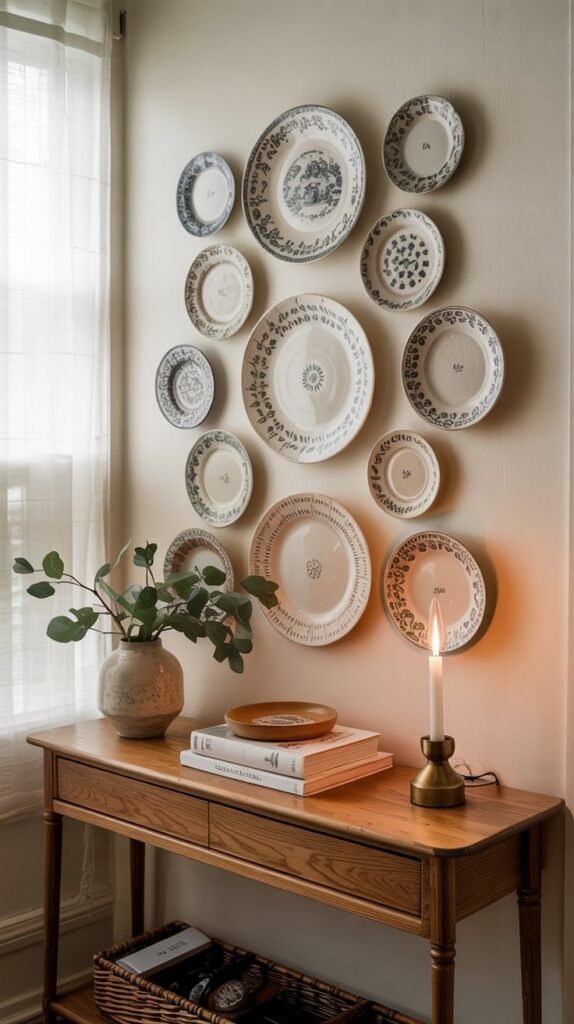
2.The Vintage Plate Gallery Wall
What You’ll Need
- Assorted thrifted plates in varying sizes and patterns
- Plate hangers or adhesive disc hangers
- Level and measuring tape
- Pencil for marking wall placement
- Optional: Ceramic paint for customizing plain plates
- Paper templates of each plate for planning layout
Creating Your Plate Gallery
The key to a stunning plate gallery is thoughtful selection. Look for plates with complementary colors or themes while embracing variety in sizes and patterns. Don’t shy away from plates with minor chips or imperfections, they add character and authenticity to your display.
Before hanging, clean your plates thoroughly with warm, soapy water and let them dry completely. If you’ve found plain plates with good shapes, consider customizing them with ceramic paint. Simple designs like dots, stripes, or a wash of color can tie your collection together.
Planning your layout is crucial. Trace each plate onto paper, cut out the shapes, and arrange them on your floor. Once you’ve found a pleasing composition, transfer the paper templates to your wall using painter’s tape. This allows you to visualize the final display before making any holes.
For a secure and damage-free hanging method, try adhesive disc hangers. These discs activate with water and adhere firmly to the back of your plates without damaging them. Simply wet, attach to the back of your plate, and let dry overnight before hanging.
When you’re ready to hang, start with your central plate, usually the largest or most eye-catching, and work outward. Keep spacing consistent (about 2-3 inches between plates) for a cohesive look. Use your level frequently to ensure everything stays straight.
Design Tips
- Mix ornate plates with simpler designs for visual contrast
- Group plates by color family for a harmonious look
- Incorporate one or two unexpected elements like a small mirror or wooden platter
- Consider the negative space between plates as part of your design
3.Framed Textile Treasures
Showcase beautiful textiles as art by framing them in thrifted frames
What You’ll Need
- Thrifted picture frames (with or without glass)
- Interesting textiles: scarves, handkerchiefs, embroidery, or fabric remnants
- Foam core board or cardboard for backing
- Staple gun or fabric glue
- Iron and ironing board
- Scissors
- Optional: Spray paint for updating frames
Creating Your Textile Art
Begin by hunting for textiles with visual interest, vintage scarves with bold patterns, delicate lace doilies, embroidered handkerchiefs, or even beautiful fabric remnants. Thrift stores often have these treasures tucked away in bins or hanging on racks.
Prepare your frames by cleaning them thoroughly and making any needed repairs. A fresh coat of paint can unify mismatched frames, consider white for a clean gallery look or rich jewel tones for drama. Remove the glass from your frames (you won’t need it for this project) and set aside the backing.
Iron your chosen textile to remove any wrinkles. Cut your foam core or cardboard to fit snugly inside the frame, then center your fabric over it, allowing at least 2 inches of excess fabric on all sides for wrapping.
Carefully stretch the fabric over the backing, pulling it taut but not so tight that it distorts the pattern. Secure it on the back with your staple gun or fabric glue, working from the centers of each side outward. Fold the corners neatly, as you would when wrapping a gift.
The magic of textile art lies in its texture and dimension. Choose fabrics that have interesting weaves, embroidery, or patterns that tell a story and add depth to your walls.
Place your stretched fabric back into the frame and secure it according to your frame’s design. Some frames have clips, while others might require small nails or points to hold the backing in place.
Design Tips
- Group similar textiles (like all lace pieces or all geometric patterns) for impact
- Consider the scale of patterns, mix large-scale designs with smaller, more intricate ones
- For delicate or valuable textiles, use acid-free backing to prevent deterioration
- Try layering different fabrics for added dimension and interest
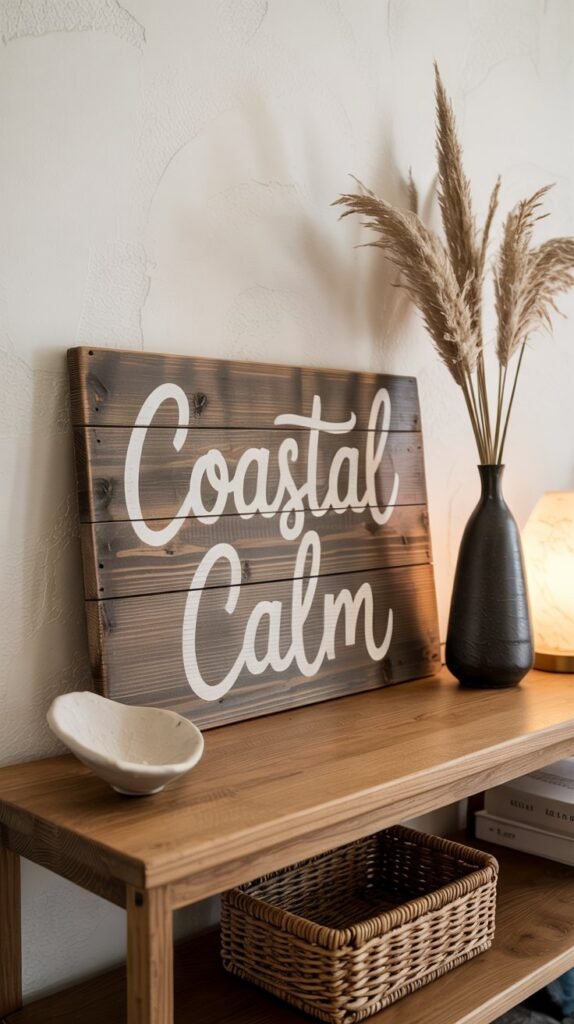
4.Reclaimed Wood Plank Signs
What You’ll Need
- Thrifted wooden items (cutting boards, planks, cabinet doors)
- Sandpaper (medium and fine grit)
- Chalk paint or acrylic paint
- Paintbrushes in various sizes
- Stencils or transfer paper for designs
- Clear sealer or wax for finishing
- Picture hanging hardware
- Optional: Furniture wax for antiquing effects
Creating Your Wood Sign
Start by selecting wooden pieces with character, old cutting boards, salvaged planks, or even cabinet doors make excellent canvases. Look for solid construction and interesting grain patterns. Minor scratches or wear add to the charm, but avoid pieces with deep damage or warping.
Prep your wood by sanding lightly with medium-grit sandpaper to remove any rough spots or splinters, then follow with fine-grit for a smooth surface. Wipe away all dust with a damp cloth and allow to dry completely.
Decide on your design approach. For a rustic look, apply a whitewash by diluting white paint with water (about 1:1 ratio) and brushing it on, then quickly wiping away excess with a cloth. This allows the wood grain to show through while brightening the surface.
For text or designs, you have several options. Stencils offer precision and consistency, while transfer paper allows for custom typography or images. Simply print your design, place carbon paper between it and your wood, then trace with firm pressure to transfer the outline.
For an aged, authentic look, try the dry brush technique: dip just the tips of your brush in paint, wipe most of it off on a paper towel, then lightly drag the brush across the wood’s surface. This creates a weathered, time-worn appearance.
Once your paint is completely dry, protect your artwork with a clear sealer or furniture wax. This not only preserves your design but also enhances the wood’s natural beauty. For hanging, attach picture hanging hardware to the back, ensuring it’s appropriate for the weight of your piece.
Design Tips
- Keep text simple and legible, quotes, single words, or family names work beautifully
- Consider the room’s color scheme when choosing your paint palette
- For a cohesive collection, create several signs with a unified theme or color story
- Incorporate natural elements like rope or twine for added texture and rustic charm
5.Mirror Frame Mosaic Magic
What You’ll Need
- Thrifted mirror with a wide frame (or just the frame)
- Mosaic tiles, broken china, or glass pieces
- Mosaic adhesive or strong craft glue
- Grout (sanded for gaps larger than 1/8 inch, unsanded for smaller gaps)
- Grout sealer
- Rubber gloves and protective eyewear
- Grout float or flexible spatula
- Sponge and bucket of water
- Cloth for polishing
Creating Your Mosaic Mirror
Begin with a thorough cleaning of your thrifted mirror frame. Remove any dust, grime, or loose paint to ensure proper adhesion. If you’re planning to paint the frame before adding mosaic pieces, now is the time to do it.
Gather your mosaic materials. While you can purchase new mosaic tiles, consider creative alternatives: broken china from thrift stores, sea glass, old jewelry pieces, or even broken mirrors (handle with care and always wear protective gloves and eyewear when breaking glass).
Before gluing anything down, experiment with different arrangements. Try geometric patterns, random placements, or color gradients. Take a photo of your final design to use as a reference during assembly.
Working in small sections, apply adhesive to the frame and press your mosaic pieces firmly into place, maintaining consistent spacing between them. Allow the adhesive to dry completely according to the manufacturer’s instructions, usually 24 hours for full strength.
When working with broken glass or mirrors, always wear protective gloves and eyewear. Wrap glass in a cloth before breaking to contain shards, and dispose of any waste safely in a puncture-resistant container.
Once your adhesive has cured, it’s time to grout. Mix your grout according to package directions until it reaches a peanut butter-like consistency. Wearing rubber gloves, use your float to press grout into all the gaps between mosaic pieces, working at a 45-degree angle.
After about 15-20 minutes, when the grout begins to haze over, use a damp sponge to gently clean the surface of your mosaic pieces, being careful not to pull grout from the gaps. Rinse your sponge frequently and change your water as needed.
Allow the grout to cure for 48-72 hours, then apply a grout sealer to protect your work from moisture and staining. Finally, polish the mosaic pieces with a soft, dry cloth to bring out their shine.
Design Tips
- Create a color theme that complements your room’s palette
- Mix textures and finishes for visual interest, glossy tiles with matte ceramics, for example
- Consider incorporating meaningful pieces like broken heirloom china or special trinkets
- For a cohesive look, choose grout that matches your most prominent mosaic color
6.Literary Landscape: Book Page & Map Panels
What You’ll Need
- Thrifted frames with glass
- Old books, sheet music, or maps (look for yellowed pages for vintage charm)
- Mod Podge or decoupage medium
- Foam brushes for smooth application
- Scissors or craft knife
- Ruler and pencil
- Canvas or sturdy cardstock for backing
- Optional: Gold leaf or metallic paint for accents
Creating Your Literary Art
Start by selecting pages with visual interest, look for beautiful typography, illustrations, or meaningful text. Maps with interesting regions or decorative borders make stunning focal points. If you’re hesitant to cut up books, consider purchasing damaged volumes specifically for crafting, or look for reproductions of vintage maps and texts.
Prepare your frames by cleaning the glass thoroughly and painting the frames if desired. For a cohesive gallery wall, consider painting all frames the same color, or choose complementary shades that work with your decor.
Cut your canvas or cardstock to fit your frame exactly. This will serve as the sturdy backing for your paper elements. Arrange your book pages or map sections on this backing, playing with overlapping edges, angles, and focal points until you’re satisfied with the composition.
Once you’ve finalized your design, apply a thin, even coat of Mod Podge to the back of each paper piece and press it firmly onto your backing. Work from the center outward to avoid air bubbles. Allow this layer to dry completely, usually about 15-20 minutes.
For a truly special piece, highlight meaningful words, places, or dates with a touch of gold leaf or metallic paint. This subtle accent draws the eye and adds a personal connection to your art.
After your base layer is dry, apply a thin coat of Mod Podge over the entire surface to seal and protect your work. For a smooth finish, brush in one direction only, using long, even strokes. Allow this top coat to dry completely, it will appear clear when fully cured.
Place your finished piece in the frame, secure the backing according to your frame’s design, and add hanging hardware if needed. For a professional finish, cover the back with kraft paper, securing it with double-sided tape around the edges.
Design Tips
- Create a theme by using pages from the same book or maps of places you’ve visited
- Try tinting pages with tea or coffee for an aged, vintage look
- Incorporate small pressed flowers or thin fabric elements for added texture
- For a clean, modern look, cut pages into geometric shapes before arranging
7.Broken Treasure Resin Panels
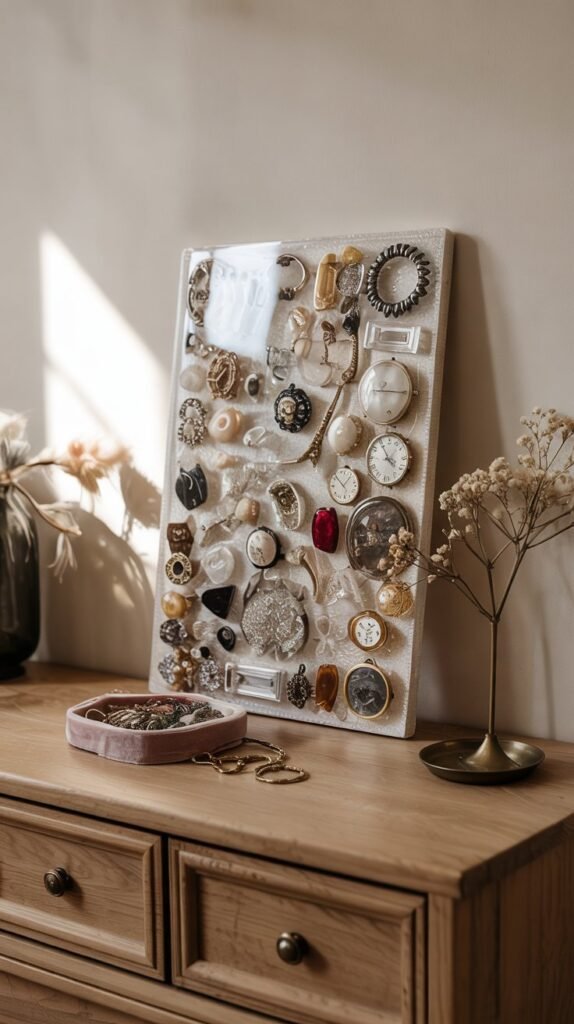
What You’ll Need
- Thrifted frame with depth (shadowbox works best)
- Broken jewelry, buttons, small trinkets, or watch parts
- Clear casting resin and hardener
- Silicone mold release spray
- Mixing cups and stir sticks
- Heat gun or torch for removing bubbles
- Disposable gloves and protective surface
- Level work surface
- Optional: Alcohol inks for adding color to resin
Creating Your Resin Treasure Panel
Begin by preparing your frame. Remove the glass and backing, then apply silicone mold release spray to the inside edges of the frame. This will allow you to remove the cured resin panel if needed. Place the frame on a level, protected surface.
Gather your broken treasures, old brooches missing stones, single earrings, watch faces, keys, or other small objects with visual interest. Clean each piece thoroughly and ensure they’re completely dry before using.
Arrange your items within the frame, creating a composition that pleases you. Take a photo for reference, then carefully remove the pieces and set them aside in the same arrangement.
Following the manufacturer’s instructions, mix your resin and hardener in the exact ratio specified. Stir gently but thoroughly for the recommended time, usually 2-3 minutes, to avoid introducing air bubbles. If you wish to add color, now is the time to incorporate a few drops of alcohol ink.
Work in layers for the best results. Pour a thin base layer of resin (about 1/8 inch) and let it set until tacky (usually 30-60 minutes). This creates a foundation for your objects and prevents them from sinking to the bottom.
Once your base layer is tacky, carefully place your treasures according to your planned design. Pour another layer of resin over them, just enough to cover. Use a toothpick to gently position any items that float or shift.
After pouring each layer, use a heat gun or torch passed quickly over the surface to remove air bubbles. Keep the heat source moving to avoid overheating the resin. Allow this layer to partially cure before adding more resin to completely fill the frame.
Cover your work with a dust cover and allow it to cure completely, usually 24-48 hours, depending on your resin type and project depth. Once fully cured, your resin panel should pop out of the frame easily thanks to the mold release. You can then secure it back in the frame for display.
Design Tips
- Create a color theme with your chosen objects for a cohesive look
- Consider the story behind your pieces, family heirlooms or travel souvenirs add meaning
- Vary the sizes and shapes of objects for visual interest
- For a magical effect, incorporate items that catch and reflect light
8.Circular Statement: Wheel & Tray Transformation
What You’ll Need
- Thrifted bicycle wheel, metal tray, or wooden hoop
- Wire brush or sandpaper for cleaning and prep
- Primer for metal surfaces
- Spray paint or acrylic paint
- Decorative elements: ribbon, yarn, fabric strips, beads, etc.
- Strong adhesive appropriate for your materials
- Heavy-duty picture hangers
- Optional: Dremel tool for drilling holes if needed
Creating Your Circular Statement Piece
Start by thoroughly cleaning your circular find. For metal items like bicycle wheels or trays, use a wire brush to remove rust and a degreaser to eliminate any oily residue. For wooden hoops, sand lightly to create a smooth surface for paint adhesion.
Apply a primer suitable for your material, this is especially important for metal surfaces to prevent future rusting and ensure paint adhesion. Allow the primer to dry completely according to the manufacturer’s instructions.
Choose a paint color that makes a statement in your space. Metallics like gold, copper, or bronze create dramatic focal points, while matte black or white offer sophisticated simplicity. Apply paint in thin, even coats, allowing each layer to dry before adding another. For bicycle wheels, consider painting just the rim and leaving the spokes their original metal for contrast.
Once your base is painted and completely dry, it’s time to add decorative elements. The approach will vary depending on your circular object:
For Bicycle Wheels:
- Weave colorful yarn, ribbon, or fabric strips through the spokes in patterns
- Attach small mirrors, crystals, or beads to catch light
- Wrap sections with twine or copper wire for textural interest
- Hang small ornaments or charms from the spokes
For Metal Trays:
- Create a mosaic design with broken china or tile pieces
- Decoupage with maps, book pages, or decorative paper
- Add dimensional elements like wooden cutouts or metal findings
- Paint mandala or starburst patterns using stencils
For a bohemian look, try creating a dreamcatcher effect by weaving yarn in intricate patterns through a bicycle wheel or embroidery hoop. Add feathers, beads, or small crystals for movement and light reflection.
Secure all decorative elements with appropriate adhesives, E6000 works well for most applications, while hot glue is suitable for lighter items. Allow all adhesives to cure completely before hanging your piece.
For hanging, use heavy-duty picture hangers rated for the weight of your finished piece. Bicycle wheels, in particular, may require wall anchors or multiple hanging points to distribute the weight evenly.
Design Tips
- Position your circular piece where it creates interesting shadows on the wall
- Consider scale, larger circles make bold statements in spacious areas
- For added dimension, layer smaller circular elements on top of larger ones
- Incorporate natural elements like dried flowers or feathers for organic texture
Embracing the Thrift-Flip Journey
The beauty of thrift-flipping lies not just in the finished pieces that grace your walls, but in the creative journey itself. Each project transforms forgotten items into personal expressions of your style and story. As you wander through thrift stores with new eyes, you’ll begin to see potential in the most unexpected places, a chipped plate becomes the centerpiece of a stunning gallery wall, a tarnished frame holds treasured textiles, and broken jewelry finds new life suspended in resin.
These projects do more than just decorate your home, they reduce waste, support local thrift organizations, and create truly one-of-a-kind art that sparks conversation. The imperfections and history in each piece add character that mass-produced decor simply can’t match. And perhaps most satisfying is the pride that comes from pointing to a stunning focal point and saying, “I made that from things others had discarded.”
So gather your supplies, embrace the creative process, and transform those thrift store treasures into statement wall art that tells your unique story. Your walls and your wallet will thank you.
Frequently Asked Questions
How do I clean thrifted items before upcycling them?
For hard surfaces like frames, trays, or wood pieces, start with a thorough dusting, then wipe down with a solution of warm water and mild dish soap. For stubborn grime, try a mixture of equal parts white vinegar, rubbing alcohol, and water. Allow items to dry completely before painting or applying adhesives.
For textiles, check care labels if present. Most can be hand-washed in cold water with mild detergent or dry cleaned. For delicate pieces, consider freezing them overnight to eliminate any potential pests before gentle cleaning.
What should I look for when selecting frames at thrift stores?
Focus on the frame’s structure rather than its current appearance. Look for solid construction with tight corners and minimal warping. Wooden frames are versatile as they can be easily painted or stained. Don’t worry about scratches, outdated colors, or even missing glass, these can all be remedied. Check that hanging hardware is intact or easily replaceable, and prioritize interesting shapes or detailed molding that will add character to your finished piece.
How can I create a cohesive gallery wall with different thrift-flipped pieces?
Unify your diverse pieces through consistent elements. Choose a limited color palette and ensure each piece incorporates at least one of these colors. Consider painting all frames the same color for instant cohesion. Maintain consistent spacing between pieces (2-3 inches is standard) and align at least one edge of each piece with another for visual order.
Start with a central anchor piece, usually the largest or most eye-catching and build outward. Before hanging, arrange your pieces on the floor and take a photo to reference as you work. Remember that a truly interesting gallery wall embraces some variety while maintaining visual connections between elements.