9 Stunning DIY Christmas Tree Decorations
There’s something truly magical about decorating the Christmas tree — the soft twinkle of lights, the scent of pine, and the cozy hum of holiday music in the background. It’s that moment every year when the house begins to feel alive with warmth and joy. Whether you’re sipping hot cocoa in fuzzy socks or wrapping gifts late into the night, your Christmas tree becomes the glowing heart of it all.
But here’s the best part: you don’t need expensive ornaments or store-bought décor to make it shine. With a few simple supplies, a sprinkle of creativity, and a touch of rustic charm, you can create your own unique Christmas decorations that tell your story.
In this post, we’ll explore 9 DIY Christmas tree decorations — each one easy to make, budget-friendly, and full of cozy handmade character. From natural wood ornaments to sparkling handmade stars, these ideas will bring warmth, creativity, and heart to your holiday home.
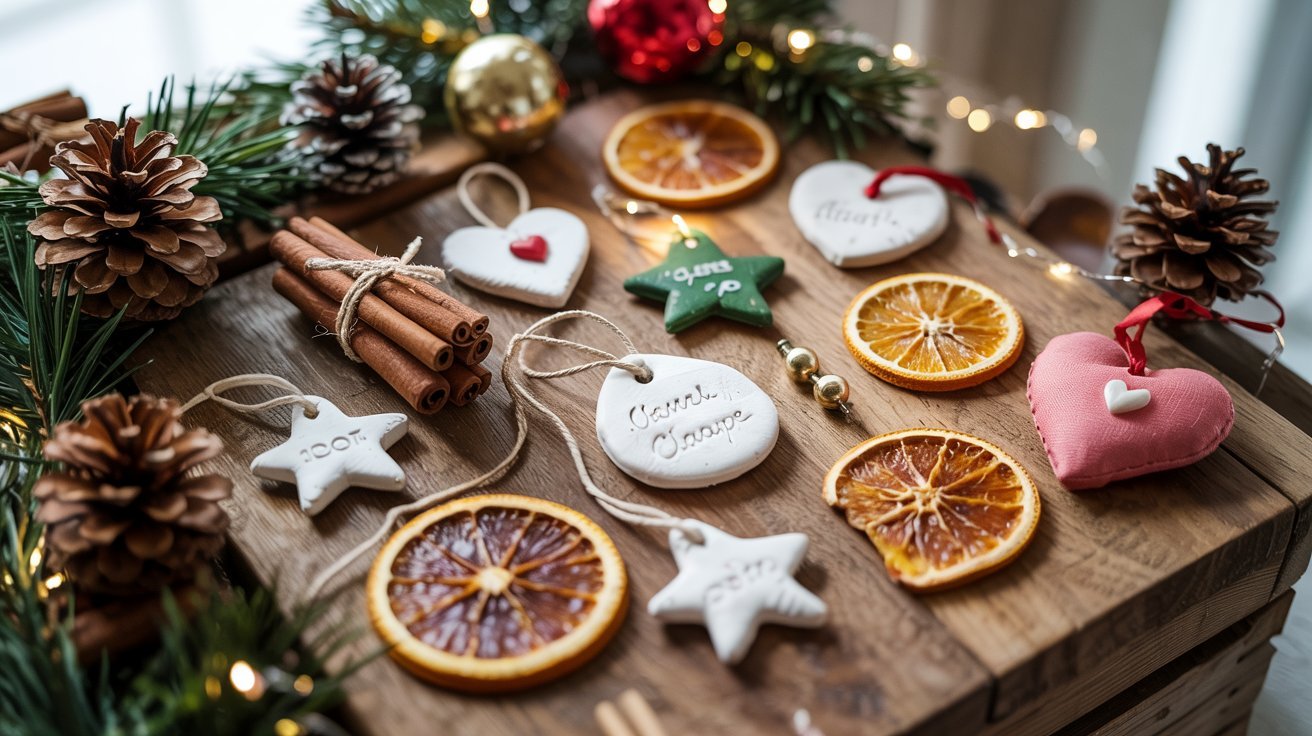
1. Rustic Cinnamon Stick Ornaments

There’s nothing that says Christmas quite like the warm, spicy scent of cinnamon. These simple yet elegant cinnamon stick ornaments not only look beautiful — they fill your home with that comforting holiday aroma every time you walk by the tree. Each one adds a touch of rustic charm, perfect alongside twinkling lights and soft plaid ribbons.
Supplies You’ll Need:
- Cinnamon sticks (whole)
- Twine or jute string
- Faux greenery or small pinecones
- Optional: fine gold glitter or spray glue
- Scissors and hot glue gun
- Small ribbon or fabric scraps
To make them.
- Tie 2–3 cinnamon sticks together with twine or thin jute string to form a small bundle.
- Add a sprig of faux greenery, a tiny pinecone, or even a dusting of gold glitter to give it a festive touch.
- For an extra cozy feel, finish with a little red gingham bow or a thin velvet ribbon before hanging them on your tree.
Styling Tip: Cluster three or four cinnamon bundles together near the center of your tree for a fuller, layered look — it helps balance larger ornaments and adds that authentic handmade feel.
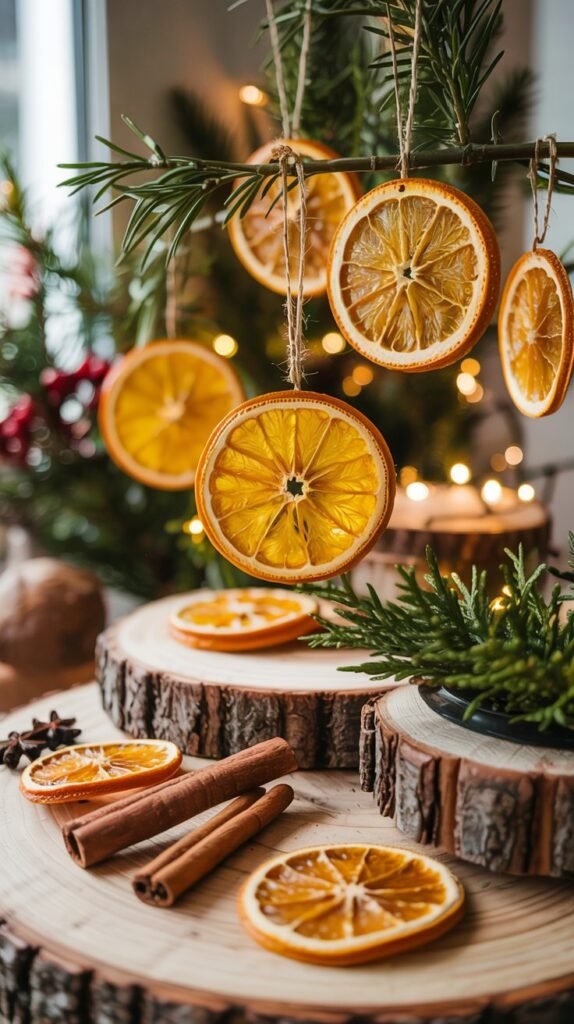
2. Dried Orange Slice Ornaments
Few things feel as nostalgic as the glow of dried oranges catching the twinkle of Christmas lights. These ornaments bring a soft golden hue to your tree — like little drops of sunshine in the branches. The gentle citrus scent mixed with pine creates a cozy, old-fashioned Christmas aroma that instantly warms the room.
Supplies You’ll Need:
- Fresh oranges (2–3 large ones)
- Baking sheet and parchment paper
- Twine, jute, or ribbon for hanging
- Optional: whole cloves or cinnamon sticks for extra scent
- Scissors or a needle for threading
How to Make It:
- Slice & Bake: Preheat your oven to 200°F (90°C). Slice the oranges thinly (about ¼ inch) and lay them flat on a parchment-lined baking sheet. Bake for 2–3 hours, flipping halfway, until completely dry.
- Thread & Decorate: Once cooled, poke a small hole near the top of each slice and thread with twine or ribbon. You can also press cloves into the center or tie a mini cinnamon stick to the string.
- Hang & Enjoy: Place them evenly across your tree, near fairy lights to let the soft orange tones glow beautifully in the light.
Styling Tip: Mix these dried slices with wooden ornaments and burlap ribbon for a rustic farmhouse look — or add a hint of glitter spray for a subtle modern sparkle.
3. Classic Salt Dough Ornaments
There’s something heartwarming about creating ornaments from scratch — especially ones that look timeless hanging on your tree year after year. Salt dough ornaments are simple, affordable, and have that nostalgic handmade beauty that fits perfectly with a rustic Christmas theme. Whether you shape them as stars, hearts, or snowflakes, each one adds a personal, homespun touch to your tree.
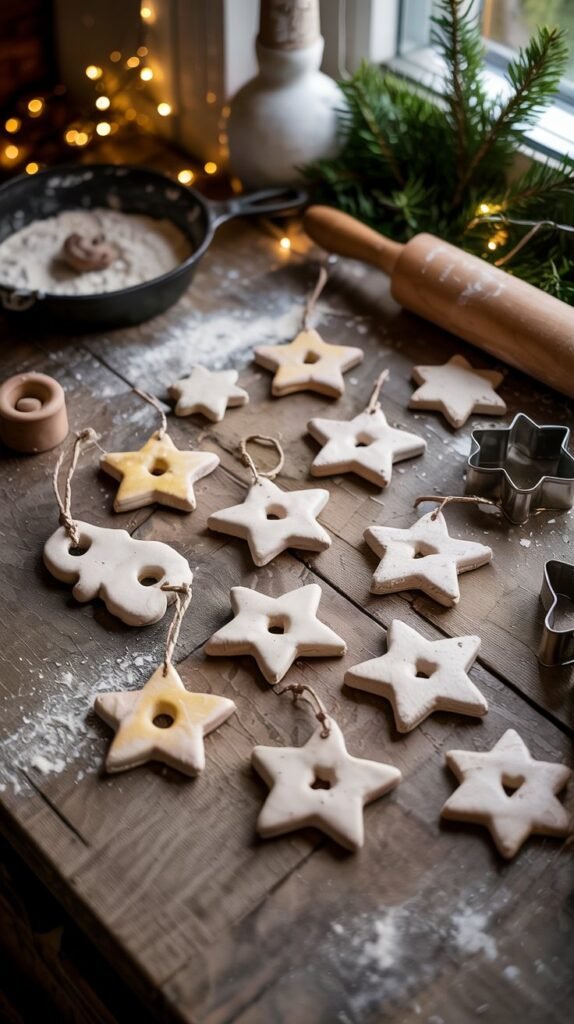
Supplies You’ll Need:
- 2 cups all-purpose flour
- 1 cup salt
- ¾ cup warm water
- Rolling pin and cookie cutters
- Straw or skewer for making holes
- Twine or ribbon for hanging
- Optional: white paint, gold paint pen, or glitter for decorating
How to Make It:
- Mix & Roll: Combine flour and salt in a bowl, then slowly add warm water until a dough forms. Knead until smooth, then roll it out to about ¼ inch thickness.
- Cut & Bake: Use cookie cutters to create shapes. Make a small hole at the top of each one for hanging, then bake at 200°F (90°C) for 2–3 hours or until completely dry.
- Decorate & Hang: Once cooled, paint them white for a snowy look, outline details with a gold paint pen, or dust lightly with glitter for a soft sparkle. Tie with ribbon or twine and hang on your tree.
Styling Tip: Mix painted salt dough ornaments with natural wooden ones for a cozy, Scandinavian-style tree that feels simple and elegant.
4. Sparkling Pinecone Ornaments
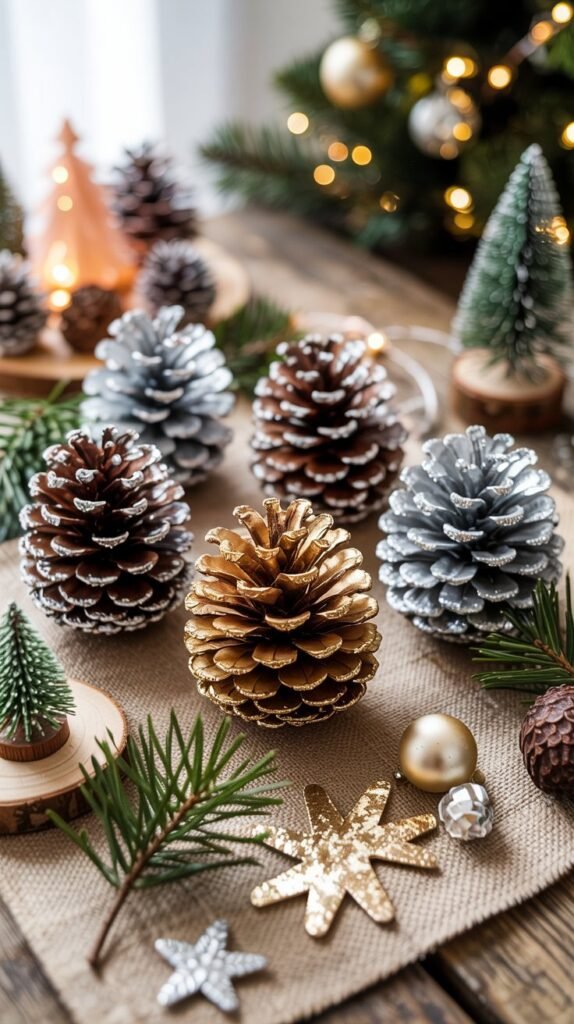
Pinecones are nature’s own little ornaments — beautifully textured, timeless, and perfectly rustic. When brushed with a hint of shimmer, they turn into elegant accents that catch the light just enough to feel magical. These ornaments bring that “walk in the woods on Christmas Eve” vibe — cozy, natural, and softly glimmering under the tree lights.
Supplies You’ll Need:
- Pinecones (clean and dry)
- Small screw eyes or hot glue + twine for hanging
- White acrylic paint or spray paint (optional for frosted look)
- Fine gold or silver glitter
- Paintbrush
- Ribbon or jute string
How to Make It:
- Prep the Pinecones: Make sure they’re clean and dry. If you want a “snowy” look, lightly brush the tips with white paint.
- Add Sparkle: While the paint is still a bit tacky, sprinkle fine glitter over the edges for a subtle shine. You can also apply a touch of glue before glitter if needed.
- Attach & Hang: Screw in a small eye hook at the top or use hot glue to secure a twine loop. Tie a ribbon bow at the top for an elegant finish, then hang them evenly around your tree.
Styling Tip: Mix gold-glittered pinecones with matte wood ornaments and white lights for a balanced, rustic-elegant look.
5. Cozy Fabric Heart Ornaments
There’s something timeless about fabric ornaments — the way they soften a tree’s look and bring a handmade warmth that feels full of love. These cozy fabric hearts are perfect for a nostalgic Christmas theme, especially when made from plaid, linen, or velvet. Hung among twinkling lights and pine greenery, they instantly make your tree feel like home.

Supplies You’ll Need:
- Fabric scraps (plaid, burlap, linen, or velvet)
- Scissors
- Needle and thread or hot glue gun
- Cotton or stuffing material
- Twine, jute, or thin ribbon for hanging
- Optional: buttons, lace trim, or tiny bells for detail
How to Make It:
- Cut & Shape: Cut two matching heart shapes from your chosen fabric.
- Sew or Glue: Sew around the edges (leaving a small opening) or glue with hot glue. Add a little stuffing to give it shape.
- Add Finishing Touches: Sew or glue the opening closed, attach a twine loop for hanging, and decorate with buttons, lace, or a dab of glitter for a soft sparkle.
Mini Variations:
- Use burlap for a rustic farmhouse look.
- Try velvet with gold thread for a touch of vintage luxury.
- Add a tiny bell or pearl bead at the center for a delicate detail.
Styling Tip: Mix these fabric hearts with wooden stars or white salt dough ornaments for a tree that feels both nostalgic and softly elegant.
6. Glittered Wood Slice Ornaments
Color Theme: Natural wood, gold, and creamy white
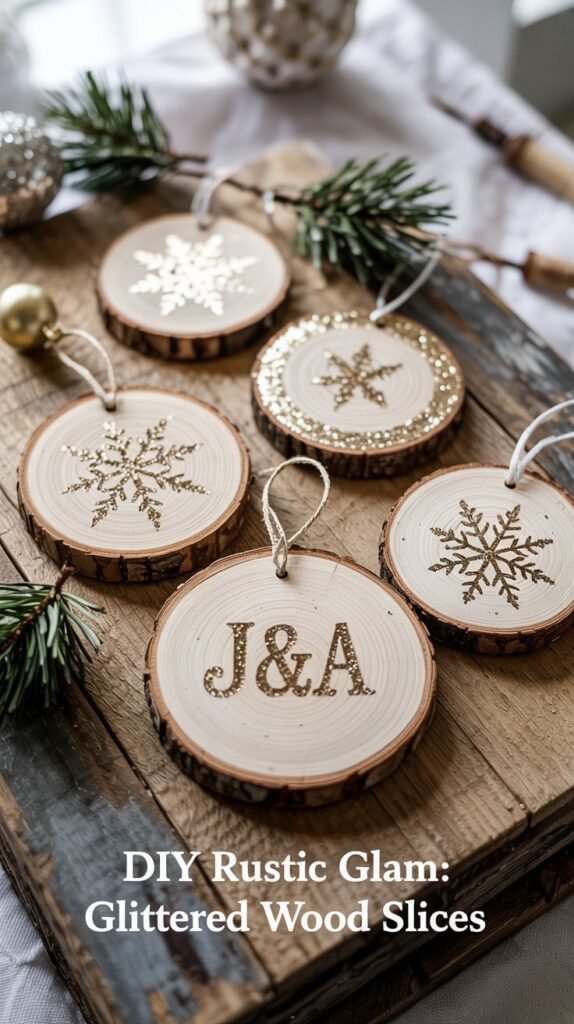
Wood slice ornaments bring the heart of the forest into your home — simple, rustic, and beautifully organic. When paired with a touch of gold glitter or metallic paint, they transform into something elegant yet still grounded in nature. These ornaments add warmth and texture to your Christmas tree, glimmering softly as the lights reflect off their golden edges.
Supplies You’ll Need:
- Wood slices (pre-cut or DIY from branches)
- Drill or awl for small hanging holes
- Twine, ribbon, or jute
- Gold acrylic paint or gold leaf flakes
- Paintbrush or sponge
- Optional: stencil or white paint pen for lettering or snowflake details
How to Make It:
- Prep & Drill: Drill a small hole near the top of each wood slice for hanging. Lightly sand rough edges if needed.
- Add Design: Use a stencil or freehand to paint stars, initials, or snowflakes in white. Once dry, add gold paint or leaf flakes around the edges for a radiant shimmer.
- Finish & Hang: Thread twine or ribbon through the hole and tie securely. Hang them evenly across your tree, mixing them between softer fabric ornaments for balance.
Mini Variations:
- Use silver paint and white ribbon for a frosty woodland look.
- Try personalizing each slice with family initials for a sentimental touch.
- Layer a clear coat of Mod Podge for a glossy, durable finish.
Styling Tip: Pair these with gold-tipped pinecones and white lights to create a rustic-luxe tree that feels timeless and inviting.
7. Frosted Glass Baubles
Color Theme: Silver, white, and clear glass
Nothing captures the magic of Christmas quite like the shimmer of frosted glass. These ornaments glisten like freshly fallen snow, reflecting the twinkle of your lights and adding a touch of airy elegance to your tree. Even though they look store-bought, they’re incredibly easy (and affordable) to make at home.
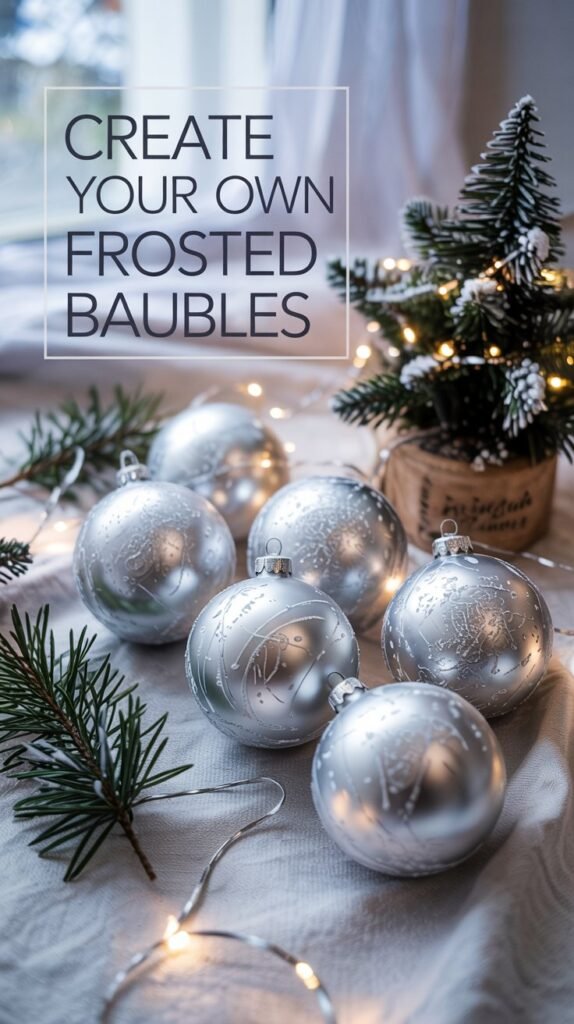
Supplies You’ll Need:
- Clear glass or plastic baubles
- White acrylic paint or frosted glass spray
- Silver glitter (fine)
- Paintbrush or sponge applicator
- Twine, white ribbon, or metallic string for hanging
- Optional: faux snow or tiny metallic beads for filling
How to Make It:
- Create the Frosted Effect: Lightly sponge white paint or spray a frosted finish over the surface of each clear bauble. Let it dry completely.
- Add Sparkle: Apply a thin layer of glue around the base or top and dust with fine silver glitter for that icy shimmer.
- String & Hang: Replace the ornament cap, tie with white or silver ribbon, and hang near lights so they sparkle beautifully.
Mini Variations:
- Fill baubles with faux snow, silver tinsel, or tiny pine sprigs for texture.
- Try metallic leaf flakes instead of glitter for a modern, luxe feel.
- Use pearlescent spray paint to create an iridescent glow effect.
Styling Tip: Combine these frosted glass baubles with soft white lights, paper snowflakes, and light wooden ornaments for a balanced, winter wonderland look.
8. Dried Orange Slice & Cinnamon Stick Ornaments
Color Theme: Warm orange, cinnamon brown, and soft red accents
These ornaments look as lovely as they smell. Combining dried orange slices, cinnamon sticks, and twine, they bring the perfect mix of color, fragrance, and rustic charm to your Christmas tree. The natural tones glow beautifully under string lights, creating a cozy, old-fashioned holiday atmosphere that feels both festive and timeless.
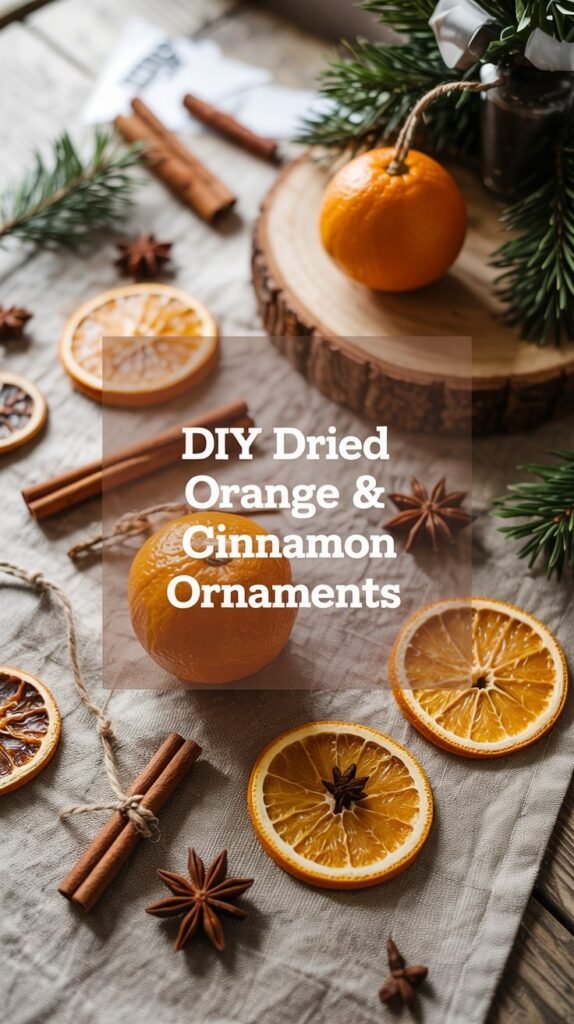
Supplies You’ll Need:
- 2–3 oranges
- Whole cinnamon sticks
- Red and white baker’s twine or jute string
- Baking sheet and parchment paper
- Optional: whole cloves or star anise for extra scent and texture
How to Make It:
- Slice & Dry: Preheat your oven to 200°F (90°C). Slice oranges about ¼ inch thick, then lay them on a parchment-lined baking sheet. Bake for 2–3 hours, flipping halfway through, until they’re fully dried.
- Assemble: Once cool, thread twine through the center of a cinnamon stick and an orange slice. Tie securely into a loop for hanging.
- Add Accents: Optional — press a few cloves into the orange or glue on a small piece of star anise for a decorative, aromatic touch.
Mini Variations:
- Add a small sprig of pine or rosemary for a fresh greenery accent.
- Thread a wood bead or tiny bell above the orange for extra charm.
- Use dried blood oranges for a deeper, more dramatic color tone.
Styling Tip: Scatter these ornaments evenly across your tree to break up metallics and whites. Their warm hues and scent instantly add depth, contrast, and that cozy Christmas feeling.
9. Glittered Snowflake Keepsakes
Bring a touch of frosty magic to your Christmas tree with these sparkly, elegant snowflake ornaments. They catch the light beautifully and balance rustic charm with a refined, wintry shimmer — perfect for anyone who wants a tree that feels both cozy and sophisticated.
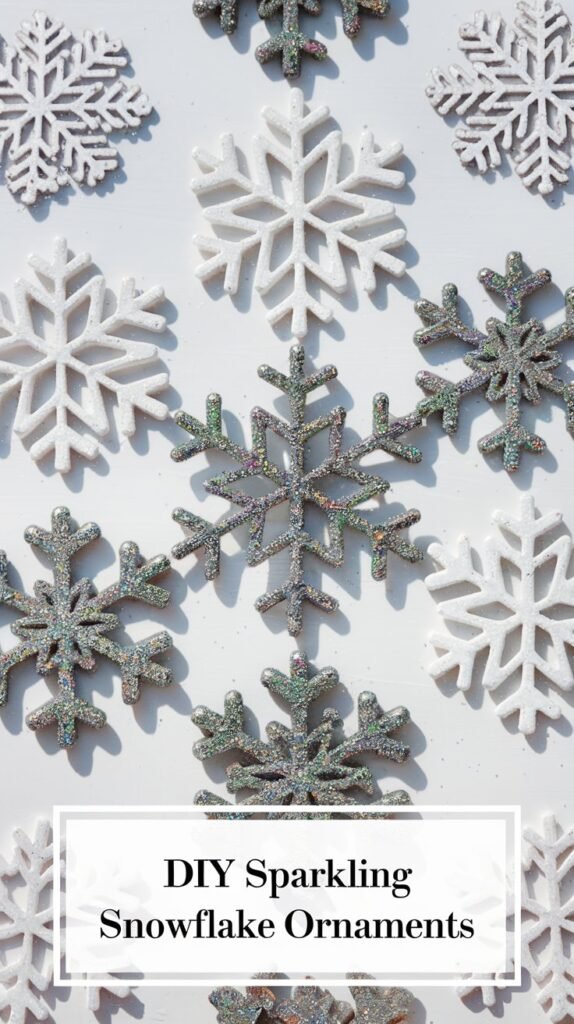
Materials:
- Pre-cut wooden or cardboard snowflake shapes
- Silver and white glitter (fine + chunky mix for texture)
- Mod Podge or clear-drying glue
- Small paintbrush
- Thin silver ribbon or thread for hanging
How to Make:
- Brush on glue: Coat the snowflake shape evenly with Mod Podge or glue.
- Add sparkle: Sprinkle the glitter mix generously over it — silver first, then white for a snowy effect.
- Dry and seal: Let it dry completely, then seal with another thin coat of Mod Podge to prevent shedding.
Optional variation: Add tiny pearl beads or rhinestones in the center for extra dazzle.
These ornaments work beautifully as standalone tree decor or as filler pieces among more rustic designs. They create that magical “twinkle” that turns your tree into a winter wonderland.