Macrame Curtain Tie Backs

This guide walks you through making a matching pair of beginner-friendly macrame curtain tie backs. Choose the Classic Wrapped Tassel or the quick Ring‑Loop design and you’ll have a pair in about 1–2 hours.
Difficulty: Easy. Knots used: Lark’s Head, Square Knot (or Spiral/Half‑Square), Gathering Knot, and optional Half Hitch.
Materials & tools
- 4–5 mm cotton macrame cord (soft, 3– or 4-ply recommended), neutral or colour of choice
- Wooden ring (optional), 30–40 mm for ring-loop style
- Measuring tape, sharp scissors
- Small comb or brush (for finishing tassel)
- Tapestry needle or a short scrap cord (to tuck ends for gathering knot)
- Optional: wooden beads, metal closures or button for wrap style
Finished sizes & cutting guideline
- Typical finished tieback length (from curtain edge to tassel bottom): 40–60 cm. Choose length to suit your curtain drop and styling.
- Cutting rule: knots consume cord. For cords folded in half (common when attaching with Lark’s Head), multiply finished vertical length by 8 to estimate cut length per cord. Always add ~30–50 cm extra for safety.
- Example (for one tieback): desired finished length = 50 cm → 50 × 8 = 400 cm (4.0 m) per cord; if using 8 cords per tieback, cut eight lengths ~4.2–4.5 m. For a pair, double that amount. (This is an example method, adjust based on your chosen knot density and tassel length.)
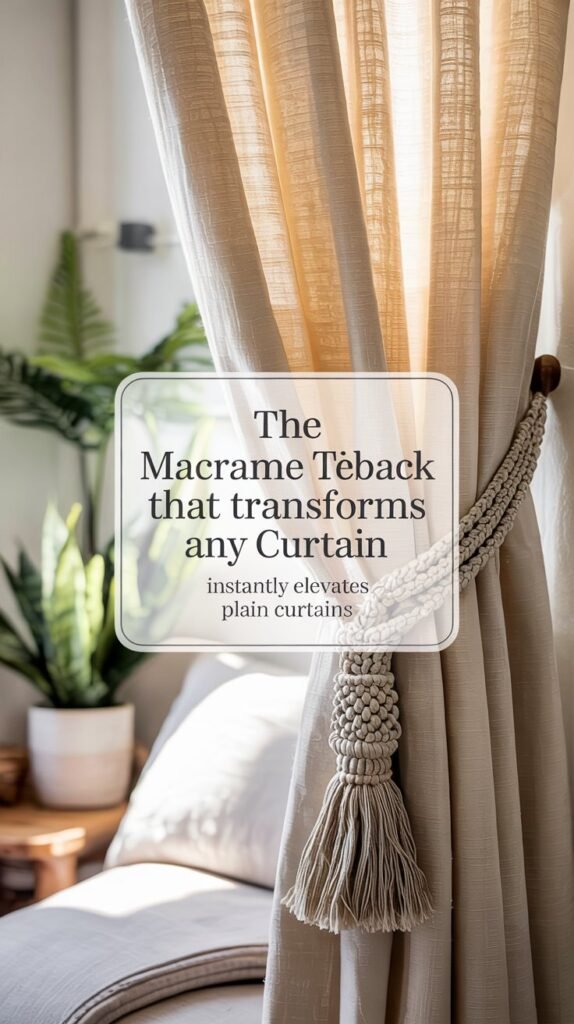
1.Classic Wrapped Tassel Tieback (no ring)
This gives a neat, elegant tassel that loops around the curtain and tucks under itself.
- Layout
- For one tieback use 8 cords (folded over a temporary dowel gives 16 working strands). For a fuller tassel use 12 cords.
- If you prefer a slimmer look, use 6 cords.
- Attach & build the body
- Fold each cord in half and attach to a short working stick or clamp with Lark’s Head (or simply keep them loose if you’ll gather and wrap).
- Create 6–10 rows of square knots or spiral knots down the cords to form a short decorative panel (about 6–8 cm). Tighten consistently.
- Form the loop
- Bring the knot panel ends together and test the loop around the curtain to check length. Adjust before finishing.
- Make the tassel & gathering knot
- Gather all working cords, decide on tassel length (10–20 cm), and use a separate short cord to make a tight gathering wrap about 4–6 cm above the tassel ends. Secure with a knot and tuck or stitch the tail through the wrap with a needle.
- Trim tassel ends evenly and comb to finish.
- Attach to curtain
- Loop tieback around curtain and tuck the decorated knot or wrapped section under itself or behind the curtain, adjust to hold securely. Add a decorative bead or button into the loop if you want a clickable closure.
2.Fast Ring-Loop Tieback (quick & secure)
This is the fastest option, ideal if you want a tidy, repeatable pair using wooden rings.
- Materials
- One wooden ring per tieback (30–40 mm)
- For one tieback, use 8 cords folded (16 working ends) for a medium-thick look.
- Attach cords to ring
- Fold each cord and attach to the ring with Lark’s Head knots, spacing evenly around the ring.
- Knotting
- From the ring, create a short column of square knots or alternating square knots (4–6 rows) to add texture. Optionally make two short spiral-knot ropes (one on each side) to create a loop that wraps around curtain and threads through the ring.
- Form the functional loop
- Either:
- Make a rope section long enough to pass through the ring and secure by tucking or tying a small knot so it doesn’t slip; or
- Create a fixed loop (by knotting or attaching a small button) that the ring can hook into when wrapped around the curtain.
- Finish
- Create a small tassel under the ring (gather and wrap), trim, and comb.
Quick step-by-step for a simple ring tieback (summary)
- Cut cords, fold and attach to ring with Lark’s Head.
- Work 6–8 rows of square knots (or spiral knots) from the ring.
- Measure loop length around curtain, add extra 5 cm for comfort, and finish end with a gathering knot and tassel.
- Trim and comb tassel.
Troubleshooting & tips
- If tiebacks slip on sheer curtains, add a small stitch or bead to create friction where the loop contacts the fabric.
- Keep tension even, uneven knots make the loop sit crooked.
- If your tassel looks sparse, add more cords (increase from 8 to 12).
- Always test loop length on the curtain before finishing the gathering knot.
- To prevent fraying while working, secure ends with small pieces of masking tape; do not melt cotton.
Variations & styling ideas
- Add wooden beads threaded onto select cords before knotting for a farmhouse look.
- Make matching napkin rings or a coordinating wall hanging using the same knots and cord colour.
- Use coloured cords for a tassel ombré, switch colours at a square-knot row and cover the join with the gathering wrap.
- For a boho look, leave the tassel long and combed; for a modern look, trim into a blunt edge.
Care
- Spot clean cotton tiebacks with mild soap and cool water. Lay flat to dry.
- Avoid machine washing attached to curtains. For synthetic cords, follow manufacturer advice.
Quick knots cheat-sheet
- Lark’s Head: Fold cord → loop behind ring/rod → pull ends through loop → tighten.
- Square Knot: Left over center under right → right under center up through loop → repeat mirrored.
- Spiral Knot: Repeat left or right half of square knot only to create twist.
- Gathering Knot: Wrap a short cord tightly many times around grouped cords → secure and tuck tail.
f you like this article, you’ll love this Easy Beginner Macrame Projects: DIY Ideas to Start Today