Foam Clay Ideas for Home Accents
There’s something magical about transforming simple materials into beautiful, personalized touches for your home. Foam clay art offers the perfect blend of accessibility and creativity, allowing you to craft functional decor pieces that tell your unique story. These lightweight, moldable creations add warmth and character to everyday items, turning the ordinary into something wonderfully yours.
In this guide, we’ll explore three delightful foam clay ideas that elevate common household items into conversation pieces. From table settings to furniture details, you’ll discover how this versatile medium can bring your personal touch to every corner of your home.
What Makes Foam Clay Perfect for Home Accents
Foam clay stands apart from other crafting materials with its unique combination of lightness and durability. Unlike traditional clay that can be heavy and brittle, foam clay dries to a spongy, flexible finish that’s perfect for items you’ll handle regularly.
This wonderful medium offers several advantages for creating home accents:
- Lightweight nature makes it ideal for decorative elements that won’t weigh down objects
- Pliable texture allows for intricate details and easy shaping
- Air-dries without requiring baking or special equipment
- Holds color beautifully, either in its natural state or when painted
- Creates a slightly cushioned surface that’s pleasant to touch
The gentle, tactile quality of foam clay brings a cozy, handcrafted feel to your home that mass-produced items simply can’t match. Each piece carries the subtle imprint of your hands,a quiet reminder of the care you’ve put into making your space uniquely yours.
Materials You’ll Need for Your Foam Clay Projects
Before we dive into our projects, let’s gather everything you’ll need. The beauty of foam clay art is that it requires relatively few supplies to create something truly special.
Basic Supplies
- Foam clay in your chosen colors (air-dry type)
- Craft mat or wax paper to protect your work surface
- Basic sculpting tools (or toothpicks and butter knives work well)
- Small bowl of water for smoothing
- Clear acrylic sealer (matte or glossy, depending on preference)
- Strong craft glue (E6000 or similar)
Project-Specific Materials
- For napkin rings: Plain wooden or metal napkin ring bases
- For drawer pulls: Cabinet hardware bases or wooden knobs
- For vase embellishments: Glass or ceramic vases with smooth surfaces
- Optional: Acrylic paint for adding details
- Optional: Small brushes for painting
- Optional: Metallic powders for shimmer effects
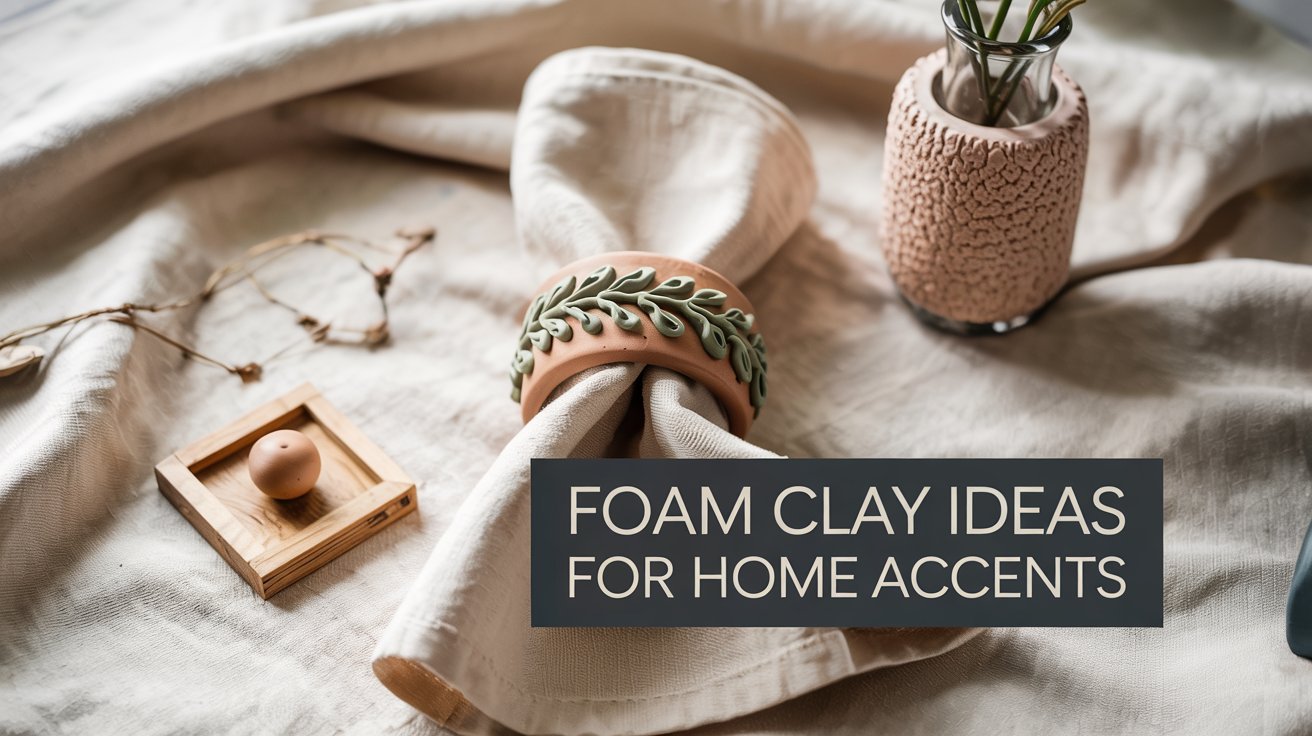
Project 1: Botanical Foam Clay Napkin Rings

Transform your table settings with these delightful botanical napkin rings. These little works of foam clay art bring nature’s touch to your dining experience, creating a warm, inviting atmosphere for family meals and special gatherings.
Step-by-Step Instructions
- Prepare your base: If using plain wooden or metal napkin ring bases, ensure they’re clean and dry. If creating rings from scratch, roll foam clay into a snake about 6 inches long and ½ inch thick.
- Create your ring: Either wrap the clay around your base or form it into a circle, gently pressing the ends together and smoothing the seam with a damp finger.
- Add botanical elements: Roll small pieces of foam clay into leaf shapes, using a toothpick to add vein details. For flowers, create tiny balls for centers and flatten small pieces for petals, arranging them around the center.
- Attach decorations: Lightly dampen the surface where you’ll place your decorations, then press them gently onto the ring base. Use a toothpick to secure and blend edges.
- Add texture: Press real leaves into the clay for authentic imprints, or use textured tools to create patterns that mimic natural elements.
- Allow to dry: Let your napkin rings dry completely for 24-48 hours, turning occasionally to ensure even drying.
- Seal for durability: Once dry, apply a thin coat of clear acrylic sealer to protect your creation and add longevity.
Design Variations
The beauty of foam clay art lies in its versatility. Consider these creative variations for your napkin rings:
- Seasonal themes: Create autumn leaves for fall, holly for winter, or cherry blossoms for spring
- Color stories: Blend complementary colors for an ombré effect that matches your table linens
- Personalized touches: Add tiny initials to create place settings for special occasions
- Textural contrasts: Combine smooth surfaces with textured elements for visual interest
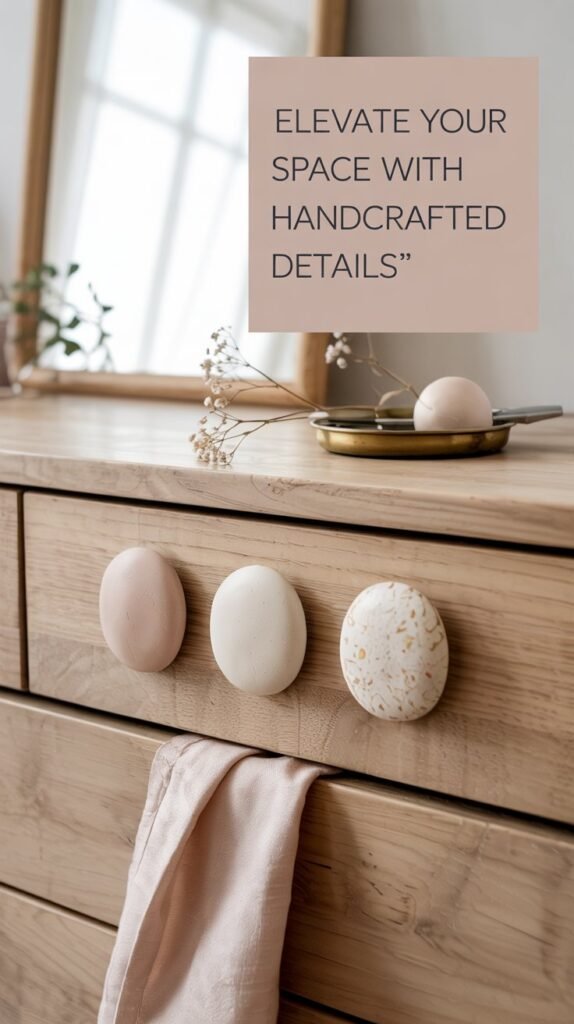
Project 2: Custom Foam Clay Drawer Pulls
Elevate your furniture with custom drawer pulls that reflect your personal style. These foam clay accents add character to dressers, nightstands, and cabinets, turning functional hardware into artistic focal points that make your space uniquely yours.
Step-by-Step Instructions
- Select your hardware base: Choose cabinet knobs or pulls that will serve as the foundation for your foam clay design. Metal or wooden bases work well.
- Prepare the surface: Clean the hardware thoroughly and roughen the surface slightly with fine sandpaper to help the clay adhere better.
- Create your design: Roll foam clay to approximately ¼ inch thickness. Cut shapes slightly larger than your hardware base, or form a ball and flatten it against the base.
- Add details: Press textures, patterns, or small decorative elements into your clay. Consider geometric patterns, nature-inspired textures, or abstract designs.
- Attach to hardware: Apply a thin layer of strong craft glue to your hardware base, then press your clay design firmly onto it, ensuring good contact across the surface.
- Refine edges: Use a damp finger to smooth edges and blend seams. A toothpick helps define details and remove any excess clay.
- Allow to dry: Let your drawer pulls dry completely for 24-48 hours in a dust-free area.
- Seal thoroughly: Apply 2-3 coats of clear acrylic sealer, allowing drying time between coats. This is essential for pieces that will be handled frequently.
Style Inspiration
Your drawer pulls can complement any interior style. Here are some design approaches to consider:
Rustic Charm
Incorporate textures that mimic bark, stone, or woven materials. Earthy colors like terracotta, moss green, and warm browns create a natural, grounded feel.
Modern Minimalist
Explore geometric shapes, clean lines, and monochromatic color schemes. Consider marbled effects or subtle ombré transitions for sophisticated simplicity.
Whimsical Accent
Create playful shapes like tiny houses, animals, or abstract forms. Bright colors and unexpected combinations add personality to children’s furniture or creative spaces.
Project 3: Textured Foam Clay Vase Embellishments
Breathe new life into plain glass or ceramic vases with foam clay embellishments that transform simple vessels into artistic displays. These textured accents create visual interest and tactile appeal, making your floral arrangements and plant displays even more special.
Step-by-Step Instructions
- Select your vase: Choose a vase with a smooth surface. Glass, ceramic, or even plastic containers work well as bases.
- Plan your design: Decide whether you want to cover a portion of the vase or create a pattern that wraps around it. Consider how the design will complement the flowers or plants you typically display.
- Prepare the surface: Clean the vase thoroughly with alcohol to remove any oils or residue that might prevent adhesion.
- Create your embellishments: Roll foam clay to approximately ⅛ inch thickness for delicate designs or thicker for more substantial textures.
- Apply texture: Press textured objects like lace, leaves, or textured rolling pins into the clay to create patterns. Alternatively, use tools to create your own textures.
- Attach to vase: Apply strong craft glue to the back of your clay pieces, then carefully position them on the vase. Hold in place for a minute to ensure good adhesion.
- Blend edges: If creating a continuous design, use a damp finger to gently blend seams where pieces meet.
- Allow to dry: Let your embellished vase dry completely for 24-48 hours, handling it minimally during this time.
- Seal thoroughly: Apply 2-3 coats of clear acrylic sealer, focusing especially on edges and textured areas.
Design Approaches
Your vase embellishments can take many forms, each creating a different aesthetic effect:
- Organic bands: Create a textured band around the middle or neck of the vase
- Climbing patterns: Design elements that appear to grow up from the base
- Asymmetrical accents: Place focal elements on just one side for a modern look
- Tonal layers: Build up layers of similar colors for subtle depth
- Contrasting colors: Create bold statements with colors that pop against your vase
Making Your Foam Clay Art Last: Durability Tips
Creating beautiful foam clay accents is just the beginning,ensuring they stand the test of time is equally important. These practical tips will help your handcrafted pieces remain beautiful and functional for years to come.
Essential Sealing Techniques
- Choose the right sealer: Use a water-based acrylic sealer for foam clay. These come in matte, satin, or glossy finishes to suit your aesthetic preference.
- Apply multiple thin coats: Three thin coats provide better protection than one thick coat, which can remain tacky or crack.
- Seal all surfaces: Don’t forget to seal the undersides and edges of your pieces, as these areas are often vulnerable to moisture and wear.
- Allow proper drying time: Let each coat dry completely (usually 2-4 hours) before applying the next for optimal durability.
- Consider specialized sealers: For items that may encounter water (like vases), consider using a waterproof sealer designed for crafts.
Structural Strength Considerations
Beyond sealing, these structural techniques will help your foam clay art maintain its integrity:
For Delicate Details
- Keep delicate projections under ½ inch to prevent breaking
- Reinforce thin areas with an additional layer of clay
- Consider embedding toothpicks or wire in pieces that need extra support
- Avoid making pieces too thin, aim for at least ⅛ inch thickness
For Frequently Handled Items
- Round edges slightly rather than leaving sharp corners
- Build up layers gradually rather than adding large chunks
- Allow extra drying time before handling or sealing
- Consider adding a final coat of furniture wax for items like drawer pulls
Pro Tip: To test if your foam clay is completely dry before sealing, press gently on the thickest part. If it feels cool or slightly damp, or if it yields under pressure, it needs more drying time. Properly dried foam clay should feel room temperature and firm throughout.
Secure Attachment Methods for Foam Clay Projects
The success of your foam clay home accents depends greatly on how securely they’re attached to their bases. Different projects require different approaches to ensure your creations stay firmly in place through regular use.
Choosing the Right Adhesive
| Adhesive Type | Best For | Drying Time | Strength | Notes |
| E6000 Craft Adhesive | Drawer pulls, hardware attachment | 24 hours | Very strong | Flexible when dry; waterproof; excellent for items that will be handled |
| Silicone Adhesive | Glass vases, ceramic surfaces | 12-24 hours | Strong | Remains slightly flexible; good for surfaces that may expand/contract |
| Tacky Glue | Napkin rings, lightweight applications | 1-2 hours | Moderate | Easy to use; dries clear; good for porous surfaces |
| Two-Part Epoxy | Heavy-duty applications | 5-30 minutes | Extremely strong | Best for items that will endure stress or weight; requires mixing |
Surface Preparation Techniques
Proper surface preparation dramatically improves adhesion for your foam clay art:
- Clean thoroughly: Remove all dust, oils, and residues with alcohol or acetone
- Create texture: Lightly sand smooth surfaces like glass or metal to give the adhesive something to grip
- Apply primer: For very smooth surfaces, consider a thin layer of gesso or primer before attaching clay
- Score contact areas: Create small scratches or crosshatching patterns on both the clay and the base surface
Hardware Embedding Methods
For drawer pulls and other functional items, properly embedding hardware ensures both aesthetic appeal and practical durability:
- Pre-position hardware: Determine exactly where your hardware needs to sit before applying adhesive
- Create a depression: Press the hardware lightly into the clay to create an impression of where it will go
- Apply adhesive: Add your chosen adhesive to both the hardware and the depression
- Press firmly: Insert the hardware and press firmly, holding for 30-60 seconds
- Clean excess: Immediately wipe away any adhesive that squeezes out with a cotton swab
- Support while drying: Position the piece so gravity helps maintain contact during drying
Maintenance Tip: Even with proper sealing and attachment, inspect your foam clay creations periodically for signs of wear or loosening. A small touch-up with appropriate adhesive can extend the life of your handcrafted pieces significantly.
Bringing Your Personal Touch to Every Corner of Your Home

The beauty of foam clay art lies not just in the finished pieces, but in the process of creating something uniquely yours. As you craft these napkin rings, drawer pulls, and vase embellishments, you’re infusing your home with personal meaning and handcrafted warmth that no store-bought item can replicate.
Remember that perfection isn’t the goal,it’s the subtle variations and imperfections that make handcrafted items special. Each time you or your guests interact with these foam clay accents, there’s a tangible connection to the care and creativity that went into making them.
Consider creating these projects in coordinating colors or complementary designs to create a subtle thread of continuity throughout your home. A cohesive palette helps these small touches contribute to your overall design story while maintaining their individual charm.