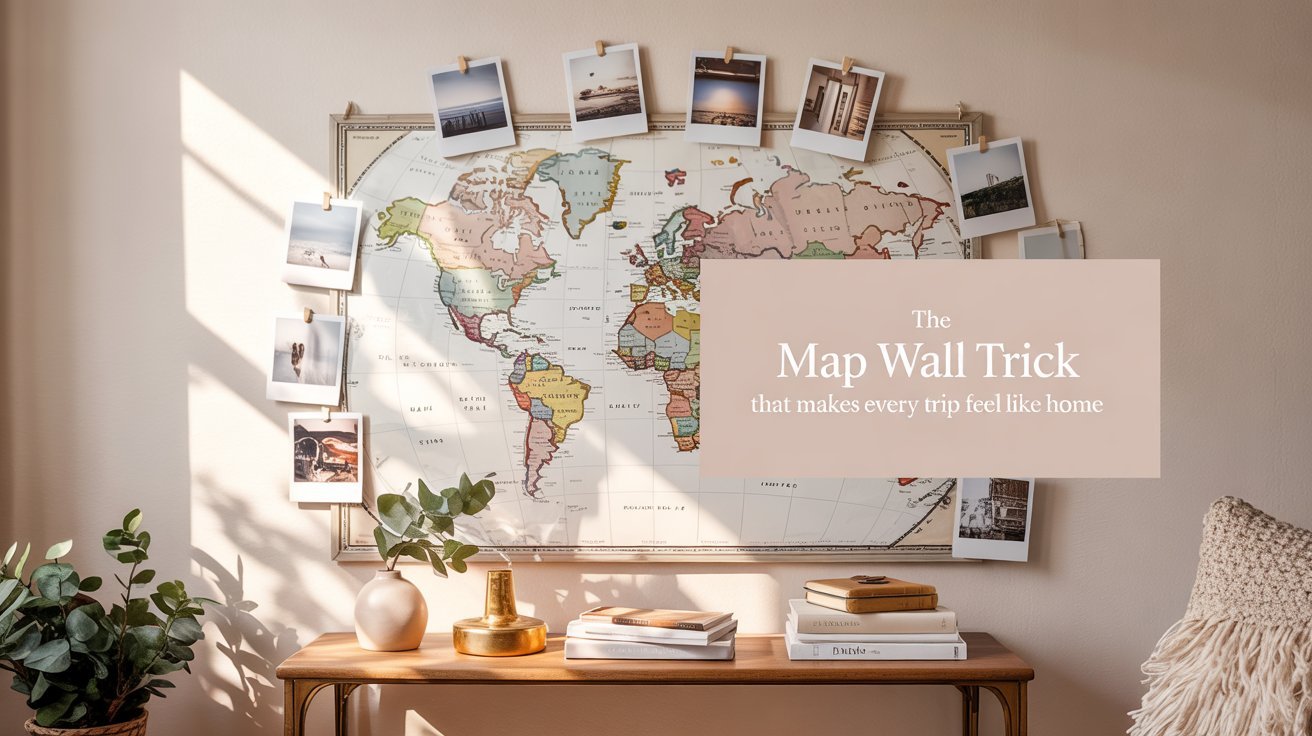
8 Map-Based Travel Photo Wall Layouts
There’s something captivating about travel photography, how a single image can capture the color of a distant city, the quiet texture of an old street, or the sweeping lines of a landscape that left you breathless. Bringing those photos into your home turns your wall into a gallery of moments that shaped your journey.
Map-based photo wall layouts offer a clean, modern way to display your travels with purpose and visual harmony. They pair the structure of maps with the emotion of your images, creating a display that’s both stylish and deeply personal. In this post, you’ll discover 8 thoughtfully designed map-inspired layouts that are simple to recreate and elevate your space with meaning, movement, and beautifully curated storytelling.
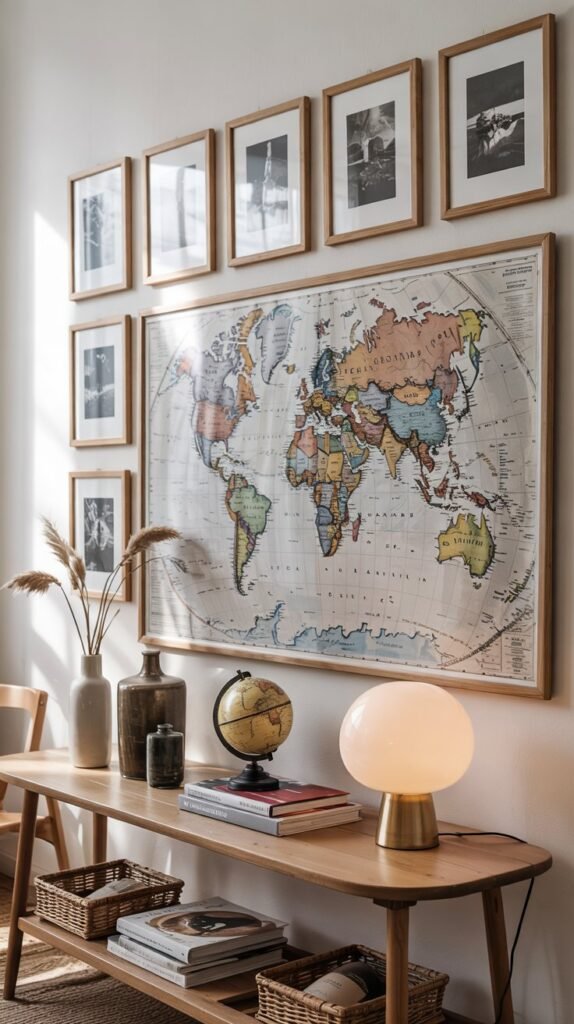
1. The Classic World Map Grid
A world map paired with a clean grid of travel photos creates a layout that feels both modern and inviting. The map becomes the anchor, while your photos frame it like moments orbiting a central theme, your love of exploring. The overall look is calm, intentional, and perfectly suited for a cozy modern space.
To create this layout,
Start with a framed world map and place it in the center of your wall. Surround it with matching photo frames arranged in a tidy grid. Keep the spacing even and the frames similar in tone for a polished, gallery-like feel. This design works beautifully in living rooms, hallways, or entry spaces where you want a touch of warmth without visual clutter.
Supplies
- Framed world map
- 6–12 matching photo frames
- Level or measuring tape for even spacing
Styling Tip: Soft wood frames or warm neutrals enhance the cozy modern aesthetic without overpowering your images.
2. Pin-Point Pushpin Board
This layout brings the charm of an old-school traveler’s pinboard into a clean, cozy modern home. It blends structure with personality, perfect if you love the look of curated memories with a slightly tactile feel.
Imagine a large cork board or linen-wrapped board as your backdrop. In the center, a world or regional map becomes the focal point, grounding the entire display. Around it, or directly over specific locations, your travel photos act like “pins,” visually marking the moments that made each destination special. The effect feels warm, creative, and deeply personal, almost like a visual diary hanging on your wall.
Assemble it
Start by mounting your board. Place your map in the middle, then begin attaching your photos, either clustered around the map or overlapping the exact places you’ve visited. You can also include small elements like handwritten notes, ticket stubs, postcards, or tiny flags to give your board more texture and depth. This layout is especially beautiful in workspaces, home offices, or reading nooks where a bit of inspiration fits naturally.
Supplies:
- Large cork or linen board
- World/continent/city map
- Pushpins or mini clips
- Tape for photos (or photo corners)
- Optional: postcards, ticket stubs, small paper flags
Styling Tip: Choose warm-toned pins or brass accents to complement cozy modern décor and avoid a cluttered “office board” look.
Do:
- Mix flat photos with layered memorabilia for texture and visual interest.
- Keep a soft color palette (neutral map + warm tones) to maintain balance.
Don’t:
- Overcrowd the board, leave small pockets of breathing room.
- Use mismatched pins or random bright colors that break the cohesive look.
3. The Route Map Storyline
This layout turns your wall into a guided tour of one of your most meaningful journeys. Whether it was a cross-country road trip, a multi-city adventure, or a backpacking path across continents, the storyline layout visually retraces your steps in a beautiful, intentional way.
Picture a printed map that outlines your exact route, curving lines, highlighted paths, or dotted trails. Around it, you display photos in chronological order, creating a narrative flow that feels like flipping through the pages of your travel journal. The combination of the map’s structure and your personal imagery creates a layout that feels dynamic yet balanced.
To build it
Print or purchase a map that includes the route of your trip. Hang it in the center. Then place your photos outward from the map, arranging them in the order you traveled. Use thin string, twine, or subtle vinyl lines to connect each image to its point on the map. The effect is cohesive, stylish, and full of movement, perfect for a hallway or above a long console table.
Supplies:
- Printed route map
- Photo frames in mixed sizes
- Thin twine or vinyl line decals
- Small pins or adhesive hooks
Styling Tip: Keep your line connectors subtle, warm neutrals or thin gold accents maintain a modern, elevated feel.
Variation Idea: Use black-and-white photos for a timeless, classic storyline aesthetic.
Do:
- Arrange photos in clear chronological order to support the storyline.
- Keep the layout elongated (horizontal or vertical) to enhance the sense of movement.
Don’t:
- Use thick or dark lines that overpower the map and photos.
- Let images drift too far from the map, keep everything visually connected.
4. Continental Clusters
If your travels are scattered across the globe, continental clusters are a beautiful way to organize them. Instead of one large map, you use smaller continental outlines, Europe, Asia, North America, Africa, and more, creating dedicated “mini galleries” for each region you’ve explored.
Each continent becomes its own visual chapter, surrounded by the memories you created there. This layout feels curated and artistic, offering both structure and creative freedom. It’s especially lovely in a cozy modern home because it keeps the look intentional while allowing personal touches to shine through.
To create it
Start by printing simple, minimalist continent outlines in matching styles. Place each one on the wall with a bit of breathing room between them. Surround each outline with 3–6 photos from that region, using light, neutral frames or Polaroid-style prints for a clean, cohesive look.
Supplies:
- Simple printed continent outlines
- Small matching frames or Polaroid-style prints
- Adhesive photo strips
- Level for even spacing
Styling Tip: Keep continent outlines in soft neutrals (cream, tan, warm gray) to maintain the cozy-modern palette.
Variation Idea: Add small handwritten captions under each photo, dates, cities, or a short memory.
Do:
- Keep each cluster tight and consistent to avoid visual clutter.
- Use similar frame finishes across all continents for unity.
Don’t:
- Mix drastically different photo sizes within one cluster.
- Overfill the wall — leave space between continents for a clean, modern look.
5. Framed Map Collage With Layered Photos
This layout is rich, tactile, and perfect if you want something that feels artistic and curated. Instead of placing your map and photos separately, this design layers your favorite images directly on top of a framed map, creating dimension and visual depth.
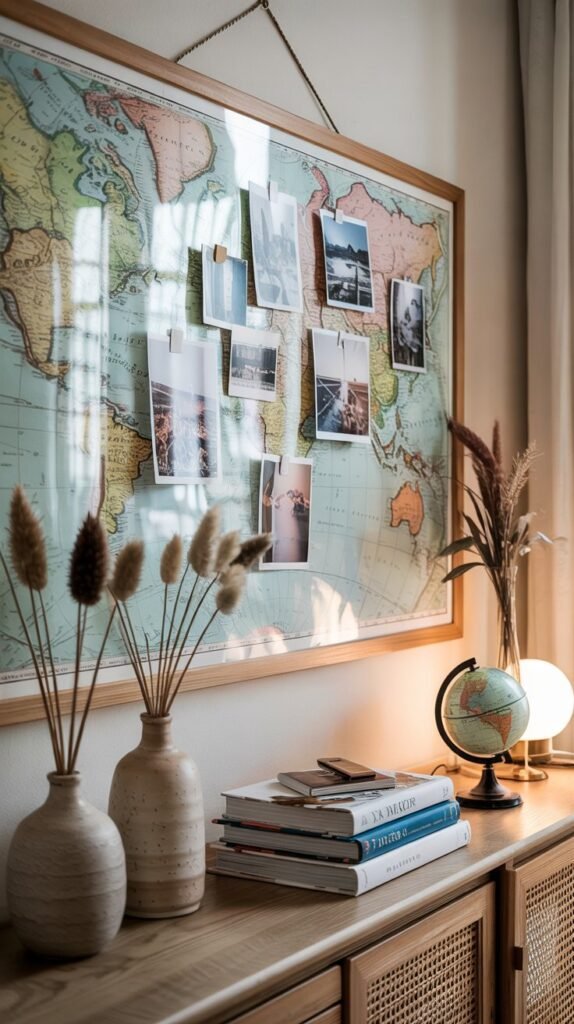
Imagine a large framed map acting as the backdrop. On top of the glass or frame edges, you attach photos using removable tabs or photo corners. The overlapping effect feels cozy and personal, almost like a beautifully arranged scrapbook elevated to wall art. It’s warm, inviting, and perfect for living rooms or bedrooms.
To create it
Choose a map with soft colors or muted tones, ideally something that won’t compete with the photos. Hang the map at eye level, then begin layering your images in a loose, organic arrangement. Mix vertical and horizontal photos, allowing edges to overlap for a natural, relaxed look.
Supplies:
- Large framed map
- Assorted photo prints (mixed sizes recommended)
- Removable adhesive tabs or photo corners
- Optional: dried leaves or small flat keepsakes
Styling Tip: Add 1–2 small, flat travel mementos (ticket stubs, dried flowers, small notes) for texture without overwhelming the composition.
Variation Idea: Use a linen-backed frame instead of a glass surface for a softer, warmer finish.
Do:
- Keep the layers slightly asymmetrical for a natural, artistic feel.
- Use warm lighting nearby (lamps, sconces) to enhance texture and shadows.
Don’t:
- Cover too much of the map, let portions peek through.
- Use overly glossy photos that reflect too much light.
6. Destination Silhouette Cut-Outs
This layout is bold, clean, and visually striking. Instead of using a full map, you highlight your favorite destination by using its silhouette as a central design element. Think of the outline of Italy, New Zealand, Japan, or a beloved city, transformed into wall art that anchors your travel photos.
Place the silhouette in the center of your wall, either framed or mounted directly on the surface. Surround the outline with photos from that specific trip, creating a layout that feels both modern and cohesive. This design is especially beautiful in cozy modern spaces because it balances simplicity with meaning.
To create it,
Purchase or craft a cut-out silhouette from cardstock, wood, or metal. Hang it, then arrange your photos in a tight cluster around it. Keep the spacing small to maintain a unified look.
Supplies:
- Country or city silhouette cut-out
- 4–8 photos from that destination
- Small matching frames
- Adhesive strips or hooks
Styling Tip: Metallic silhouettes (gold, brass, copper) pair beautifully with warm-toned frames and cozy lighting.
Variation Idea: Add a small title above the silhouette e.g., “Italy 2023” or “Tokyo Adventure.”
Do:
- Keep frames close to the silhouette for a strong central focus.
- Use consistent colors across all photos for a unified look.
Don’t:
- Use silhouettes that are too detailed or busy, simple outlines work best.
- Spread photos too far apart; tighter clusters feel more intentional.
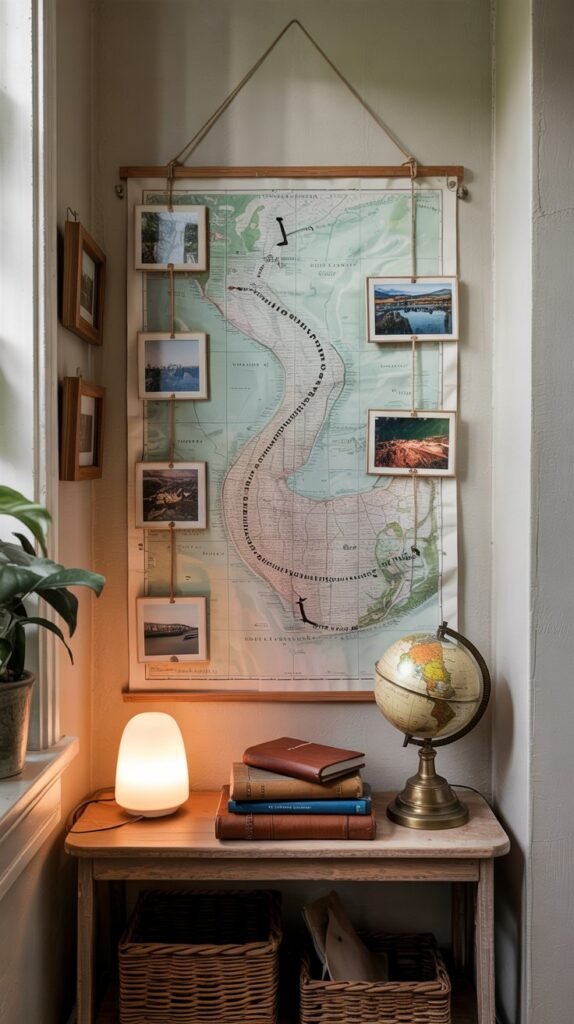
7. The Polaroid Travel Timeline
This layout is charming, simple, and perfect for a relaxed cozy-modern home. It has a soft, nostalgic feel that highlights the journey rather than the geography.
Picture a long, narrow world map hung horizontally or vertically. Beneath it (or across it), you stretch twine in one or two lines. Then, using mini clips, you hang Polaroid-style prints of your travels in the order they happened. The look is airy, lightweight, and wonderfully casual.
It’s renter-friendly too, easy to put up, easy to move, and easy to update as you continue adventuring.
Supplies:
- Narrow or minimalist map print
- Twine or cotton string
- Mini clips or wooden clothespins
- Polaroid-style prints
Styling Tip: Choose matte Polaroids or prints with soft white borders for a clean, calm aesthetic.
Variation Idea: Add a second string line for shorter trips or themed memories (food, landscapes, favorite cities).
Do:
- Keep your twine straight and lightly tensioned for a polished look.
- Mix candid and scenic shots for a more authentic timeline.
Don’t:
- Hang too many photos, aim for balance and breathing room.
- Use bright-colored clips that distract from the images.
8. Oversized Map Centerpiece With Corner Frames
This layout makes a statement, bold yet cozy, grounded yet filled with energy. It’s perfect for large blank walls, long hallways, or living room feature spaces.
Start with an oversized map in warm tones, canvas, wood-mounted, or framed. Hang it as your focal point. Then place small sets of frames in each corner of the map, creating a beautifully balanced layout that feels symmetrical but personal. The map grounds the design, while the surrounding photos add heart and narrative.
Because the layout is spacious, it works best when frames are kept simple and arranged in small, intentional groups.
Supplies:
- Oversized wall map (canvas or framed)
- 4 clusters of photo frames (2–4 photos per cluster)
- Level or tape measure
- Hanging hardware
Styling Tip: Choose frames in warm woods (oak, walnut) or soft matte tones to keep the layout cozy but elevated.
Variation Idea: Mix landscape and portrait photos to create a more natural, curated feel.
Do:
- Keep the map centered and let it dominate the space.
- Use matching frame finishes across all corners for visual harmony.
Don’t:
- Let the corner clusters become too large, they should support, not compete with, the map.
- Use overly busy photos right beside the map edges.