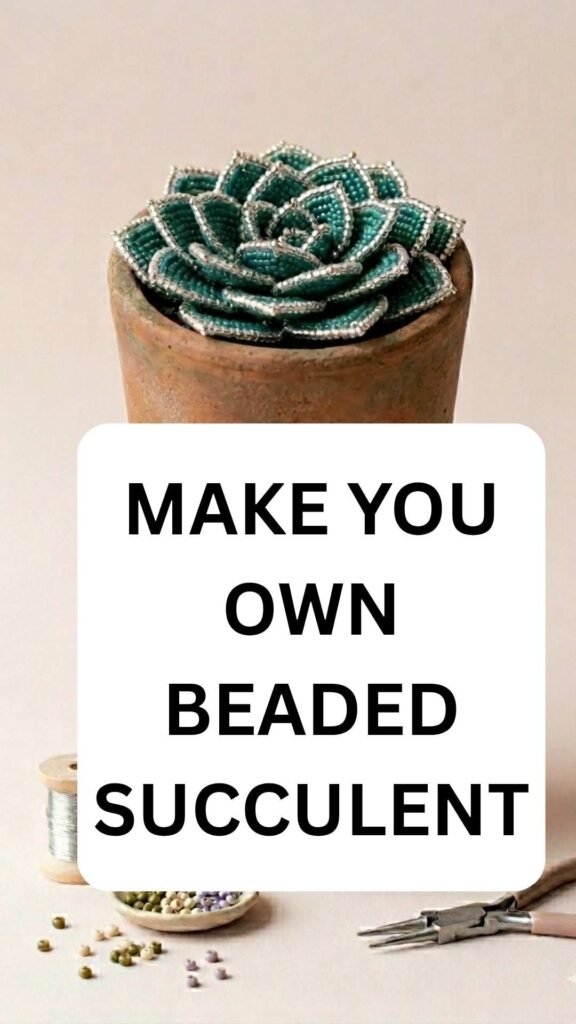
DIY Beaded Succulent: Create Your Own Stunning Plant Decor
Beaded plants bring everlasting beauty to your home without the need for watering or sunlight. These delicate craft creations combine the sparkle of seed beads with the organic shapes of real succulents. The result is a piece of decor that catches light throughout the day and adds a touch of handmade charm to any space.
This tutorial guides you through making a beaded plant from start to finish. You’ll learn the basic loop technique that forms each petal. Then you’ll build layers to create that signature succulent rosette shape. By the end, you’ll have a beautiful beaded succulent ready to display.
The project takes a few hours to complete. It’s perfect for a relaxing weekend craft session. Even beginners can achieve professional-looking results with the clear steps ahead.
Materials You’ll Need for Your Beaded Succulent

Gathering the right supplies makes this craft project flow smoothly from start to finish. Quality materials ensure your beaded plant will last for years. Here’s everything you’ll need to create one stunning beaded succulent in a pot.

Beading Supplies
- Seed beads in size 10/0 or 11/0
- Pastel green seed beads for inner petals
- Mint green beads for middle layers
- Lavender beads for color variation
- Teal or aqua beads for outer petals
- 26-28 gauge craft wire in silver or green
- Wire cutters for clean cuts
- Round-nose pliers for shaping
- Floral tape for finishing stems

Assembly Materials
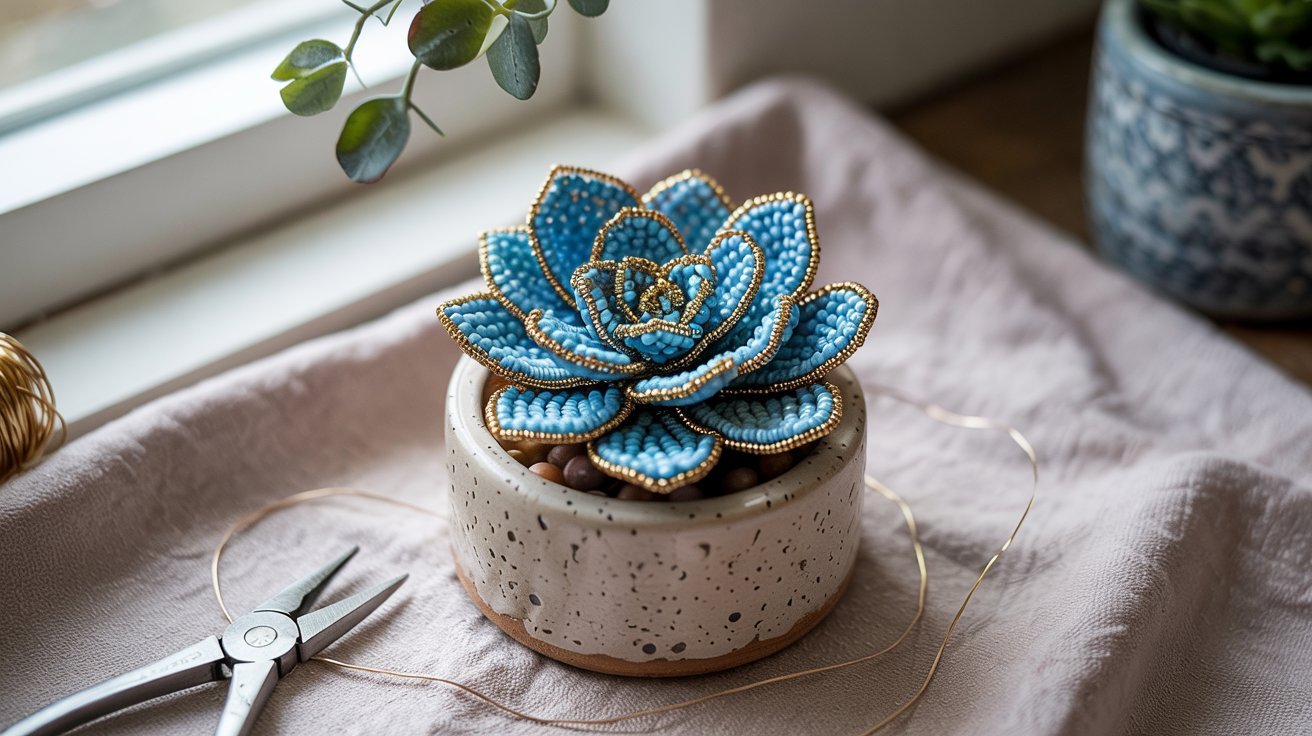
- Small ceramic planter in speckled style
- Floral foam or styrofoam block
- Moss or dried filler material
- Hot glue gun with glue sticks
- Scissors for trimming foam and moss
Pro Tip: Hobby Lobby and similar craft stores offer bead variety packs that include multiple colors. This saves money compared to buying individual tubes for each shade.
Beginner’s Kit

Perfect for those new to bead craft. Includes enough materials to make one beaded succulent plant. This starter kit helps you test the hobby before investing in larger supplies.
- 4 colors of seed beads (5g each)
- 10 yards of 26-gauge wire
- Basic round-nose pliers
- One 3-inch ceramic pot
- Floral foam piece
Intermediate Kit

Ideal for crafters ready to make multiple beaded plants. This kit provides variety in colors and enough wire for three to four projects. Great value for building a collection.
- 8 colors of seed beads (15g each)
- 30 yards of craft wire
- Professional pliers set
- Two ceramic planters
- Foam and decorative moss
Complete Artisan Kit

The ultimate collection for serious beading enthusiasts. Create an entire garden of beaded succulents and other flower designs. Premium tools and materials for professional results.
- 15 colors of premium seed beads (25g each)
- 100 yards of wire in multiple gauges
- Complete professional tool set
- Four artisan ceramic planters
- Variety of foam, moss, and decorative stones
Step 1: Create Individual Beaded Petals
Each leaf of your beaded succulent starts as a simple wire loop. This basic technique forms the foundation of the entire project. Once you master this one step, the rest flows naturally.

Basic Beaded Loop Technique
- Cut a piece of wire measuring 20 to 25 centimeters in length
- Thread 20 to 30 seed beads onto the wire
- Slide all beads to the center of the wire
- Bring both wire ends together to form a loop
- Twist the base two or three times to secure the beads
- Gently curve the loop with your fingers to create a petal shape
The number of beads determines petal size. Small inner petals need only 15 to 20 beads. Medium petals work well with 25 to 30 beads. Outer petals may require 35 to 40 beads for that dramatic spread.
Creating Size Variety
Real plants have petals of different sizes. Your beaded plant should mirror this natural variation. Make three distinct groups of petals for the most realistic look.
Small Petals
Use 15-20 beads per loop. These form the tight center of your succulent. Create 3 to 5 small petals. Keep them tightly curved inward.
Medium Petals
Use 25-30 beads per loop. These build the middle layer. Make 6 to 8 medium petals. Give them a gentle outward curve at the tips.
Large Petals
Use 35-40 beads per loop. These create the dramatic outer ring. Craft 8 to 10 large petals. Flatten these more than inner layers.
Crafting Tip: Work in batches by petal size. Cut multiple pieces of wire at once. This speeds up the process and ensures consistent sizes throughout your project.
Step 2: Create the Center Core
The center of your beaded succulent sets the foundation for all layers that follow. This core creates that classic rosette shape seen in echeveria and similar plants. Getting this part right makes the rest of the project easier.
Bundling the Inner Rosette
- Select 3 to 5 of your smallest petals
- Hold them together in a tight cluster
- Arrange petals so they spiral slightly around a center point
- Twist all wire stems together firmly
- Continue twisting for at least one inch to create a sturdy base stem
- Pinch petals inward so they cup toward the center
This twisted wire bundle becomes the main stem. All additional layers will attach here. Make sure this twist is tight and secure before moving forward.
Common Mistake: Avoid making the center too loose. Tight petals at the core make the succulent look more realistic. Loose centers fall apart easily and lack that authentic plant appearance.
Step 3: Build the Layers
Layer building transforms your simple core into a full beaded succulent. This step requires patience but delivers dramatic results. Each new ring of petals adds dimension and brings your plant to life.

Adding the Middle Layer
- Take one medium petal and position it against the core
- Wrap its wire stem around the main stem
- Twist tightly to secure in place
- Add the next medium petal adjacent to the first one
- Continue around the core until you complete the ring
- Adjust spacing so petals overlap slightly
Each petal should cover about two-thirds of the one before it. This creates that layered, dimensional look. Don’t worry if spacing isn’t perfect at first. You can adjust positions before the final twist.
Creating the Outer Layer
The outer layer uses your largest petals. These should have more dramatic bends and curves. Attach them using the same technique as the middle layer.
Bend outer petals downward more than inner ones. Real succulent leaves spread outward and slightly down. This creates that signature silhouette.
Layer Assembly Tips
- Work in a circular pattern around the stem
- Keep wire twists tight at each addition
- Maintain even spacing between petals
- Adjust angles before final securing
- Add extra petals if gaps appear
- Test stability by gently shaking the piece

Step 4: Color Placement Strategy
Color arrangement makes the difference between a good beaded succulent and a stunning one. Strategic placement of your pastel beads creates depth and visual interest. This mirrors how real plants show subtle color variations from center to edge.
Creating Natural Color Transitions
The center of real succulents often appears lighter or more vibrant. Outer leaves tend to have deeper tones or different hues. Your beaded plant should follow this pattern for maximum realism.
Inner Center Zone
Use soft mint or pastel green beads exclusively. This creates a fresh, new-growth appearance. Keep this section monochromatic for the best effect.
Middle Layer Zone
Mix lavender and mint beads in individual petals. Alternate between pure lavender petals and those mixing both colors. This transition zone adds complexity.
Outer Layer Zone
Alternate between teal and purple petals around the circumference. This creates visual rhythm and prevents monotony. Some petals can mix multiple colors within one loop.
Adding Intentional Asymmetry
Perfect symmetry looks artificial. Real plants grow with slight irregularities. Your beaded succulent gains character from intentional imperfection.
- Place one darker petal next to two lighter ones occasionally
- Make some petals slightly larger than others in the same layer
- Angle certain petals more dramatically than their neighbors
- Leave small gaps in some areas while keeping others dense
- Mix bead counts slightly within the same size category
Color Theory Tip: Cooler tones like teal and lavender create a calm, spring-like feeling. For a warmer look, substitute coral, peach, and pink beads using the same placement strategy.
Step 5: Prepare the Planter
A proper base keeps your beaded succulent standing upright and looking polished. The planter setup is simple but crucial for long-term display. This step takes only minutes but makes your finished piece look professionally crafted.
Installing the Foam Base
- Measure the inside diameter of your pot
- Cut foam slightly larger than the pot opening
- Press foam down into the pot firmly
- Trim any foam extending above the pot rim
- The foam should sit about one inch below the rim
Floral foam works better than styrofoam for this craft project. It holds wire stems more securely. The green color also blends better if any foam shows through your filler material.
Securing Your Beaded Plant
Push the wire stem straight down into the foam center. Insert it at least two inches deep for stability. Wiggle the stem gently to create a snug fit in the foam.
Test the angle by viewing from multiple sides. The succulent should tilt very slightly forward, not perfectly vertical. This mimics how real plants grow toward light.
Covering the Foam
Hide the foam base with decorative materials. This finishing touch transforms your project from craft to decor piece. Several options work well for this purpose.
- Preserved moss for natural texture
- Wood shavings for rustic appeal
- Small decorative stones or pebbles
- Shredded paper in coordinating colors
- Artificial grass or turf pieces
Apply moss or filler around the stem base. Press it gently into the foam surface. Add a small dot of hot glue under pieces that won’t stay in place. Cover all visible foam completely.
Step 6: Shape & Final Adjustments
The final shaping brings your beaded succulent to life. Small adjustments to individual petals create that organic, natural appearance. This is where your plant transforms from craft project to realistic decor piece.
Adjusting Individual Petals
Work from the center outward when making adjustments. Start by checking that inner petals curve tightly inward. These should almost cup together at the very center.
- Gently pinch center petals to create more pronounced curves
- Curl some middle layer petals slightly upward at their tips
- Flatten outer petals more dramatically downward
- Rotate certain petals left or right for better spacing
- Fill any obvious gaps by adjusting nearby petal angles
- Step back frequently to view the overall shape
Creating Dimensional Depth
Real plants have petals at varying heights and angles. Your beaded plant should show this same three-dimensional quality. Some petals should reach higher while others sit lower.
- Bend alternate outer petals down at sharper angles
- Leave some outer petals more horizontal
- Twist a few petals slightly on their axis
- Overlap petals more in some areas than others
- Create slightly more fullness on one side
- Adjust until no two petals sit at identical angles
These small variations prevent that artificial, mass-produced look. Your piece will have unique character that catches the eye from every angle.
Trimming Excess Wire
Flip the pot over carefully. Check how much wire extends below the foam. Trim any wire that extends more than one inch past the foam bottom.
Use wire cutters to make clean cuts. Tuck any remaining wire bits up into the foam so they don’t scratch surfaces. Your pot should sit flat and stable on any table or shelf.
Optional: Create the Speckled Planter Look
Making your own speckled pot adds an extra handmade touch to this project. This optional step takes less than one hour. The technique works on any plain ceramic or clay pot you already own.
Painting Your Pot
- Clean the pot surface with rubbing alcohol
- Apply two coats of matte white acrylic paint
- Let each coat dry completely before adding the next one
- Wait at least two hours after the final coat
Matte finish works better than glossy for this technique. The flat surface helps the speckles show more clearly. Use quality acrylic craft paint for the best coverage.
Creating the Speckled Effect
Mix brown acrylic paint with water in a one-to-one ratio. The consistency should be thin and runny. Dip an old toothbrush into this mixture.
- Hold the toothbrush about six inches from the pot
- Run your thumb across the bristles toward yourself
- This flicks tiny paint droplets onto the pot surface
- Rotate the pot and repeat from multiple angles
- Build up density gradually with multiple passes
- Let dry for one hour between coats if adding more speckles

Speckle Density Tips
- Start with light coverage and add more gradually
- Vary your distance for different speckle sizes
- Use multiple brown shades for depth
- Practice on paper first to control the technique
- Clean the toothbrush between color changes
Sealing Your Design
Once fully dry, seal the pot with matte acrylic spray. Apply two light coats instead of one heavy coat. This prevents drips and maintains the matte finish.
Let the sealer cure for 24 hours before adding foam and your beaded plant. The sealed surface resists minor bumps and handling.

Essential Tips for Beading Success
Small tricks make a big difference in your final result. These tips come from experienced crafters who make beaded plants regularly. Apply these ideas to save time and improve your work quality.

Workspace Organization
Set up your craft area before starting. Place beads in small containers or a bead organizer. This prevents spills and makes color selection quick. Keep wire and tools within easy reach on your dominant side.
Bead Storage
Use pill organizers or craft boxes with compartments. Label each section with the bead color name. This saves time when working on multiple projects over several days.
Wire Management
Cut multiple wire pieces at once and store them flat. This prevents tangling and maintains straight wire for easier threading. Keep different lengths in separate labeled bags.
Tool Placement
Keep pliers and cutters in a cup or tool holder. Store them point-down for safety. A magnetic strip on your table edge also works well for metal tools.
Common Problems and Solutions
Issue: Beads Won’t Stay in Place
This happens when wire is too thick for bead holes. Switch to 28-gauge wire or choose beads with larger holes. Size 10/0 beads have bigger holes than 11/0 beads.
Issue: Petals Look Flat and Lifeless
Real petals have curves and dimension. Use your fingers or round-nose pliers to add gentle bends. Shape petals after attaching them rather than before.
Issue: Wire Keeps Untwisting
Twist more times at each junction. Three twists is minimum, but five or six creates stronger holds. Use pliers to grip the wire while twisting for tighter results.
Issue: Plant Won’t Stand Upright in Pot
The stem isn’t deep enough in the foam. Remove the plant and push it in at least two inches. Add a bit of hot glue on the stem before reinserting for permanent hold.
Time-Saving Hack: Make all your petals in one sitting during a movie or while listening to music. Then assemble them on another day. Breaking the project into stages prevents fatigue and maintains quality.
Making Your Project Last
Beaded succulents are durable, but proper care extends their beauty for years. Keep them away from direct sunlight to prevent bead fading. Dust them monthly with a soft makeup brush.
Display your beaded plant on stable surfaces away from edges. Wire can bend if the piece falls, though it’s usually repairable. Store seasonal pieces in tissue paper inside boxes to prevent crushing.
More Beading Ideas to Try
Once you master this beaded succulent, expand your skills with related projects. These ideas use the same basic techniques you’ve learned. Each one adds new challenges while building on your existing knowledge.
Beaded Flower Bouquet

Create entire flower arrangements using the loop petal technique. Roses, tulips, and daisies all work beautifully with seed beads. Make a variety of stems and combine them into stunning bouquets that never need water. Perfect for kitchen or bedroom decor.
Miniature Bonsai Tree

Challenge your skills by creating a tiny bonsai tree with wire trunk and beaded foliage. This project requires more wire shaping but produces a statement piece for your home. Use brown floral tape on wire to mimic bark texture. A wonderful idea for living room or office display.
Beaded Plant Jewelry

Scale down your technique to create wearable art. Mini succulent earrings and flower brooches make unique gifts. These smaller pieces take less time than full plants but offer big style impact. Great project ideas for craft fairs or gift-giving occasions throughout the year.
Your Beaded Succulent Journey
You now have all the knowledge needed to create beautiful beaded succulents. This project combines simple techniques with artistic expression. Each piece you make will improve as you develop your skills and personal style.
Start with one succulent to learn the basics. Then experiment with different color combinations and petal arrangements. Try mixing bead sizes or creating multi-color petals. Each variation teaches you something new about the craft.
These beaded plants make thoughtful gifts for any occasion. They’re perfect for spring and summer home decor. Display them on tables, shelves, or kitchen windowsills. Group several together for more visual impact in any room.
The skills you’ve gained open doors to countless other beading projects. From flowers to bonsai trees to jewelry, the basic loop technique adapts to many designs. Keep practicing, and you’ll soon create entire gardens of beaded beauty.
Share your finished projects with fellow crafters online. The beading community loves seeing new interpretations and creative ideas. Your unique color choices and shaping decisions make each piece one-of-a-kind art.
Most importantly, enjoy the process. Beading provides a relaxing hobby that produces lasting decorative pieces. Take your time, experiment freely, and watch your confidence grow with each completed petal. Your home will soon showcase these charming handmade treasures that combine the sparkle of beads with the organic beauty of nature.