How to Avoid Cracks in Air Dry Clay
OK, friends can we talk about air dry clay cracks for a second? Because I have been there. You spend an hour shaping something you’re genuinely proud of, you set it aside to dry, you come back the next morning absolutely buzzing with excitement and there it is. A crack. Running right through the middle of your beautiful piece like it personally has something against you. 😭
I’m talking hairline cracks that appear overnight. Deep splits that open up as the clay dries. Edges that curl. Bases that warp. The kind of thing that makes you want make the whole project disappear and never touch clay again.
But here’s the thing, cracks in air dry clay are almost always preventable. And once you understand why they happen, you can stop them before they start. I’ve rounded up everything I’ve learned about how to avoid cracks in air dry clay. The tips that actually work, the mistakes that cause most of the damage, and what to do when a crack sneaks through anyway. Let’s get into it.
Understanding Why Air Dry Clay Cracks Happen in the First Place
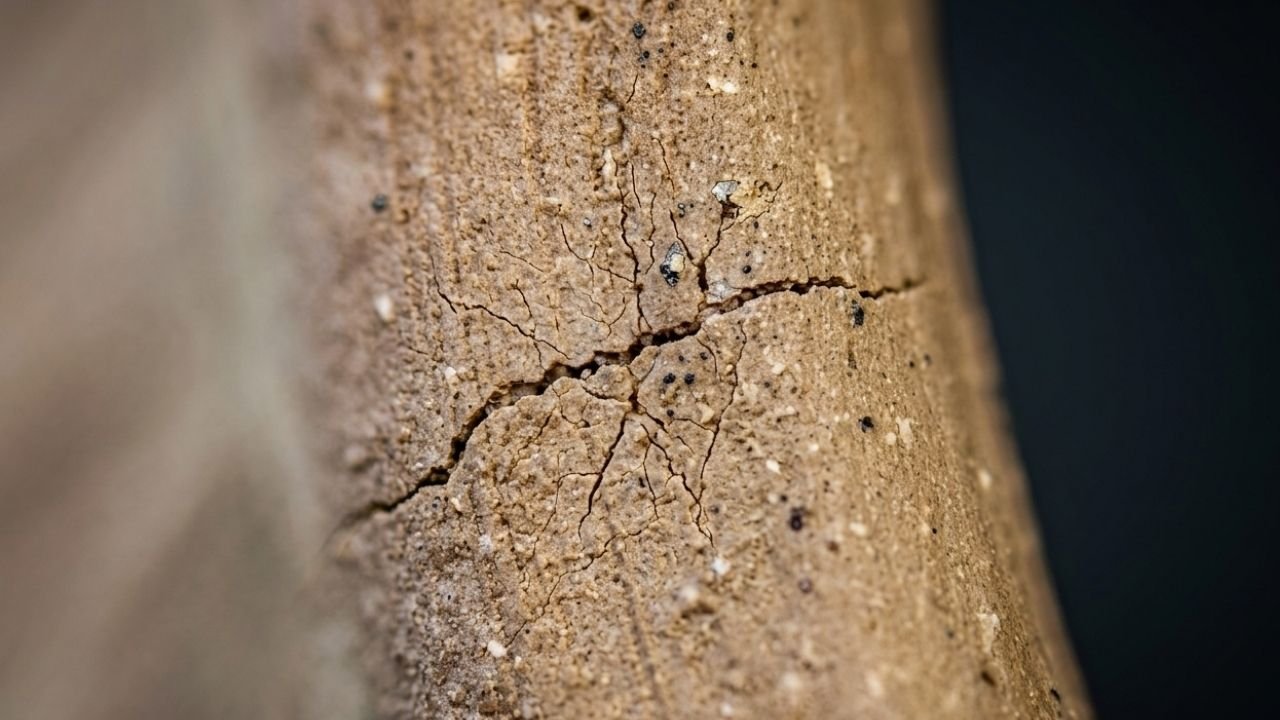
Before you can stop cracks from happening, it helps to understand what’s actually causing them and it comes down to one thing: uneven drying. As air dry clay loses moisture, it shrinks. When different parts of your piece lose moisture at different rates. a Thin edge drying faster than a thick centre, the top drying faster than the bottom, that uneven shrinkage creates tension in the clay. And when the tension gets too great, the clay cracks.
Everything else on this list is essentially a way of controlling that drying process. The goal is to let the moisture leave your piece slowly, evenly, and consistently from every direction at once.
Think of air dry clay like a sponge full of water. If you squeeze one corner hard while leaving the rest untouched, that corner compresses differently than the rest. Air dry clays work the same way during drying. When one area shrinks faster than another, internal stress builds up.
⚠️ Watch Out For: Assuming that cracks mean you did something wrong with your shaping. Most cracks are a drying problem, not a sculpting problem, which means even a beautifully made piece can crack if it dries too fast or unevenly. Understanding this changes everything.
The science behind clay drying is fairly straightforward. Water molecules sit between clay particles. As water evaporates, particles move closer together. If this happens uniformly, the piece shrinks evenly. If it happens faster in one area, that area pulls against slower-drying parts. That’s when cracks air dry into your work.
Temperature and humidity play huge roles here. A warm room accelerates surface drying. Low humidity pulls moisture out faster. Even air movement from a fan can create uneven drying across different parts of your sculpture.
Start With Well-Conditioned Air Dry Clay
The condition of your clay before you start working it is more important than most people realise. Clay that’s too dry going in is already starting the cracking process before you’ve even shaped anything, it has less plasticity, less flexibility, and far less tolerance for the drying process ahead.
Before you begin any project, knead your clay thoroughly until it’s smooth, pliable, and completely consistent in texture. If it feels stiff or crumbly, work a tiny amount of water in gradually and I mean gradually, because too much water creates a whole different set of problems. The clay should feel soft and cooperative, not sticky or wet.
Proper kneading does more than just add moisture. It aligns clay particles and removes air pockets. Think of it like kneading bread dough. You’re creating a uniform structure throughout the entire body of material.
Signs Your Clay Needs More Conditioning
- Surface feels rough or grainy when touched
- Clay cracks when you bend or fold it
- Pieces crumble when you try to shape details
- Dry patches visible in the clay mass
- Resistance when pressing or rolling
Signs Your Clay Is Perfectly Conditioned
- Smooth, butter-like texture throughout
- Bends without cracking or resistance
- Holds shape when sculpted
- Uniform color with no dry spots
- Slightly tacky but not wet or sticky
⚠️ Watch Out For: Air pockets in your clay. When you knead, press and fold rather than pulling and stretching. Pulling traps air inside the clay that can cause bubbling and cracking as it dries. Take your time with conditioning and your piece will thank you for it later.
The amount of time you spend conditioning depends on your clay’s starting condition. Fresh clay from a sealed package might only need two to three minutes. Clay that’s been sitting open for a while could need ten minutes or more of thorough kneading.
Some crafters warm their clay slightly before conditioning. Placing the wrapped clay near (not on) a warm surface for a bit makes it more pliable. This is especially helpful in winter when clay gets stiff from cold storage.
Keep Your Thickness Even Throughout the Piece
This is the rule that prevents more cracks than any other single technique and it’s the one that beginner clay workers most often overlook. When different parts of your piece are dramatically different thicknesses, they dry at dramatically different rates. The thin parts shrink first. The thick parts shrink later. The difference in tension between them is where the crack forms.
Aim for an even thickness throughout your piece, ideally between 6mm and 1cm for most projects. Use rolling guides or two equal stacks of coins on either side of your clay when rolling slabs to keep the thickness consistent. For sculpted pieces, hollow out any areas that are significantly thicker than the rest.
Think about a clay sculpture with a thick body and thin arms. As drying progresses, those thin arms shrink completely while the thick body core is still losing moisture. The arms pull against the body. Stress concentrates at the joints. That’s exactly where you’ll find cracks the next morning.
Pro Tip: When building a sculpture on an armature, keep the clay layer consistent all around the wire or support structure. Don’t build up thick areas in some spots and thin coatings in others. Uniform coverage means uniform drying and far fewer cracks air dry into your finished work.
⚠️ Watch Out For: Thick bases on pieces with thin walls. The base is almost always the last part to dry and the first place a crack appears, if you’re hand-building a pot or bowl, make sure the base is no thicker than the walls. Score the underside of the base to help it release moisture more evenly.
Hollowing thick pieces is essential for anything over 2cm thick. You can hollow from the bottom, create the piece in sections, or build around a removable core. The goal is eliminating any solid mass of clay that will dry slower than the surface.
Rolling guides are incredibly helpful for consistent slab work. You can buy adjustable rolling guides or simply use wooden dowels of equal diameter on both sides of your clay. Roll with a rolling pin that rests on both guides, and you’ll get perfectly even thickness every time.
Common Thickness Problems and Solutions
Thick Joined Areas
Problem occurs when attaching pieces together creates a thick junction point. Solution is to carefully thin the join from the inside or backside before the piece dries.
Uneven Hand Building
Happens when pinching or coiling creates varying wall thickness. Solution is to measure frequently with calipers or a thickness gauge as you build.
Decorative Additions
Adding thick decorative elements to thin bases creates stress points. Solution is to keep additions proportional or hollow out decorative pieces.
Base Versus Body
Flat bases often end up thicker than walls. Solution is to roll the base slab thinner than you think necessary or score deeply underneath.
Dry Your Air Dry Clay Pieces Slowly and Evenly
This is the big one. The single most common reason air dry clay cracks is that it dried too fast, left in direct sunlight, near a heater, or in a warm dry room with good airflow. All of those things sound like helpful drying conditions and every single one of them will crack your clay.
Slow drying is everything. Loosely cover your piece with a plastic bag or cling wrap for the first 24 to 48 hours, this traps just enough moisture to slow the drying process without keeping the clay wet. After that, remove the cover and let dry fully in a cool, still room away from direct sun, heat, and draughts.
The plastic cover creates a microenvironment around your piece. Moisture evaporating from the surface gets trapped and then reabsorbed. This cycling slows the overall drying rate significantly. It also helps moisture distribute more evenly throughout the piece.
Ideal Drying Conditions: Room temperature between 18-21°C (65-70°F), moderate humidity around 40-50%, no direct airflow, no direct sunlight, and at least 3-7 days of drying time depending on thickness. Patience during drying prevents hours of repair work later.
⚠️ Watch Out For: Drying your piece on a non-porous surface like glass or sealed tile. These surfaces trap moisture underneath the base while the top dries, creating exactly the uneven drying conditions that cause cracks and warping. Always dry on a porous surface, unfinished wood, a piece of drywall, or a foam board, that allows moisture to escape evenly from all sides.
Some crafters rotate their pieces during drying. Every 12 hours, gently turn the piece so a different side faces up. This promotes more even moisture loss from all surfaces. It’s especially helpful for pieces with complex shapes or protruding elements.
Climate matters enormously. If you live in a very dry climate, you might need to keep pieces covered for three or four days instead of two. In humid climates, you might only need 24 hours of covering before exposing the piece to air.
Drying Timeline for Different Project Types
Thin Slabs & Tiles
Thickness: 3-6mm
Covered Time: 12-24 hours
Total Dry Time: 2-3 days
Rotate every 12 hours. Dry on porous board.
Medium Sculptures
Thickness: 6-12mm
Covered Time: 24-48 hours
Total Dry Time: 4-5 days
Check daily for surface changes. Keep away from heat.
Thick or Hollow Pieces
Thickness: 1-2cm
Covered Time: 48-72 hours
Total Dry Time: 7-10 days
Extend covered time in dry climates. Test weight for moisture.
Use Slip to Join Clay Pieces Together
If you’re building a piece from multiple parts, attaching handles, adding coils, joining slabs . The join is always the most vulnerable point. A join that isn’t properly bonded is almost guaranteed to crack as the clay dries and shrinks, because the two pieces are pulling against each other at slightly different rates.
The solution is slip, a mixture of air dry clay and water blended to a smooth, thick paste. Score both surfaces with a toothpick or fork, apply slip to both sides, press the pieces firmly together, and smooth the join. This creates a bond that dries as one continuous piece of clay rather than two pieces glued together.
Making good slip takes just a few minutes. Take a small amount of the same air dry clay you’re using for your project. Add water bit by bit and mix thoroughly until you get a consistency like thick yogurt or peanut butter. Too thin and it won’t bond properly. Too thick and it won’t spread into the scored grooves.
⚠️ Watch Out For: Skipping the scoring step and just using slip alone. Scoring creates a rough surface that the slip can grip, without it, even a good slip application can fail as the piece dries. Score first, always, no exceptions.
The scoring pattern matters less than scoring depth and coverage. Crosshatch patterns work great. Parallel lines work fine too. The key is creating enough texture that slip has something to grab onto.
When joining pieces of different thicknesses, be extra generous with slip. The thinner piece will dry faster, so you need a really strong bond to resist the pulling force. Press firmly and hold for a few seconds to let the slip start bonding.
Step-by-Step Joining Process
- Score both surfaces to be joined with a toothpick, fork, or scoring tool. Create a crosshatch pattern about 2-3mm deep.
- Mix slip to the right consistency. Test by letting a bit drop from your brush, it should be thick enough to coat the brush but thin enough to flow.
- Apply a generous layer of slip to both scored surfaces. Don’t be stingy, excess can be smoothed away, but too little causes weak bonds.
- Press the pieces firmly together, wiggling slightly to help the slip penetrate the scoring. Hold pressure for 5-10 seconds.
- Smooth the join immediately with a damp finger or tool. Blend the seam into surrounding clay so it disappears completely.
- Let the join dry for at least an hour before handling that area again. The bond strengthens as moisture evaporates.
Alternative Joining Method: For very small attachments or delicate work, some artists use a tiny amount of the same air dry clay softened with water directly on the join instead of separately mixed slip. This works well for adding fine details like tiny flowers or decorative elements to a dry clay sculpture.
Cover Your Work Between Sessions
This one sounds so simple and it saves so many projects. If you’re working on a piece across multiple sessions, which most of us are, the clay you’re not actively working on is drying. And if it dries unevenly between sessions, you’re building in crack potential before you’ve even finished.
Between sessions, wrap your entire piece loosely in a damp cloth and then cover it with a plastic bag. The damp cloth keeps the surface from drying out while the plastic bag traps the moisture and slows the process. This keeps your clay workable, consistent, and crack-resistant until you’re ready to come back to it.
The damp cloth shouldn’t be dripping wet. Wring it out thoroughly so it’s just barely moist. Too much water can actually soften your clay too much or distort fine details you’ve already created.
⚠️ Watch Out For: Wrapping the clay too tightly in the damp cloth. If the cloth is pressed directly against fine details or delicate edges, it can distort them as it dries. Wrap loosely, with enough airspace between the cloth and the clay surface to protect the detail work.
For armature-based sculptures, covering gets a bit more complex. You can’t wrap the whole thing tightly without potentially shifting the clay on the wire. Instead, drape the damp cloth over the piece like a tent, supported by the armature itself, then cover everything with a large plastic bag.
Some artists keep a dedicated plastic storage container for works in progress. Place your piece inside on a wooden board, add a small dish of water to the container to maintain humidity, seal the lid, and your clay stays perfect for days.

Storage Solutions for Works in Progress
- Plastic Bag Method: Best for small to medium pieces. Use grocery bags or dedicated craft storage bags. Seal loosely with a twist tie.
- Container Method: Ideal for delicate sculptures. Use airtight plastic containers with a small water dish inside to maintain humidity without direct contact.
- Tent Method: Great for large armature pieces. Create a frame over the sculpture and drape plastic sheeting to form a moisture tent.
- Refrigerator Storage: For very long breaks (a week or more), some crafters store wrapped pieces in the refrigerator to slow drying dramatically.
Quick Test: When you unwrap your piece to continue working, the surface should feel cool and slightly damp to the touch, not wet or sticky. If it feels dry, the wrapping wasn’t effective enough. If it’s too wet, reduce cloth moisture next time.
Fix Cracks Before They Dry Completely
The best time to fix a crack is the moment you see it, because a crack in wet clay takes about thirty seconds to repair and a crack in dry clay takes thirty minutes. As soon as you spot a crack forming, act immediately.
Dip your finger in water and work it gently into the crack, smoothing the clay back together from the edges inward. Then smooth over the surface with a damp finger or a clay tool until the crack has closed completely. If the crack is deeper, fill it with a small amount of fresh clay blended with water to a paste and smooth it in. The key is moisture and speed, the wetter the clay still is, the easier the repair.
Timing is critical here. A crack that just appeared minutes ago is still moist enough to bond back together easily. A crack that’s been sitting for hours has dry edges that won’t bond well without significant rewetting.
⚠️ Watch Out For: Using too much water when repairing a crack. It’s tempting to flood the area with water to get the clay moving again, but too much water weakens the clay around the repair and can cause new cracks to form nearby as it dries. Use water sparingly and work slowly.
For cracks that appear during initial shaping, the repair is straightforward. Simply compress the crack closed with your fingers, add a tiny bit of moisture if needed, and smooth everything flush. The surrounding clay is still wet enough that the repair blends seamlessly.
For cracks discovered during the early drying phase when clay is leather-hard, you’ll need more intervention. Score both sides of the crack lightly, apply slip, press together, and smooth thoroughly. This creates a repair that’s as strong as the original clay.

Wet Crack Repair Techniques by Clay State
Fresh Clay (Just Shaped)
Clay State: Soft and fully pliable
Repair Method: Pinch crack closed with fingers, smooth surface with damp finger or tool. No additional materials needed.
Success Rate: Nearly 100% if done immediately
Leather-Hard Clay (Partially Dried)
Clay State: Firm but still slightly flexible
Repair Method: Score crack edges, apply slip, compress together, smooth thoroughly. May need to cover area overnight.
Success Rate: 90% with proper technique
Almost Dry Clay (Late Drying Stage)
Clay State: Hard with minimal flexibility
Repair Method: Rewet crack area thoroughly, apply thick paste of clay and water, compress and smooth. Will need extended drying.
Success Rate: 70% – may need dry repair later
Repair Dried Air Dry Clay Cracks That Got Away From You
Here’s the good news: a crack in a fully dried piece of air dry clay is not the end of the world. It’s fixable and with the right approach, the repair can be virtually invisible.
For hairline cracks, mix a small amount of air dry clay with water to create a smooth, fluid paste and work it into the crack with your finger or a fine brush. Let it dry completely, then sand lightly with fine-grit sandpaper. For larger cracks, use a proper air dry clay repair paste or a fine surface filler, let it cure fully, and sand smooth. Prime before painting to seal everything and the repair disappears completely.
The challenge with dried cracks is that the surrounding clay is no longer flexible. You’re essentially creating a patch that needs to bond to a rigid surface and withstand the same conditions that caused the original crack.
⚠️ Watch Out For: Trying to repair a dried crack with fresh clay straight from the packet without adding water. Dry clay applied to dry clay without a slip or paste to bond them will simply fall out as it dries. The repair needs moisture to adhere properly to the existing surface.
Repair Materials Comparison
| Repair Material | Best For | Dry Time | Sandable | Paintable |
| Clay + Water Paste | Hairline cracks, same-clay repairs | 12-24 hours | Yes | Yes |
| Wood Filler | Medium cracks, structural repairs | 2-4 hours | Yes | Yes |
| Epoxy Clay | Large cracks, load-bearing areas | 24 hours full cure | Yes (harder) | Yes |
| Acrylic Caulk | Wide cracks, flexible joints | 1-2 hours | Limited | Yes |
| Super Glue + Powder | Emergency fixes, small breaks | Instant | Difficult | Yes |
Step-by-Step Dried Crack Repair Process
- Clean the crack thoroughly by brushing away any dust or debris with a dry brush. This ensures good adhesion for your repair material.
- Assess the crack depth and width. Hairline cracks need thin paste. Deep cracks need multiple applications or structural filler.
- Mix your repair paste to the right consistency. For clay paste, aim for slightly thinner than toothpaste so it flows into the crack.
- Apply the paste by working it into the crack with a small brush, toothpick, or your finger. Push it in firmly to fill the entire depth.
- Overfill slightly, allowing the paste to mound above the surface. It will shrink as it dries and you’ll sand it flush later.
- Let it dry completely – at least 24 hours for clay-based repairs. Don’t rush this or the repair will fail.
- Sand the repair area with progressively finer sandpaper (start 150-grit, finish 220-grit) until perfectly smooth and flush with the surrounding surface.
- Prime the entire piece before painting. This seals the repair and creates a uniform surface that hides the fix completely.
Pro Trick: For cracks that keep reopening even after repair, the piece may have internal stress issues. Try this: apply repair paste, then immediately wrap the entire piece in plastic and let it sit for 48 hours. This allows moisture from the paste to penetrate and slightly rehydrate the surrounding area, relieving some of the stress that caused the crack.
Advanced Prevention Strategies for Crack-Free Clay Work
Beyond the core techniques we’ve covered, there are several advanced strategies that experienced clay workers use to keep their pieces crack-free. These tips address specific scenarios and project types that present unique challenges.

Working With Armatures
Armatures provide essential support for sculptures, but they can also cause cracks if not used properly. Wire, wood, or other core materials don’t shrink as the clay dries. This creates internal tension that leads to cracking around the armature.
The solution is to either wrap your armature in a slightly compressible material like foam or cotton, or keep the clay layer very thin and uniform around the wire. Some artists use epoxy clay for the innermost layer against the armature because it doesn’t shrink, then apply air dry clay over that stable base.
- Wrap wire armatures with masking tape or thin foam before applying clay
- Keep clay thickness around armatures to 6mm or less
- Build armature pieces to leave space for clay shrinkage
- Consider removable armatures for hollow forms
- Use aluminum foil cores that compress as clay shrinks
Climate Control and Seasonal Adjustments
Your local climate dramatically affects how air dry clay behaves. Summer humidity keeps clay workable longer but extends drying time. Winter heating systems create bone-dry air that cracks clay within hours.
In dry climates or winter months, consider these adjustments. Use a room humidifier while pieces dry. Extend plastic-covering time to three or four days. Mist the damp cloth daily when covering works in progress. Place a pan of water near drying pieces.
In humid climates, the opposite problem occurs. Clay can take weeks to dry fully, and mold becomes a risk. In this case, shorten covering periods. Use fans for gentle air circulation after the initial slow-dry phase. Consider dehumidifiers for your workspace.
Surface Treatments That Prevent Cracks
Some artists apply a thin coating of watered-down white glue to the surface of leather-hard clay. This creates a flexible barrier that helps hold the piece together as it finishes drying. The glue shrinks with the clay and doesn’t interfere with painting later.
Another approach is to lightly mist the entire piece with water every 12 hours during the first few days of drying. This keeps the surface from drying faster than the interior. Just don’t overdo it, too much water causes other problems.
Troubleshooting Common Air Dry Clay Problems
Even when you follow all the rules, sometimes things go wrong. Here are the most common issues crafters face with air dry clay and how to address them.
The Piece Warped While Drying
Warping happens when one surface dries faster than another, causing uneven shrinkage that bends the piece. This is especially common with flat pieces like tiles or plaques.
Prevention is similar to crack prevention. Dry on porous surfaces, cover during initial drying, and rotate the piece regularly. For tiles, sandwich them between two boards with light weight on top to keep them flat as they dry.
If a piece has already warped, you can sometimes correct it. Very lightly mist the concave side with water, cover with plastic, and let sit overnight. The moisture will cause that side to swell slightly. Then dry slowly with something flat and weighted on top.
Surface Is Rough or Flaky After Drying
This usually means the surface dried too quickly and the outer layer separated slightly from the inner clay. It can also happen if the clay wasn’t well-conditioned to start with.
Light sanding with fine-grit sandpaper fixes most surface issues. For more severe flaking, apply a thin coat of watered-down glue as a sealant, let dry, then sand smooth and prime before painting.
Edges Curled or Lifted
Thin edges dry much faster than the rest of the piece and curl up as they shrink. This is common on leaf shapes, thin bowls, and decorative tiles.
Prevent edge curling by paying extra attention to edges during drying. Keep them covered longer than the rest of the piece. Lightly mist edges daily for the first few days. Weight down edges gently if possible.
Clay Feels Dry But Cracks When Handled
This means the surface is dry but the interior still holds moisture. The piece isn’t fully cured yet. Moving it or adding stress at this stage causes cracks.
Always do the weight test before handling. Weigh your piece when you first make it and write down the weight. Check weight every few days. When it stops losing weight, it’s fully dry. For thick pieces, this can take two weeks.
Problem Indicators
- Piece feels cool to the touch (still moist inside)
- Sounds hollow when tapped but feels heavy
- Color is lighter on surface than when broken open
- Flexes slightly under gentle pressure
- Condensation appears inside plastic when covered overnight
Fully Dry Indicators
- Piece feels room temperature throughout
- Weight hasn’t changed in 2-3 days
- Color is consistent throughout if broken
- Completely rigid with no flex
- No condensation when wrapped overnight
Crack Prevention for Specific Project Types
Different air dry clay projects present unique challenges. Here’s targeted guidance for common project categories.

Bowls and Functional Pottery
Bowls are particularly prone to base cracks and rim warping. The round shape creates stress points, and the base usually ends up thicker than intended.
For bowls, roll your base slab thinner than the walls. Score the underside of the base in a star pattern to help moisture escape. Dry the bowl upside-down for the first day, then right-side-up for the rest of drying. This promotes even moisture loss from both surfaces.
Support the walls during drying by stuffing the interior loosely with crumpled plastic bags or bubble wrap. This prevents walls from collapsing inward but still allows air circulation.
Sculptural Figures and Animals
Figures with extended arms, legs, or thin parts present challenges. These thin extensions dry and shrink faster than the body, creating stress at the joints.
Build figures from the core outward, allowing each part to dry to leather-hard before adding the next. This staged approach lets each section stabilize before adding more weight or stress.
Use internal armatures wrapped in tape or foil. Keep the clay coating around armatures thin and consistent. Pay special attention to joints where thick body meets thin limbs.
Decorative Wall Art and Tiles
Flat pieces like tiles want to warp. The bottom surface trapped against the drying surface holds moisture longer than the exposed top surface.
Dry tiles on a raised screen or mesh that allows air under the piece. Flip tiles daily. Weight them between two flat boards if warping starts. Cut drainage grooves on the back to speed interior drying.
Jewelry and Small Detailed Work
Tiny pieces with fine details are delicate. Cracks in small work often happen during handling rather than drying.
Let small pieces dry completely before removing them from the work surface. Don’t try to flip or move them until fully cured. Drill holes for jewelry after drying rather than before, pre-made holes create weak spots.
Bowls & Vessels
- Thin base, thicker walls
- Dry upside-down initially
- Score base underneath
- Support walls during drying
Figures & Sculptures
- Build core first, add details later
- Use wrapped armatures
- Let parts dry to leather-hard between stages
- Thin clay on armatures
Tiles & Wall Art
- Dry on mesh or screen
- Flip daily
- Weight if warping occurs
- Add drainage grooves on back
Essential Tools and Materials for Crack-Free Results
Having the right tools makes crack prevention much easier. You don’t need expensive equipment, but a few key items will dramatically improve your success rate.
Must-Have Tools
- Rolling Guides: Wooden dowels or adjustable plastic guides ensure consistent slab thickness every time
- Spray Bottle: Fine mist spray for controlled moisture application during repairs and drying
- Thickness Gauge or Calipers: Measure clay thickness accurately, especially important for complex builds
- Scoring Tools: Forks, toothpicks, or dedicated scoring tools for preparing surfaces before joining
- Plastic Sheeting: Large sheets or bags for covering work in progress and controlling drying
- Damp Cloths: Cotton or microfiber cloths for keeping pieces moist between sessions
- Porous Drying Boards: Unfinished wood, foam board, or drywall pieces for proper drying surfaces
- Fine Sandpaper: 150-220 grit for smoothing repairs and finishing dried pieces
Helpful But Optional
- Small kitchen scale for tracking piece weight during drying
- Humidity meter to monitor workspace conditions
- Heat gun for emergency drying (use with extreme caution)
- Lazy Susan or turntable for even drying access
- Storage containers for keeping works in progress
Clay Selection Matters
Not all air dry clays are created equal. Some brands are more crack-resistant than others. Paper-based air dry clays tend to be more flexible and crack less than pure mineral clays. They’re also lighter and easier to sand.
Polymer-modified air dry clays have additives that improve flexibility and reduce cracking. They cost more but offer better results for complex projects or thin sculptures.
For structural pieces or anything with an armature, consider using epoxy clay for the core and air dry clay for surface details. Epoxy clay doesn’t shrink, eliminating that source of stress entirely.
Knowing When to Repair Versus Starting Fresh
Sometimes a piece is so badly cracked that repair isn’t worth the effort. It’s important to recognize when you’re better off learning from the experience and starting a new piece.
Consider starting over if the piece has multiple large cracks in structural areas. If repairs will take longer than making a new piece. If the cracks have caused significant shape distortion. Or if this is a practice piece and you now know how to avoid the problem.
On the other hand, repair is worthwhile when the crack is isolated and doesn’t affect the overall form. When you’ve invested significant time in surface details or texture. When it’s a commissioned piece or gift with sentimental value. Or when the piece is a learning opportunity for repair techniques.
Signs You Should Repair
- Single crack or limited cracking area
- Crack is in a non-structural decorative area
- Overall shape and proportions are still intact
- Significant time invested in details or texture
- Piece has sentimental or commissioned value
- Good learning opportunity for repair skills
Signs You Should Start Over
- Multiple large cracks throughout the piece
- Structural integrity is compromised
- Significant warping or shape distortion
- Repair time would exceed remake time
- Cracks reopened after previous repair attempts
- This is early practice work with many issues
Remember that every cracked piece teaches you something valuable about how clay behaves. Even if you decide not to repair it, examine the piece carefully. Where did the cracks form? What part of the process might have caused them? That knowledge prevents cracks in your next project.
Moving Forward With Confidence
Cracks in air dry clay are frustrating, but they’re almost never a reason to give up on a piece or abandon a project. Once you understand that cracks are a drying problem rather than a making problem, the whole thing becomes so much more manageable.
Slow down the drying process. Keep the thickness even throughout your work. Use slip on your joins. Cover your work between sessions. These simple changes prevent the vast majority of cracking issues.
And when a crack does sneak through? You now know exactly how to fix it, whether it’s fresh or fully dried. With the right approach, most repairs become completely invisible once the piece is finished and painted.

Start with one tip from this list on your next air dry clay project. Maybe it’s using rolling guides for even thickness. Maybe it’s covering your piece during the first 48 hours of drying. Maybe it’s simply slowing down and being more intentional about moisture control.
I promise it makes a difference immediately. And before long, crack-free air dry clay work will just be how you create. The techniques become automatic. The awareness of moisture and drying becomes second nature. And those frustrating morning discoveries of overnight cracks become rare exceptions rather than regular occurrences.
You’ve got this. Your next piece is going to turn out beautifully.
Quick Fix Cheat Sheet
Because sometimes you just need the answer fast — here’s everything you need to know in one place.
| Problem | Cause | Fix |
|---|---|---|
| Hairline crack appearing while drying | Drying too fast | Cover loosely with plastic wrap, slow it down immediately |
| Deep split opening up overnight | Uneven thickness in the piece | Fill with clay paste, smooth, re-cover and dry slowly |
| Edges curling up as it dries | Drying on a non-porous surface | Move to drywall or foam board, flip gently every few hours |
| Join cracking where two pieces meet | No slip used, or scoring skipped | Re-wet the join, work slip in, smooth and re-cover |
| Base cracking while walls are fine | Base too thick compared to walls | Score the underside, slow the drying, fill cracks with paste |
| Cracks appearing in a fully dried piece | Dried too fast or unevenly | Sand lightly, fill with clay paste or fine filler, sand again when dry |
| Fresh repair falling out after drying | Repair applied without slip or paste | Re-do with watered-down clay paste to bond properly |
| Crack forming mid-session | Clay drying out between sessions | Work water in gently, smooth closed, cover between sessions |
The golden rules to remember:
- 🐢 Slow is everything. Most cracks are a drying speed problem, not a making problem.
- 📏 Even thickness saves projects. Thin edges and thick centres are a crack waiting to happen.
- 💧 Slip every join, every time. Score, slip, smooth — no exceptions.
- 🛡️ Cover between sessions. Damp cloth, then plastic bag, every single time you walk away.
- ⚡ Act fast when you see a crack forming. Thirty seconds wet versus thirty minutes dry — catch it early.