Easy Block Printing With Everyday Items You Already Own (No Carving Required!)

Hands up if you have ever looked at a beautiful block-printed fabric and thought “I could never do that.” I was that person. And then someone told me that a celery stalk cut at the base makes a perfect rose stamp and I genuinely could not get to the kitchen fast enough. 😂
That one piece of information sent me down the most wonderful rabbit hole of easy block printing with things I already owned. What I found completely changed how I think about this craft.
You do not need carving tools. You do not need special equipment. You do not need to buy a single thing before your first print.
Your kitchen, your bathroom cupboard and your recycling bin are full of the most brilliant, completely free stamps just waiting to be discovered. This is the beginner’s guide to relief printing with everyday items, the ones already in your home, right now, today. Let’s go. 🌿
Why Everyday Items Make the Best Block Print Stamps
Here’s the thing that makes found-object printing so magical. Everyday items create prints that look organic, interesting and completely unique in a way that even the most carefully carved block sometimes can’t.
The imperfect edge of a cork. The beautiful symmetry of a cut apple. The delicate lace-like pattern of a bubble wrap sheet.
These are textures and shapes that nature and manufacturing created. They’re genuinely stunning when transferred onto fabric or paper with a little paint.
Easy block printing with found objects is also — and I cannot stress this enough — completely free to start. You are not buying anything for your first print.
You are going to your kitchen, your recycling bin and your craft drawer. You are printing with what you find there. The only thing you need to purchase is a bottle or two of fabric paint or acrylic paint, and even that costs just four to eight dollars.
This is the most accessible version of an already accessible craft. Beginner-friendly doesn’t even begin to cover it. ✨
Your Home Is Full of Stamps: The Ultimate Found Object List
Before we get into the process, let’s talk about what you’re actually going to stamp with. Here is your scavenger hunt list, go and gather these before you start.
From the Kitchen
Vegetables & Fruits
These natural items create the most beautiful organic prints with zero carving required.
- Celery stalk cut straight across the base, creates a stunning rose or peony-like print
- Apple or pear cut in half horizontally, reveals a beautiful star pattern inside
- Citrus fruits, lemon, lime or orange cut in half, creates a gorgeous citrus slice print
- Corn on the cob, roll it across paper or fabric for beautiful all-over textured patterns
Kitchen Tools
Common kitchen items become instant printing tools with interesting shapes and textures.
- Mushroom cap, press the underside (the gills) into paint for incredible organic fan prints
- Broccoli floret, press the top into paint for beautiful tree or cloud-like prints 🌳
- Cookie cutters, press the edge into paint for perfect geometric or shaped outlines
- Fork tines dragged through wet paint for lined texture effects
Recycling Bin Treasures
Don’t throw these away, they make perfect relief printing stamps.
- Wine corks, flat end for circles, side for rectangles, carved slightly for simple shapes
- Cardboard tubes, toilet rolls and paper towel tubes cut into shapes create perfect stamps
- Bottle caps, both the flat inside and ridged outside create interesting prints
- Bubble wrap, press into paint and stamp for all-over dot texture 🫧
Craft & Garden Items
These natural and household materials create stunning botanical and textured prints.
- Leaves of all kinds, press the underside where veins are more pronounced into paint
- Cotton reels or thread spools, flat ends create perfect circles with ridged patterns
- Rubber bands wrapped around a toilet roll, creates beautiful striped cylindrical stamps
- Flowers, seed pods and pine cones, press or roll through paint for organic textures
What You’ll Need to Get Started
The supply list for found-object block printing is genuinely the shortest in all of crafting. Here’s everything you need for your first printing session.
Essential Materials
- Paint – fabric paint for fabric projects (four to eight dollars per bottle), acrylic paint for paper projects (three to six dollars). One bottle goes a very long way.
- A palette – an old ceramic plate, a piece of glass, a disposable foil tray. Free from your cupboard.
- Your found object stamps – completely free, already in your home right now.
- Something to print on – paper for practice, then fabric, cards or gift wrap for proper projects.
- A foam brush or small roller for applying paint to your stamp evenly (three to five dollars from a craft store, or use a scrunched piece of sponge).
- An iron for heat-setting fabric prints to make them permanent and washable.
Total cost to start: seven to thirteen dollars if you need to buy paint and a brush. That is genuinely it. 🙌
Recommended Starter Supplies
While you can start with absolutely anything, these three items will give you the best results for your first projects
Fabric Paint Set
Tulip Soft Fabric Paint in assorted colors. Permanent, washable, and works beautifully on cotton, linen, and canvas. Perfect for tea towels, napkins, and tote bags.
Price: Around eight dollars for a starter set
Foam Roller & Brush Set
Small foam roller with handle plus assorted foam brushes. Creates even paint coverage on stamps every time. Washable and reusable for hundreds of prints.
Price: Around five dollars for a complete set
Plain Cotton Fabric
Pack of plain white cotton tea towels or natural linen fabric squares. Pre-washed and ready to print. Perfect surface for your first block printing projects.
Price: Around twelve dollars for a pack of four
How to Get a Great Print Every Time: The Basic Printing Technique
Before we get into the projects, here’s the printing technique that makes the difference between a frustrating first attempt and a brilliant one. This process works for every found object stamp.
The Six-Step Printing Process
- Prepare your stamp. If using a fruit or vegetable, pat the cut surface dry with a paper towel first. Excess moisture dilutes the paint and creates a weak, watery print. Dry surface equals good print.
- Load your stamp. Pour a small amount of paint onto your palette and spread it into a thin, even layer. Press your stamp into the paint gently. You want a thin, even coat of paint on the surface of your stamp. Not thick and gloopy. Thin and even.
- Do a test print. Always do your first print on a piece of scrap paper. This shows you how much paint you have, whether the coverage is even, and what the design actually looks like. Adjust paint amount as needed.
- Press and lift. Place your stamp paint-side down onto your surface. Press firmly and evenly, don’t rock or drag. Then lift straight up cleanly. No sliding. Straight up.
- Reload between prints. Most stamps need fresh paint after every one to two prints. Re-dip in paint as needed, always testing on scrap paper first.
- Heat set fabric prints. Once completely dry, press with a hot iron using a cloth between the iron and your print for two minutes to permanently set fabric paint. Without this step it will wash out. 🌿
Pro Tip: The single most common mistake in easy block printing is using too much ink or paint. A thin, even layer creates clean, crisp prints. A thick layer creates blurry, messy prints. When in doubt, use less paint than you think you need.
Six Beautiful Block Print Projects Using Everyday Items
Now for the fun part. Here are six beginner-friendly projects that look genuinely impressive but cost almost nothing to make. Each one uses different household stamps and techniques.
Project 1: Citrus Print Gift Wrap
Cut a lemon, lime and orange in half. Pat the surfaces dry thoroughly.
Load with paint, try yellow for lemon, green for lime, orange for orange, or go monochrome in a single color for a sophisticated look. Stamp all over a sheet of brown kraft paper or white cartridge paper in a loose, scattered arrangement.
Overlap prints, vary the spacing, turn the fruit at different angles. The result is the most beautiful, completely unique wrapping paper that costs practically nothing and looks like it came from a boutique stationery shop.
Budget tip: A roll of brown kraft paper from the post office or craft store costs five to eight dollars and makes enough wrapping paper for dozens of gifts. Your stamp cost: the price of a lemon. 🍋
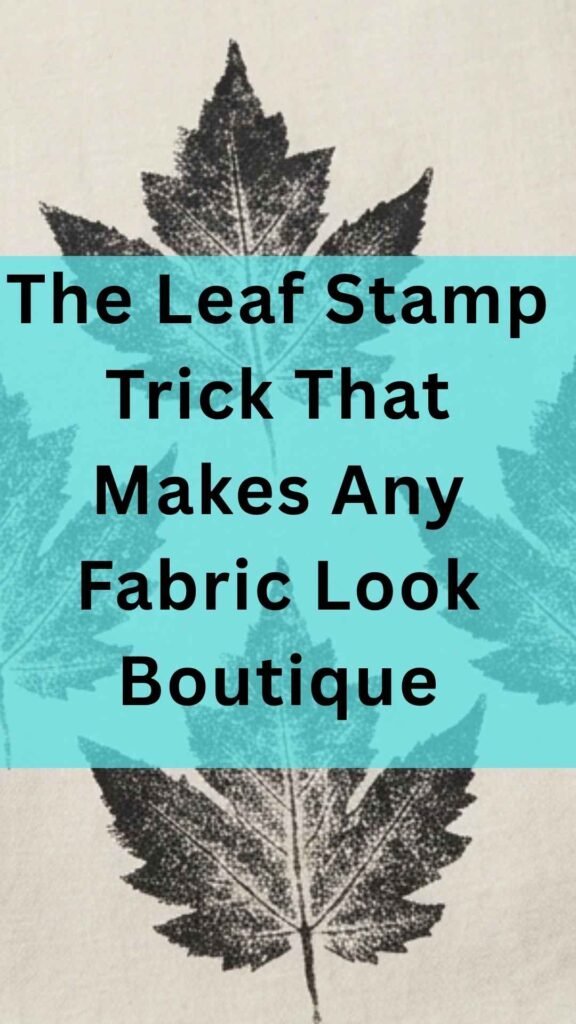
Project 2: Leaf-Printed Tea Towels
Go outside and collect leaves in different sizes and shapes. Look for ones with interesting outlines and pronounced veins on the underside.
Lay your tea towel flat on a firm surface with cardboard slipped inside. Apply fabric paint to the underside of your leaf with a foam brush. Cover it evenly all the way to the edges.
Place it paint-side down onto your tea towel, cover with a piece of scrap paper, and press firmly across the whole surface with your hand or a rolling pin. Peel back carefully to reveal your print.
Repeat across the tea towel in a scattered pattern, alternating sizes and leaf types. The result looks genuinely beautiful — like a botanical illustration printed on linen. Heat set with an iron when dry. 🍃
Project 3: Celery Rose Napkins
This is the project that started my whole found-object printing obsession and it remains one of my absolute favorites.
Cut a bunch of celery about five centimeters from the base. Pat dry thoroughly. Load the cut surface with pink, red or cream fabric paint.
Press firmly onto a plain linen napkin and lift. There is your rose. It is astonishing how much it looks like a proper flower print.
Scatter three or five celery roses across a napkin in a loose arrangement. Add a few leaf prints from small leaves if you want to get fancy. You have the most beautiful set of hand-printed napkins that people will assume cost a fortune.
Make a set of four for a gorgeous housewarming gift. 🌹
Project 4: Bubble Wrap Canvas Art
This one is genuinely so fun and the results look like proper abstract art.
Cut a piece of bubble wrap to whatever size you want your artwork to be. Apply paint generously across the bubble side using a foam roller. Use two or three complementary colors applied in sections for a beautiful painterly effect.
Lay a piece of watercolor paper or canvas paper paint-side down onto the bubble wrap. Press firmly across the whole surface, then peel back to reveal your print.
The bubble pattern creates the most gorgeous textured effect. It looks somewhere between a painting and a relief print and it is completely unique every single time. Frame it. Put it on your wall. Accept all compliments graciously. 😂
Budget tip: Watercolor paper pads are six to twelve dollars at craft stores and give you many prints. Bubble wrap: free from your last online order.
Project 5: Cork-Stamped Stationery
Wine corks are one of the most versatile found-object stamps there is. The flat end makes a perfect small circle.
With a sharp knife you can cut simple shapes into the end in about two minutes without any special carving tools. A simple triangle. A small star. A tiny heart. A leaf outline.
Use a set of cork stamps with acrylic paint on plain white cards to make the most beautiful set of handmade note cards. Stamp in a repeating geometric pattern, a scattered botanical arrangement, or a simple border design.
Package them in a set of six tied with twine for a handmade gift that looks genuinely impressive. 🌿
Project 6: Broccoli Stamped Kids’ Fabric
This one is brilliant if you have children. Broccoli florets pressed into paint make the most beautiful tree-shaped prints that kids absolutely love making.
Use a white or natural cotton pillowcase, a plain tote bag, or a piece of calico fabric. Set up a palette with two or three paint colors.
Let the kids stamp to their hearts’ content, trees, forests, abstract all-over patterns. Heat set with an iron when dry.
The results are genuinely adorable, the process is completely joyful, and you have a unique piece of fabric art that doubles as the best kind of keepsake. Plus broccoli: two dollars. Can’t argue with that. 🥦
Do’s and Don’ts: What Gets You the Best Results
Here are the most important tips for successful easy block printing with everyday materials. These are the things that make the difference between okay prints and genuinely beautiful ones.
Do These Things
- Do pat fruit and vegetables dry before stamping. Moisture is the enemy of a clean print. Always pat your natural stamp dry with a paper towel before loading with paint.
- Do use thin, even layers of paint. The single most common printing mistake is too much paint. Thin layer equals clean print. Thick layer equals blurry print. Less is always more.
- Do work on a hard, flat surface. A soft or uneven surface underneath your fabric or paper absorbs the pressure unevenly and creates patchy prints.
- Do reload your stamp frequently. Natural object stamps, especially fruit and vegetables, absorb paint as you work and need reloading more often than carved blocks or rubber stamps.
- Do let layers dry before adding more. If you’re building up a design with multiple stamps or colors, let each layer dry completely before adding the next.
- Do make multiples. Once your setup is done and you’re in a rhythm, make six napkins instead of one. The incremental effort is tiny and the results are so satisfying as a collection.
Don’t Do These Things
- Don’t use too much paint. This is in the do’s too because it is that important. The number one issue is excess ink or paint causing blurry prints. Roll excess paint off on your palette before stamping.
- Don’t expect perfect uniformity. Found-object printing is organic and imperfect by nature and that is completely the point. Each print will be slightly different. This is not a flaw, this is what makes it beautiful and handmade.
- Don’t use food items as stamps for very long projects. Fruit, vegetables and other natural materials will start to break down after a session or two. Corks, cardboard and bubble wrap will last much longer. 🌿
- Don’t skip the cardboard insert. Any time you’re printing on something with two layers, a tote bag, a pillowcase, a folded tea towel,slip a piece of cardboard inside first to prevent bleed-through.
- Don’t wash fabric prints before heat setting. Fabric paint is not washable until it’s been heat set with an iron. Let it dry completely first, then iron, then wash. Skip the iron and your beautiful print goes down the drain. 😅
- Don’t buy anything before your first print. Seriously. Gather your everyday items, grab a plate and some paint you already have, and just start. Fall in love with it first, then invest in supplies later.
Advanced Tips and Relief Printing Techniques
Once you’ve mastered the basic stamping process, these techniques will take your prints to the next level. These are the details that make professional-looking results.
Layering Multiple Colors
Create depth and interest by printing multiple colors in layers. Start with the lightest color first, let it dry completely, then add darker colors on top.
This technique works beautifully for creating leaf prints with different green tones or citrus prints with yellow centers and orange edges. Let each layer dry for at least twenty minutes before adding the next.
Creating Patterns and Repeats
For all-over patterns on fabric, create a simple grid with light pencil marks as guides. Stamp in rows, keeping consistent spacing between each print.
Alternate the orientation of your stamp, turn it forty-five degrees or flip it, for more visual interest. This works especially well with geometric shapes from cookie cutters or cork stamps.
Mixing Stamps for Complex Designs
Combine different household stamps in one design for beautiful compositions. Print celery roses, then add cork dot centers. Print leaf shapes, then add fork-tine texture details around them.
The key is to work from large shapes to small details. Print your main design elements first, let them dry, then add the fine details and textures.
Technique Tip: For precise placement when layering or creating patterns, do a test print of each stamp on tracing paper first. You can then position the tracing paper over your fabric to see exactly where the print will land before committing to the actual stamp.
Common Block Printing Problems and How to Fix Them
Even experienced printers encounter issues. Here’s how to solve the most common problems with found-object stamps and relief printing materials.
| Problem | Cause | Solution |
| Blurry, unclear prints | Too much paint or ink on stamp | Use less paint. Roll excess off on palette before stamping. Aim for thin, even coverage. |
| Patchy, incomplete prints | Not enough paint or uneven pressure | Reload stamp with more paint. Press down firmly and evenly across entire surface without rocking. |
| Paint bleeding under stamp edges | Stamp surface too wet or too much paint | Pat stamp dry if using fruit or vegetables. Use less paint. Press straight down without sliding. |
| Prints washing out of fabric | Fabric paint not heat-set properly | Let prints dry completely. Iron on high heat with cloth barrier for two full minutes to set permanently. |
| Stamp breaking down quickly | Natural materials deteriorating from moisture | Pat stamp dry between prints. Use fresh fruit or vegetables for each new project. Switch to cork or rubber for longer sessions. |
Budget Summary: What This Craft Actually Costs
One of the most appealing aspects of easy block printing with household items is how affordable it is to start and maintain. Here’s the honest breakdown of costs.
Initial Investment
- First print session: Zero dollars if you have any paint at home. Under eight dollars if you need to buy a bottle of fabric paint.
- Basic toolkit: Twelve to twenty dollars for paint, foam brush, and plain fabric if starting from scratch.
- Found object stamps: Completely free, already in your kitchen and recycling bin.
Ongoing Costs Per Project
- Gift wrap project: Under two dollars for kraft paper plus the cost of a lemon.
- Tea towel set (four towels): Twelve dollars for plain towels, one dollar for paint, leaves free from garden. Total: thirteen dollars for a gift worth forty dollars retail.
- Canvas art: Three to six dollars for watercolor paper, bubble wrap free. Total: under six dollars for framed art.
- Stationery set: Five dollars for blank cards, wine corks free. Total: five dollars for twelve handmade cards.
Optional Upgrades When You’re Hooked
None of these are necessary to start. All of them are lovely to have eventually as you explore more advanced printmaking techniques. 💚
- A proper soft-cut carving block: three to six dollars
- Carving tools for linoleum block printing: eight to fifteen dollars
- A brayer (roller) for even pressure: five to ten dollars
- More paint colors and screen printing ink: four to eight dollars each
- Specialty printing fabric like linoleum or easy carve rubber: six to twelve dollars
Cost Comparison: A single store-bought hand-printed tea towel typically costs fifteen to thirty dollars. You can make a set of four custom printed tea towels for under fifteen dollars total using this method. The savings are genuinely substantial for handmade gifts and home decor.
Start Your Block Printing Journey Today
The best thing about easy block printing with everyday items is that it completely removes every barrier between you and a genuinely beautiful craft.
No expensive tools. No steep learning curve. No trip to the craft store before you can begin.
Just a celery stalk and a plate of paint and your kitchen table and an afternoon. The most satisfying, impressive results you’ve ever made with so little.
Your recycling bin has never been so exciting. The process of relief printing has never been more accessible.
Whether you’re exploring basic stamp techniques or advancing to linoleum block printing later, this foundation in found-object printing will serve you well. The principles are the same — ink or paint, pressure, surface, design.
Go find your stamps and make something wonderful. 🌿✨