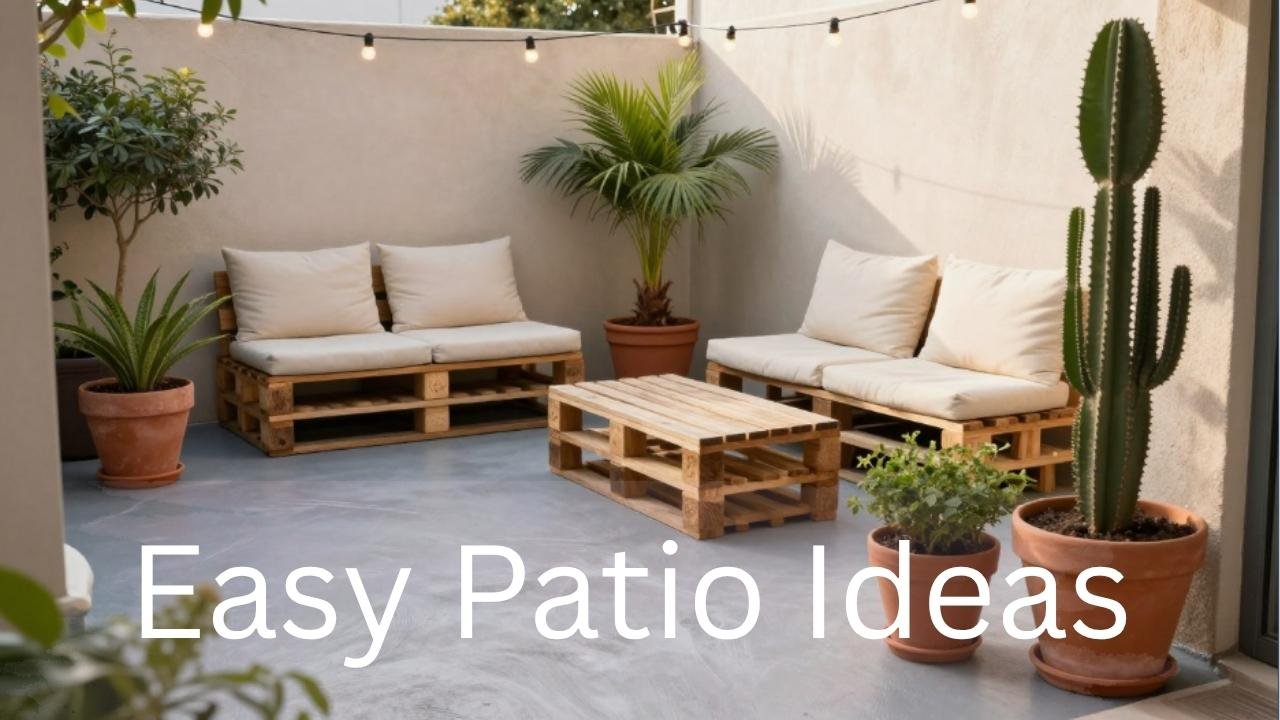
10 DIY Easy Patio Ideas on a Budget
Can I tell you about the weekend I accidentally became a patio person? Because it genuinely was not planned. I had a free Saturday, a tin of leftover outdoor paint, approximately zero dollars to spend, and a patio that had been quietly judging me for months. I thought I would give it a couple of hours.
Six hours later I was still out there, completely covered in paint, rearranging pots in the golden hour light and feeling like an absolute genius. 😂
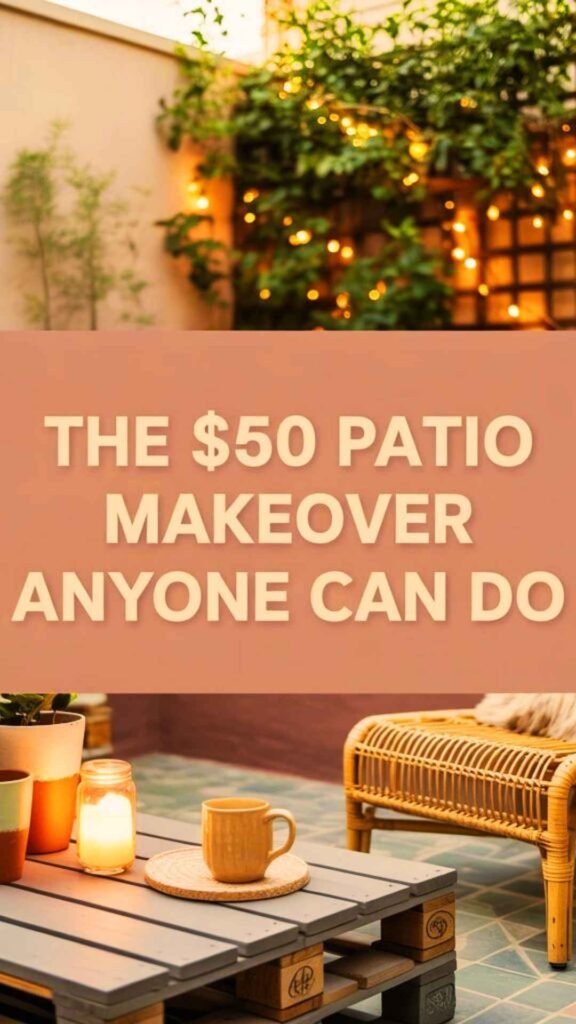
That weekend taught me something I now believe very firmly. The best patio transformations are not the ones with the biggest budgets. They are the ones where someone got creative with what they had, learned a couple of simple DIY tricks, and put in a few hours of genuinely satisfying work. Easy patio ideas on a budget are not a compromise on the dream. They are the dream.
Because there is something so deeply satisfying about sitting in an outdoor space you created with your own hands, knowing exactly what everything cost and how you made it. This guide is for anyone who has a sad little patio, a small budget, and a willingness to try. You do not need DIY experience. You do not need special tools. You just need a few good ideas and an afternoon. Let’s go. 🌿
Everything You Need Is Within Reach
The best part about transforming your outdoor space? You probably already have half the materials sitting in your garage. Your dream patio doesn’t require a massive budget, just a willingness to start with one simple project today.
Before You Start: The Beginner’s Patio Prep Checklist
Before any of the fun stuff, there are a few things worth doing that will make everything else easier and look better. Think of this as your patio reset.
Clean Everything First
A pressure wash or a good scrub of your patio surface, furniture and walls costs nothing but time and makes an enormous difference. Grime and weathering make everything look worse than it is.
Start clean and you will see your space’s real potential. Even just a stiff broom and bucket of soapy water can transform a grimy patio into something that looks ready for a makeover.
Assess What You Already Have
Walk around your home and gather anything that could work outside. Unused pots, candles, cushions, small tables, string lights, timber offcuts, old tins.
You almost certainly already own things that could be repurposed beautifully. I found three perfectly good plant pots in my shed that I had completely forgotten existed, plus a roll of fairy lights from last Christmas. 🎄
Measure Your Patio Space
A quick measure with a tape measure before you buy or make anything saves you from the heartbreak of a rug that is too small or furniture that does not fit.
Write down your dimensions and keep them in your phone. Measure the total area, but also measure specific zones where you want seating, a table, or planters.
Pick a Color Palette
Decide on two or three colors before you start and stick to them across everything you make and buy. A cohesive palette is what makes a DIY patio look designed rather than random.
My favorites for outdoors are terracotta, sage and cream. Or navy, white and natural wood. Or blush, charcoal and brass. Pick yours and it will guide every decision. When you are standing in the paint aisle wondering which shade to choose, your palette makes the choice obvious.
Budget Tip: Take photos of your patio space on your phone before you start. You will want the before photos later, and they also help you visualize what the space needs when you are shopping for materials or planning your next project.
Easy Patio Ideas on a Budget: The DIY Projects
These are the projects that will completely transform your outdoor area without emptying your wallet. Each one is genuinely achievable in an afternoon, requires minimal tools, and costs less than a meal out.
Start with whichever project excites you most. There is no right order. Just pick the one that makes you think “yes, I could actually do that” and begin there.
1. Paint Your Patio Floor
This is the single most transformative easy patio idea on a budget and it costs as little as fifteen to twenty-five dollars in materials like paint and supplies.
A painted patio floor takes a plain, tired concrete or paving surface and turns it into an actual design feature. And it is so much more achievable than it sounds.
What You Need
- Concrete or patio paint in your chosen color (fifteen to twenty-five dollars for a small tin, enough for a compact patio space)
- A stiff broom or brush for cleaning the surface thoroughly
- Painter’s tape for creating clean edges and patterns
- A paint roller with an extension handle for easy application
How to Do It
Clean your patio surface thoroughly and let it dry completely. This is crucial for the paint to adhere properly and last for years rather than months.
Tape off any edges you want to keep clean using painter’s tape. Press the tape down firmly to prevent paint bleeding underneath.
Apply your patio paint in long, even strokes with the roller, working away from the house so you do not paint yourself into a corner. Yes, this is a thing that happens and yes, I have done it. 😂
Two coats gives the best result. Let the first coat dry completely before applying the second. This usually takes about four to six hours depending on weather conditions.
For extra impact, use painter’s tape to create a geometric pattern. A simple grid of squares, a diamond pattern, or a border around the edge all look incredible.
Paint inside the taped sections for a tile effect that looks like you spent hundreds on professional paving.
Budget Tip: Patio paint goes on sale at the end of summer at most hardware stores. Buy then and store it for your spring project. I got mine for half price in September and kept it in the garage until April. 🎨
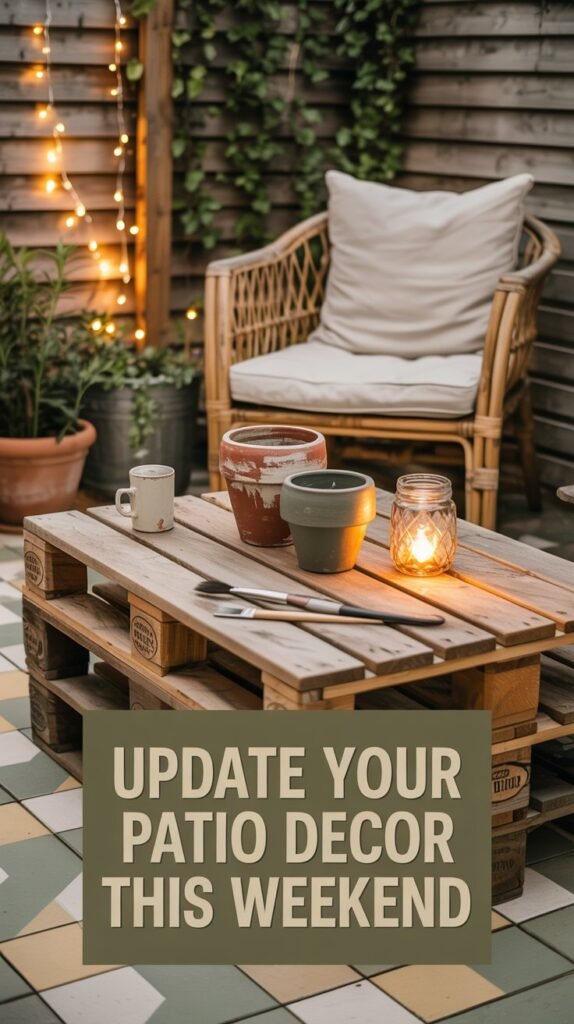
2. Build a Simple Pallet Furniture Piece
Timber pallets are one of the greatest gifts the DIY world has ever received. They are sturdy, they are often free, and with a bit of sanding and some outdoor paint or stain they become genuinely beautiful outdoor furniture.
Check local businesses, Facebook marketplace, or hardware stores. Many give pallets away for free. Just make sure you get heat-treated pallets marked with HT rather than chemically treated ones marked MB.
The Easiest Pallet Project for Beginners: A Pallet Coffee Table
This is the perfect first furniture project. It requires minimal tools, takes about two hours, and gives you a piece you will use constantly in your outdoor area.
What You Need
- One standard timber pallet (free to ten dollars depending on source)
- Sandpaper in medium and fine grit for smoothing
- Outdoor paint, stain or decking oil (ten to twenty dollars from any hardware store)
- Four small castors with screws, optional but makes the table moveable (eight to fifteen dollars)
- A paintbrush or cloth for applying finish
How to Do It
Sand the pallet thoroughly. Start with medium grit sandpaper to remove splinters and rough patches, then finish with fine grit for a smooth surface. This step is essential for safety and appearance.
Wipe away all dust with a damp cloth and let the wood dry completely. Any dust left on the surface will create bumps in your paint or stain.
Apply your paint, stain or oil in the direction of the wood grain. Let it dry completely, then apply a second coat for durability and depth of color.
If adding castors, screw them into the underside of the pallet at each corner. Pre-drill the holes if the wood is very hard to prevent splitting.
That is it. You have a coffee table. 🙌
Level Up: Simple Outdoor Sofa Base
For a simple outdoor sofa base, stack two pallets on top of each other and secure them together with wood screws through the top pallet into the bottom one.
Add an outdoor cushion on top for the seat. Lean a third pallet upright behind as a backrest and secure it with metal L-brackets from the hardware store.
The whole thing costs under thirty dollars if you source pallets for free and uses outdoor cushions you already own or find cheaply at discount stores.
Essential Patio Paint & Supplies
Quality outdoor concrete paint is the foundation of a stunning patio transformation. Look for weather-resistant formulas that can handle sun, rain and foot traffic. A good roller with extension handle saves your back and speeds up the job considerably.
What to Look For:
- Concrete or masonry-specific outdoor paint
- UV-resistant and weatherproof formula
- Non-slip additives for safety when wet
- Coverage: typically 10-12 square meters per liter
Budget Range: $15-$35 for paint, $8-$15 for quality roller and tape
3. Make Your Own Painted Terracotta Pots

This is one of my all-time favorite easy patio ideas on a budget because it is quick, satisfying, completely beginner-friendly, and the results look like something you would pay thirty dollars each for in a homewares boutique.
Painted terracotta pots in a cohesive palette are one of the fastest ways to make a patio look designed and intentional rather than random.
What You Need
- Plain terracotta pots from dollar stores, discount garden centres, or thrift shops (one to four dollars each)
- Outdoor acrylic paint or chalk paint (five to ten dollars for a small pot that goes a long way)
- Painter’s tape for creating geometric designs
- A sponge brush or regular paintbrush for application
- Outdoor sealer or varnish, optional but extends the life of the paint (eight to twelve dollars)
Design Ideas to Try
Solid color in your palette shade is simple, beautiful, and effective. This is my go-to for a cohesive garden look.
Color-dipped pots are achieved by painting just the bottom third of the pot in a contrasting color for a modern dipped effect. Use painter’s tape to create a clean line.
Geometric stripes use painter’s tape to create clean horizontal or diagonal stripes in alternating colors. Remove the tape while the paint is still slightly wet for the crispest lines.
Scalloped edge designs use tape or a coin to trace and paint a scalloped border around the rim. This looks particularly beautiful in white or cream on natural terracotta.
Terracotta left natural with just a white or cream painted rim is understated and gorgeous. It gives the pots a finished look without covering the beautiful natural clay color.
Budget Tip: Buy pots in three different sizes and paint them in variations of the same color. Light, mid and dark tones of the same shade create a collected, cohesive look that costs under fifteen dollars total. 🌿
Application Tips
Clean your pots first with soapy water and let them dry completely. Terracotta is porous and any dirt will show through the paint.
Apply paint in thin coats rather than one thick coat. Two or three thin coats give better coverage and a smoother finish than one heavy application.
Let each coat dry completely before adding the next. This prevents smudging and gives you the most professional-looking result.
If using outdoor sealer, apply it as a final coat once your design is completely dry. This protects your work from rain and UV fade.
4. DIY a Trellis Screen for Privacy and Beauty
A trellis screen solves two problems at once. It adds privacy to your small patio space AND gives you a beautiful vertical structure for climbing plants, hanging pots and string lights.
And you can make a really effective one for twenty to thirty-five dollars using basic materials from the garden centre or hardware store.
What You Need
- Four timber stakes or fence posts, 1.8 meters tall (three to five dollars each from hardware stores)
- Bamboo canes or thin timber dowel for creating the grid (five to ten dollars for a bundle)
- Jute twine or garden wire for securing the structure
- Two large pots filled with gravel or concrete to anchor the posts, or attach directly to an existing fence
- Optional: climbing plant seedlings like jasmine, sweet pea or climbing rose (three to five dollars each)
How to Do It
Stand your two upright posts in large pots filled with gravel or post-mix concrete. Space them the width you want your screen to be, typically 1.2 to 1.8 meters apart.
Once the posts are stable and the concrete has set if using it, attach your horizontal bamboo canes or dowel across the uprights at regular intervals. Every fifteen to twenty centimeters works well.
Secure each intersection with jute twine tied in a simple knot or with garden wire twisted tight. The natural jute looks beautiful and weathers well outdoors.
Weave vertical canes through the horizontals to complete the grid pattern. This creates the classic trellis look and provides plenty of attachment points for plants.
Plant a fast-growing climbing plant at the base. A jasmine, a sweet pea, or a climbing rose will all work beautifully. Within a season you will have a living green wall providing privacy and fragrance.
In the meantime, hang a string of solar fairy lights through the grid for an instant beautiful effect that makes your outdoor area feel magical in the evenings. ✨
Plant Choices for Quick Coverage: Sweet peas grow incredibly fast and smell amazing but are annuals. Jasmine is evergreen in most climates and smells divine. Climbing roses take longer to establish but are stunning once mature. Morning glory grows like crazy but can be invasive in some areas, so check before planting.
5. Create a DIY Outdoor Lantern Cluster

Lanterns are one of the most atmospheric additions to any outdoor space and making your own is much simpler than you would think.
A cluster of lanterns in different heights creates the most beautiful evening atmosphere on a small patio. And the whole thing can cost under twenty dollars if you save jars and source materials carefully.
The Simplest Version: Glass Jar Lanterns
This is the version I made first and I still think it is the most charming. There is something lovely about repurposing jars that would otherwise be recycled into something genuinely beautiful.
What You Need
- Glass jars in various sizes including pasta sauce jars, pickle jars, or mason jars (free if you save them, or one to two dollars at thrift stores)
- Wire for handles, either florist wire or thin craft wire (three to five dollars for a roll)
- Tealight candles or flameless LED tealights for safety (three to eight dollars for a pack)
- Optional: glass paint, frosted spray paint, or glue and tissue paper for decorative effects (five to eight dollars)
How to Do It
Clean your jars thoroughly and remove all labels. Soaking them in warm soapy water for twenty minutes makes label removal much easier.
If you want to decorate them, you have several beautiful options. Apply glass paint directly to the outside for solid color sections.
Spray with frosted spray paint for a soft diffused glow that looks like expensive frosted glass. Or tear small pieces of colored tissue paper and glue them to the outside with diluted PVA glue for a beautiful stained glass effect.
Let your decorated jars dry completely. This is especially important if using glue, as any moisture will cause issues later.
Create a wire handle by wrapping wire around the neck of the jar twice and twisting to secure. Then bend the remaining wire up into a loop handle, securing the end by wrapping it back around the neck.
Add your tealight to each jar. Flameless LED tealights are safer, never blow out in the wind, and last for months on a single battery. I strongly recommend them for outdoor use. 🕯️
Hang your lanterns from hooks, shepherd’s crooks, or a simple horizontal dowel suspended between two posts. Cluster three to five lanterns at different heights for maximum visual impact.
Safety Note: If using real candles, never leave them unattended and ensure jars are on stable surfaces or securely hung. LED tealights give the same ambiance with zero fire risk and are perfect for outdoor spaces where you might forget to blow them out.
Essential DIY Tools Starter Kit
These five basic tools will get you through every single project in this guide and countless future DIY jobs. Investing in quality basics means they will last for years and make every project easier and more enjoyable.
Kit Includes:
- Assorted sandpaper (medium and fine grit)
- Two quality paintbrushes (2-inch and 1-inch)
- Painter’s tape roll
- Measuring tape (5-meter minimum)
- Work gloves for hand protection
Total Investment: $25-$40 for the complete kit
6. Build a Simple Herb Garden Wall Planter

This project is part garden, part art installation. A wall-mounted herb planter gives you fresh herbs within arm’s reach AND looks absolutely beautiful on a patio fence or wall.
It is one of the most practical easy patio ideas on a budget because it pays for itself almost immediately. You are growing herbs you no longer need to buy from the supermarket every week.
What You Need
- A piece of reclaimed timber or a basic fence paling, approximately one meter long (free to eight dollars)
- Three to five small tin cans including coffee tins or tomato tins, any size (free from your recycling)
- Outdoor paint for the tins in your chosen palette color (five to ten dollars, use the same paint as your pots)
- A drill with a small drill bit for drainage holes
- Screws and wall plugs for mounting to your fence or wall
- Herb seedlings from the supermarket or garden center (two to four dollars each)
- Potting mix for planting (eight to twelve dollars for a bag that will last multiple projects)
How to Do It
Paint your tin cans in your chosen color and let them dry completely. Two coats gives the best finish and weather protection.
Drill two small drainage holes in the bottom of each tin using a drill bit slightly smaller than a pencil width. This prevents water logging which kills herbs quickly.
Attach the tins to your timber backing board using screws through the back of the board into the tin. Pre-drill pilot holes to prevent the wood splitting.
Space your tins evenly along the board, either in a horizontal row or a staggered vertical arrangement depending on your wall space.
Mount the whole assembly to your fence or wall using appropriate screws and wall plugs. Make sure it is secure as it will be quite heavy once filled with soil and plants.
Fill each tin with potting mix, leaving about two centimeters at the top. Plant up with your chosen herbs.
Basil, chives, parsley, thyme and mint are all perfect for outdoor planters. They grow well in containers, are used constantly in cooking, and look beautiful. 🌱
Water gently and watch your herb wall grow. Harvest regularly to encourage bushier growth and ensure you always have fresh herbs for cooking.
Budget Tip: Look for free reclaimed timber on Facebook marketplace. People give away fence palings, old floorboards and timber offcuts constantly. A beautiful piece of aged timber makes this project look even more artisan and costs nothing.
7. Sew or No-Sew Outdoor Cushion Covers

Bare furniture is uninviting furniture. But outdoor cushion covers can be genuinely expensive, often costing thirty to fifty dollars each in stores.
Making your own is one of the best budget moves you can make for your patio. And the no-sew version means absolutely zero sewing experience is required.
No-Sew Version That Actually Works
I am being completely honest when I say I cannot sew to save my life. The no-sew method is what I use and the results are genuinely good enough that people ask me where I bought my cushion covers. 😂
What You Need
- Outdoor fabric or heavy canvas in your palette color from a fabric store (eight to fifteen dollars per meter, one meter makes one to two covers)
- Fabric glue or iron-on hem tape for securing edges
- Scissors for cutting fabric to size
- Your existing cushion inserts, or cheap ones from discount stores
How to Do It
Measure your cushion insert and add ten centimeters to both the length and width. This gives you enough fabric to wrap around and fold under neatly.
Cut your fabric to size. For a standard 40cm cushion, cut a piece approximately 50cm x 90cm which will wrap around and overlap.
Place your cushion insert in the center of the fabric. Fold one long edge over the cushion, then fold the opposite edge over the top, overlapping in the middle like wrapping a parcel.
Fold the short ends under neatly, creating hospital corners like you would on a bed. Secure all folded edges with fabric glue or iron-on hem tape following the product instructions.
That is genuinely it. The result looks neat and tidy from the front. Nobody is inspecting the back of your cushion covers. The overlap stays closed naturally from the weight and tension of the cushion insert inside.
Budget Tip: Op shops and thrift stores often have fabric remnants, old curtain panels and tablecloths in beautiful outdoor-appropriate colors and weights. All for two to five dollars. Check these before buying new fabric. Old canvas drop cloths from the hardware store are also brilliant for outdoor cushion covers. They cost ten to twenty dollars, are durable and weather-resistant, and have a beautiful natural texture. 🛋️
Choosing the Right Fabric
Look for outdoor-rated fabric, heavy canvas, or duck cloth. These materials are designed to withstand sun and moisture without fading or developing mildew.
If you are using indoor fabric or drop cloth, treat it with a fabric waterproofing spray. This costs about eight dollars and makes any fabric significantly more weather resistant.
Avoid very thin or stretchy fabrics as they will not hold their shape well and may tear when stuffing the cushion insert inside.
8. Create a Simple Fire Pit Area

A fire pit transforms your outdoor space into somewhere you want to be on cool evenings. It creates a focal point and makes your patio feel like an actual outdoor living area rather than just an empty concrete space.
You do not need an expensive built-in fire pit. A simple designated area with a portable fire pit bowl creates the same atmosphere for a fraction of the price.
What You Need
- Portable metal fire pit bowl or fire basket (twenty-five to sixty dollars from hardware stores or online)
- Concrete pavers or bricks to create a heat-safe base (fifteen to thirty dollars for enough pavers)
- Gravel or decorative stones to define the fire pit area (ten to twenty dollars for a bag)
- Seating options positioned around the fire pit at a safe distance
How to Do It
Choose your fire pit location carefully. It should be at least three meters away from your house, fence, or any overhanging trees or plants. Check local regulations as some areas have restrictions on outdoor fires.
Clear the area and lay down concrete pavers or bricks to create a non-flammable base. A circle about 1.2 meters in diameter works well for a small patio fire pit.
Place your portable fire pit bowl in the center of the paved area. Surround the pavers with gravel or decorative stones to define the fire pit zone and prevent grass or weeds growing right up to the edge.
Position seating around the fire pit. Simple wooden chairs, the pallet furniture you made earlier, or even large cushions on the ground all work beautifully for fire pit seating.
Add some outdoor lighting nearby with string lights or the jar lanterns you created. This creates the most wonderful evening atmosphere in your outdoor area. 🔥
Safety First: Always keep a bucket of water or sand nearby when using a fire pit. Never leave a fire unattended. Make sure the fire is completely out before going inside for the night. Keep the area clear of flammable materials and supervise children and pets around fire pits at all times.
9. Build a Vertical Garden with Reclaimed Materials

Vertical gardens are perfect for small patio spaces because they add greenery and interest without taking up valuable floor area. And you can create one using materials that cost almost nothing.
This project is ideal if you want more plants and flowers in your outdoor space but do not have room for lots of pots on the ground.
What You Need
- One timber pallet, preferably a smaller size (free to ten dollars)
- Outdoor paint or stain in your palette color (five to fifteen dollars, you may have leftover from earlier projects)
- Landscape fabric or shade cloth to line the back (five to ten dollars for a piece)
- Staple gun and staples for attaching fabric (ten to fifteen dollars if you do not own one, but worth having)
- Potting mix for filling the planter sections (eight to twelve dollars for a bag)
- A variety of plants including herbs, succulents, trailing plants and flowers (two to five dollars each)
- Heavy-duty screws and wall plugs for mounting to your wall or fence
How to Do It
Sand your pallet and paint or stain it in your chosen color. Let it dry completely before moving to the next step.
Line the back of the pallet with landscape fabric or shade cloth, stapling it securely to prevent soil falling through. This creates planting pockets between the pallet slats.
Mount the pallet vertically to your fence or wall using heavy-duty screws and wall plugs. Make sure it is very secure as it will be heavy once filled with soil and plants.
Fill the spaces between the slats with potting mix from the top, packing it down gently but firmly. The landscape fabric at the back holds it in place.
Plant your chosen plants into the pockets. Succulents work brilliantly as they need little water. Herbs give you something edible and fragrant. Trailing plants like ivy create a living wall effect as they grow.
Water carefully from the top and let it trickle down through the layers. Vertical gardens dry out faster than ground-level pots so check them regularly, especially in hot weather.
Plant Selection Tip: Choose plants with similar water and light needs for each vertical garden. Mixing succulents that need little water with ferns that need lots will result in some plants being over or under watered. Group by needs for the best results.
10. Install Atmospheric String Lights

String lights are the fastest way to make any outdoor space feel magical. They create instant atmosphere, make your patio usable in the evenings, and cost less than a takeaway meal.
This is often the final touch that makes people say their patio feels complete. The transformation from functional space to somewhere you actually want to spend time happens the moment you turn those lights on for the first time. ✨
What You Need
- Outdoor string lights, either solar powered or plug-in (fifteen to forty dollars depending on length and quality)
- Hooks or eye screws for attaching lights to walls, fences or posts (five to ten dollars for a pack)
- Optional: shepherd’s hooks or tall posts if you do not have existing structures to attach lights to (ten to twenty dollars each)
How to Do It
Plan your lighting layout before installing any hooks. The most popular options are straight lines across the space, zigzag patterns, or a canopy effect with multiple strands.
Install hooks or eye screws at your chosen attachment points. These should be securely fixed into solid timber, brick or fence posts.
Hang your string lights, creating gentle swoops between attachment points rather than pulling them completely taut. The gentle drape looks much more attractive and atmospheric.
If using solar lights, position the solar panel where it will receive direct sunlight for most of the day. If using plug-in lights, ensure your outdoor outlet is weatherproof and the connection is protected from rain.
Turn them on as the sun sets and enjoy your transformed outdoor area. The warm glow makes everything look more inviting and beautiful.
Solar vs Plug-In: Solar string lights are convenient and eco-friendly with no running costs. However, they are dimmer and may not last as long on cloudy days. Plug-in lights are brighter and more reliable but require access to an outdoor power outlet and use electricity. I have both types and use solar for ambient background lighting and plug-in where I need brighter task lighting for dining or seating areas.
Do’s and Don’ts for DIY Patio Projects
These are the lessons I learned through trial and error so you do not have to. Following these guidelines will save you time, money, and frustration on every single project you tackle.
Do’s
- Do prep surfaces properly before painting. Clean, dry, lightly sanded surfaces take paint so much better than unprepared ones. Five minutes of prep work makes the difference between paint that lasts two years and paint that peels in two months.
- Do use outdoor-specific products. Regular interior paint, regular cushion fabric, regular wood stain will not survive the weather and you will be redoing everything within a season. Always check that whatever you are using is rated for outdoor use. It is not always more expensive, just check the label.
- Do make things in batches. If you are painting pots, paint six at once. If you are making jar lanterns, make five. Batch making is more efficient, uses your materials more economically, and gives you cohesive results because everything comes from the same paint session.
- Do embrace imperfection. The most beautiful handmade things have a little wobble in them. An uneven brushstroke, a slightly irregular shape, a knot in the timber. These are not mistakes. These are the signature of something made by a human rather than a machine, and that is exactly what makes them special. 🥰
- Do take before photos. Always. You will want them when you are sitting in your transformed patio feeling smug, and you will absolutely want them if you ever share anything on social media. The before and after is everything.
Don’ts
- Don’t rush the drying time. Every single DIY project in this list requires waiting for things to dry properly before moving to the next step. Skipping this almost always results in smudging, peeling or a finish that does not look right. Set a timer, go do something else, and come back when it is actually dry.
- Don’t overbuy materials. It is very easy to get excited and buy three times more paint, fabric and supplies than you need. Buy conservatively. You can always go back for more, and leftover materials that you bought in enthusiasm end up sitting in a cupboard for three years. Ask me how I know. 😅
- Don’t do everything in one weekend. Space out your projects and live with each change before adding the next. Pacing gives you time to see what the space actually needs rather than what you thought it needed before you started. The best outdoor spaces evolve gradually.
- Don’t forget weatherproofing. Any timber you use outside needs to be sealed or painted with outdoor products. Any fabric needs to be outdoor-rated or brought inside in bad weather. A little weatherproofing upfront saves you from having to redo everything in six months.
- Don’t compare your space to Pinterest. Pinterest patios have professional photographers, perfect lighting, plants that have been styled within an inch of their lives, and furniture that cost thousands. Your patio is real and lived in and made with your own hands and that is worth so much more. 🌿
Additional Tips for Success
Work in good weather whenever possible. Paint, stain and adhesives all perform better and dry properly when applied in dry conditions with moderate temperatures.
Start small and build confidence. Your first painted pot does not have to be perfect. Your first furniture piece does not have to look like something from a magazine. Each project teaches you skills for the next one.
Ask for help when you need it. Hardware store staff are usually incredibly helpful and can advise on products, techniques and quantities. Most of them genuinely love helping people with DIY projects.
Keep your tools organized and clean. A small toolbox or bucket for your DIY supplies means everything is in one place when you are ready to start your next project.
Celebrate your progress. Take photos as you complete each project. Share them with friends who will appreciate your work. Sit in your transformed space with a cup of tea and acknowledge what you have created.
Budget Planning: What Each Project Really Costs
Transparency about costs is important. Here is what you can realistically expect to spend on each project, including both the minimum if you source materials cleverly and the maximum if you buy everything new.
| Project | Minimum Cost | Maximum Cost | Time Required |
| Paint Your Patio Floor | $15 | $35 | 3-4 hours plus drying |
| Pallet Furniture Piece | $10 | $45 | 2-3 hours |
| Painted Terracotta Pots | $8 | $25 | 1-2 hours |
| Trellis Screen | $20 | $45 | 2-3 hours |
| Lantern Cluster | $5 | $25 | 1-2 hours |
| Herb Garden Wall Planter | $12 | $35 | 1-2 hours |
| Outdoor Cushion Covers | $10 | $30 | 1 hour per cover |
| Fire Pit Area | $40 | $90 | 2-3 hours |
| Vertical Garden | $15 | $50 | 2-3 hours |
| String Lights | $15 | $50 | 1 hour |
Total Transformation Budget
If you completed every single project in this guide, your total spending would range from approximately $150 at the absolute minimum if you source materials like pallets and jars for free, to around $430 at maximum if you buy everything new.
That is less than one quality outdoor furniture set from a garden center. And you would have a completely transformed outdoor space with ten distinct features, all made by your own hands.
Most people will do three to five projects rather than all ten, which brings the realistic budget to somewhere between seventy and two hundred dollars for a significant patio transformation.
Money-Saving Strategy: Start with the projects that use materials you already have or can source for free. Paint your patio floor with leftover paint. Make lanterns from saved jars. Build pallet furniture from free pallets. Once you see the impact these projects make, you will feel much more confident investing in materials for the remaining ideas.
Seasonal Maintenance: Keeping Your Budget Patio Beautiful
Creating your beautiful budget patio is just the beginning. These simple seasonal maintenance tasks will keep everything looking fresh and extend the life of all your DIY projects for years to come.
Spring Refresh
Spring is the perfect time to assess your outdoor area after winter and give everything a refresh before the main outdoor season begins.
Sweep and wash your painted patio floor thoroughly. Touch up any areas where the paint has worn or chipped. A small pot of touch-up paint costs very little and makes an enormous difference to overall appearance.
Refresh your painted pots with a new coat of paint if needed, or simply clean them thoroughly with soapy water. Replace any plants that did not survive winter with fresh seasonal flowers or herbs.
Check all timber furniture for splinters or rough patches. A quick sand and fresh coat of outdoor oil brings weathered wood back to life beautifully.
Clean cushion covers or make new ones if last year’s are looking tired. The no-sew method is so quick that making fresh covers each spring is perfectly viable.
Summer Care
Summer is about maintaining what you have created and enjoying your outdoor space to the fullest.
Water your vertical gardens and planters regularly in hot weather. Plants in containers dry out much faster than garden beds and may need daily watering in heat waves.
Trim back climbing plants on your trellis screen to maintain the shape you want and encourage bushy growth rather than sparse lanky vines.
Check string lights regularly and replace any blown bulbs immediately to maintain the evening atmosphere.
Bring cushions inside during heavy rain or cover them with a waterproof tarp to extend their life significantly.
Autumn Preparation
Autumn is the time to prepare your patio for winter and protect your DIY creations from harsh weather ahead.
Store delicate items like cushions and non-weatherproof decorations inside for winter. A plastic storage box keeps everything clean and dry until spring.
Apply a fresh coat of outdoor sealer or varnish to timber furniture and painted surfaces. This extra protection before winter dramatically reduces weather damage.
Harvest the last of your herbs from your wall planter. Many herbs can be dried and stored for winter cooking, giving you months more value from your garden.
Clean and store your fire pit if it is not weatherproof. Cover it with a tarp if leaving outside to prevent rust and deterioration.
Winter Protection
Winter is about protecting your hard work so everything is ready to enjoy again when warm weather returns.
Cover painted pots with bubble wrap or move them under shelter if you live somewhere with hard frosts. Terracotta can crack if water freezes inside it.
Take down string lights if they are not rated for winter weather, or at minimum check all connections are waterproof and secure.
Brush snow off furniture promptly to prevent moisture damage. Even outdoor-rated timber benefits from not sitting under heavy wet snow for weeks.
Plan your spring projects during winter. This is the perfect time to browse for inspiration, source free materials, and plan what you want to add or change when warm weather returns. 🌿
Frequently Asked Questions About Budget Patio Projects
How long do these budget patio projects actually last?
With proper preparation and outdoor-rated materials, most of these projects will last two to five years or even longer. Painted patio floors typically last three to four years before needing a refresh. Pallet furniture lasts indefinitely if properly sealed and maintained. Painted pots can last for years with outdoor sealer. The key to longevity is using outdoor-specific products, proper surface preparation, and basic seasonal maintenance. I still have painted pots from my first project three years ago that look great.
Can renters do these projects or are they only for homeowners?
Most of these projects are perfect for renters because they are non-permanent and portable. Painted pots, pallet furniture, cushion covers, lanterns, and herb wall planters can all move with you when you relocate. Even the trellis screen is freestanding if you use pots rather than in-ground posts. The only project to check with your landlord about first is painting the patio floor, as this changes the rental property itself. Everything else is fair game for renters wanting to improve their outdoor area without losing their security deposit.
What if I have absolutely no DIY experience at all?
Then you are exactly who these projects are designed for. I had zero DIY skills when I started and these are the projects that taught me everything I know. Start with painting terracotta pots or making jar lanterns. Both are genuinely foolproof and give you confidence for slightly more involved projects. The instructions for each project assume no prior knowledge and break everything down into simple steps. If you can follow a recipe, you can do these projects. And the satisfaction of creating something with your own hands is worth any imperfections in your first attempts.
Where can I find free pallets and reclaimed timber?
Facebook marketplace is genuinely the best source. Search for “free pallets” or “free timber” and you will find people giving away materials constantly. Construction sites often have offcuts they are happy to give away if you ask politely. Small local businesses that receive deliveries on pallets are usually delighted to have someone take them away rather than paying for disposal. Garden centers, tile shops, and furniture stores all receive pallet deliveries. Just make sure you get heat-treated pallets marked HT rather than chemically treated ones marked MB for any project where you will be handling them extensively or growing food.
Do I really need outdoor-specific paint or can I use leftover interior paint?
For anything that will be exposed to weather and foot traffic, you genuinely need outdoor-specific paint. Interior paint is not formulated to withstand UV rays, rain, or temperature fluctuations and it will peel, fade and look terrible within months. Outdoor paint contains additives that make it flexible, water-resistant and UV-stable. The price difference is minimal and the longevity difference is enormous. I learned this the hard way when my first painted pots using interior paint looked awful after one rainy season. When I repainted them with proper outdoor paint they lasted three years and counting.
How do I choose which projects to do first?
Start with the project that solves your biggest problem or excites you most. If your patio floor is the thing that bothers you every time you look outside, start there. If lack of seating is your issue, build the pallet furniture first. If your space feels bare and you want immediate impact, painted pots and string lights transform atmosphere quickly. There is no correct order. The best starting point is whatever will make you actually use and enjoy your outdoor space sooner rather than later. Momentum builds once you see results from your first project.
What if my patio is really tiny or an awkward shape?
Small and awkward patios actually benefit most from these budget ideas because you can customize everything to fit your exact space. Painted pots can cluster in corners. Vertical gardens use wall space instead of floor space. String lights make small areas feel cozy rather than cramped. A single small pallet makes a perfect side table for a tiny patio. The trellis screen can be sized to fit any gap. The projects in this guide are specifically chosen because they work in small spaces and can be adapted to any shape or size outdoor area.
Can these projects withstand really harsh weather conditions?
With proper materials and weatherproofing, yes. Outdoor paint and sealed timber handle rain, sun and moderate frost well. In areas with very harsh winters or extreme weather, bring portable items like cushions and lanterns inside during the worst months and provide extra protection like covers for furniture. I live in an area with harsh winters and my painted patio floor and sealed pallet furniture have survived three winters perfectly. The key is using outdoor-rated products and doing the weatherproofing step rather than skipping it to save a few dollars.
Your Beautiful Budget Patio Starts Now

The most important thing I want you to take away from this is that you absolutely can do this. Any of it, all of it, even if you have never picked up a paintbrush in a DIY context before.
Easy patio ideas on a budget are called easy for a reason. They are designed for real people with limited time, limited budgets, and limited experience who just want their outdoor space to feel like somewhere worth being.
You do not need special skills. You do not need expensive tools. You do not need weeks of free time or hundreds of dollars to spend.
You just need to start with one project. Pick the one on this list that excites you most. The one that made you think “yes, I could actually do that and it would make such a difference.”
Get your supplies together. Put on a good podcast or your favorite music. Give yourself an afternoon. And make something.
The satisfaction of sitting in an outdoor area you created with your own hands, even partially, even imperfectly, is one of the best feelings. That moment when you step back and realize you made something genuinely beautiful for almost no money is absolutely worth the effort.
Your patio does not need to look like Pinterest. It needs to look like somewhere you want to spend time. Somewhere that makes you happy when you see it. Somewhere that feels like yours.
And every single project in this guide will take you closer to that feeling. Start today. Start small if you need to. But start.
Because your outdoor space is waiting for you to make it wonderful. And you have everything you need to begin. Go make something beautiful. 🌿