15 Stunning Wooden Painting Ideas for DIY Enthusiasts
Wooden painting offers a unique canvas for artistic expression, combining the natural beauty of wood grain with vibrant colors and creative designs. Whether you’re a seasoned artist or just beginning your crafting journey, these 15 stunning wooden painting ideas will inspire you to create beautiful pieces for your home or as thoughtful gifts. From simple geometric patterns to intricate landscapes, we’ll guide you through each project with easy-to-follow instructions and helpful tips.
Essential Materials for Wooden Painting Projects
Before diving into our wooden painting ideas, let’s gather the basic supplies you’ll need for most projects:
Basic Supplies
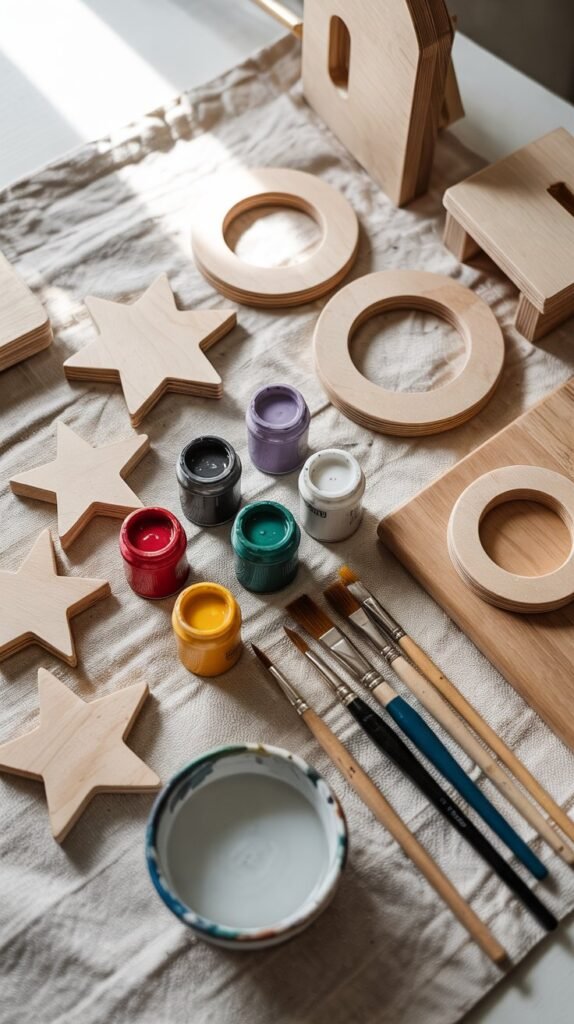
- Unfinished wood pieces (slices, planks, or shapes)
- Acrylic paints in various colors
- Paintbrushes in different sizes
- Pencil for sketching designs
- Clear varnish or sealer
- Sandpaper (fine grit)
- Paint palette or paper plate
- Water container
Optional Tools
- Acrylic paint pens for fine details
- Stencils for precise patterns
- Painter’s tape for clean edges
- Wood primer for better paint adhesion
- Glitter or metallic paints for accents
- Sponges for texture effects
- Heat gun for quick drying
- Mod Podge for decoupage elements
1. Geometric Mountain Landscape
Create a stunning mountain landscape using simple geometric shapes. This project works beautifully on wood slices or rectangular wooden panels.
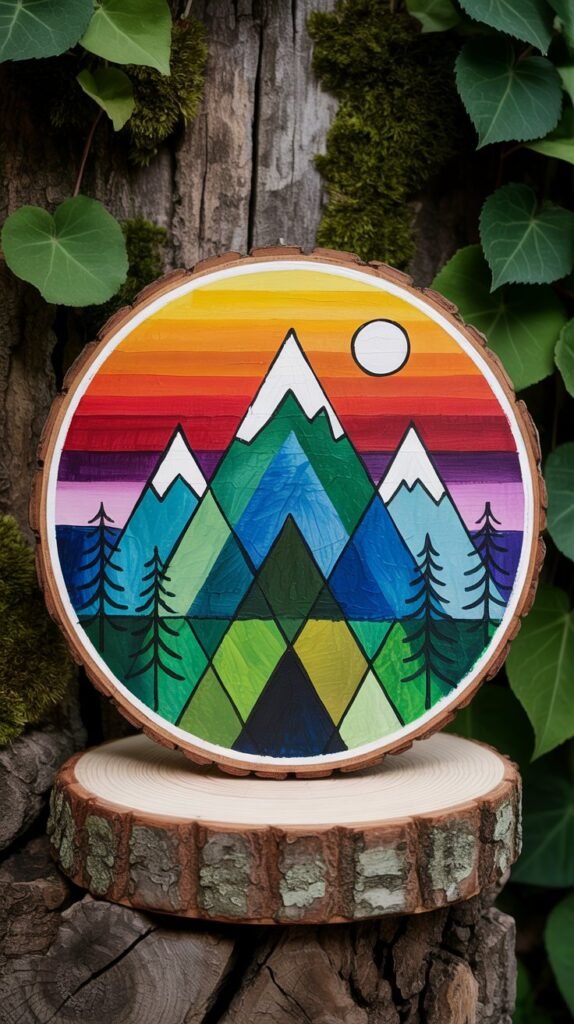
Materials Needed:
- Wood slice (4-5 inches in diameter)
- Acrylic paints (blue, white, orange, yellow)
- Fine and medium paintbrushes
- Ruler or straight edge
- Pencil
- Clear varnish
How to Create:
- Sand the wood slice until smooth and wipe clean
- Sketch your mountain outlines using triangular shapes
- Paint the sky with a gradient from yellow to orange
- Fill in the mountains with blue paint
- Add white to the mountain peaks for snow
- Let dry completely and seal with varnish
This simple yet striking design makes a perfect first project for beginners. The geometric approach means you don’t need advanced painting skills to create something beautiful.
2. Night Sky with Tree Silhouettes
This enchanting design features a vibrant night sky with the silhouettes of trees at the bottom. It’s perfect for wood slices and creates a magical effect.
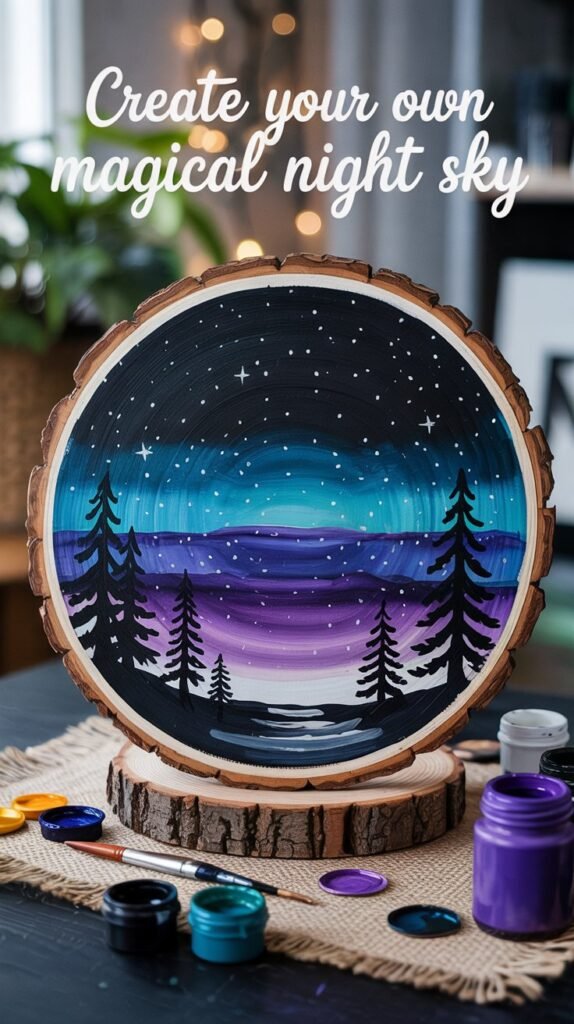
Materials Needed:
- Round wood slice with bark edge
- Acrylic paints (dark blue, purple, white)
- Black acrylic paint or paint pen
- Flat brush for background
- Fine detail brush for trees and stars
- White gel pen (optional for stars)
- Gloss varnish
How to Create:
- Paint the entire wood slice with dark blue
- While still wet, blend in purple for a galaxy effect
- Add white dots of various sizes for stars
- Once dry, paint black tree silhouettes along the bottom edge
- Add a few larger stars or a crescent moon
- Seal with gloss varnish for a shiny finish
The contrast between the colorful sky and dark silhouettes creates a dramatic effect that’s surprisingly easy to achieve. This design works wonderfully as an ornament or small wall hanging.
3. Mandala Patterns on Wood
Mandala designs bring a sense of harmony and balance to wooden surfaces. Their intricate patterns create a meditative effect that’s both beautiful and calming.
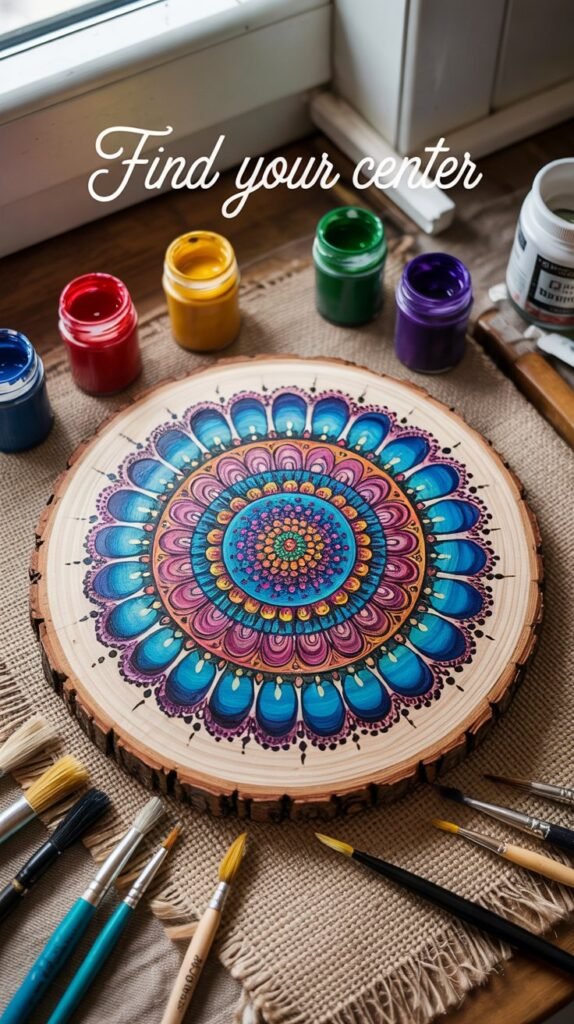
Materials Needed:
- Round wood slice or circular wooden plaque
- Acrylic paints in various colors
- Dotting tools (or the end of paintbrushes)
- Fine detail brushes
- Compass or circular objects to trace
- Pencil
- Ruler
- Clear sealer
How to Create:
- Find the center of your wood slice and mark it
- Use a compass to draw concentric circles
- Divide the circles into equal sections
- Sketch your mandala pattern lightly with pencil
- Paint from the center outward using bright colors
- Use dotting tools for precise dots and patterns
- Allow to dry completely before sealing
Perfect Your Mandala Technique
Creating beautiful mandalas is easier with the right tools. Dotting tools and fine-tip brushes make a significant difference in the precision of your designs.
4. Seasonal Bird Paintings
Birds make wonderful subjects for wooden paintings, especially when paired with seasonal elements. A cardinal against winter branches or a bluebird with spring flowers creates a charming natural scene.
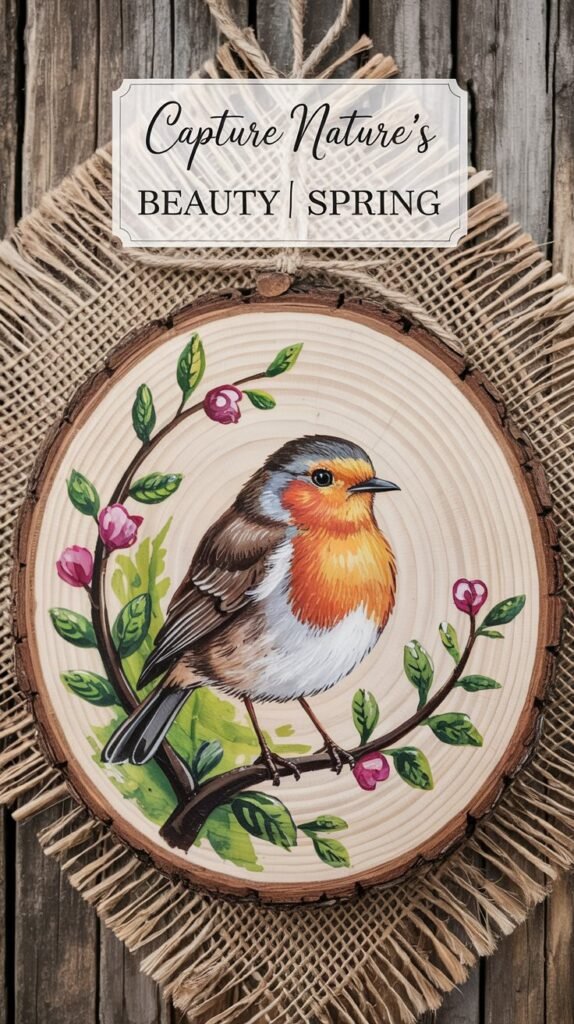
Materials Needed:
- Wood slice (4-6 inches)
- Acrylic paints in bird colors (red, black, yellow for cardinal)
- Background colors (blue, white, brown)
- Detail brushes in various sizes
- Reference photo of your chosen bird
- Pencil for sketching
- Matte or satin finish sealer
How to Create:
- Paint a light background color across the wood slice
- Sketch the basic shape of your bird and branches
- Paint the branches first, then add the bird
- Add details like the bird’s eye, beak, and wing markings
- Include seasonal elements (snow, flowers, autumn leaves)
- Add highlights and shadows for dimension
- Seal with a protective finish when completely dry
This project allows you to celebrate the changing seasons with different bird species. Create a set of four with birds representing each season for a cohesive collection.
5. Abstract Fluid Art on Wood
Fluid art creates mesmerizing patterns that highlight the natural beauty of wood. This technique involves pouring and manipulating paint to create unique, flowing designs.

Materials Needed:
- Flat wooden board or panel
- Acrylic paints in complementary colors
- Pouring medium
- Silicone oil (for creating cells)
- Cups for mixing paint
- Stir sticks
- Gloves
- Drop cloth or plastic sheeting
- Torch or heat gun (optional)
- Resin finish (optional)
How to Create:
- Prepare your workspace with protective covering
- Mix each paint color with pouring medium in separate cups
- Add a drop of silicone oil to some colors (not all)
- Pour the colors onto the wood in your desired pattern
- Tilt the wood to spread the paint and create flowing patterns
- Use a torch or heat gun to bring up cells (optional)
- Let dry for 24-48 hours
- Apply resin or varnish for a glossy finish
6. Rustic Quote Signs
Inspirational quotes or meaningful phrases painted on wood create personalized decor with a rustic charm. These make wonderful gifts and add character to any space.
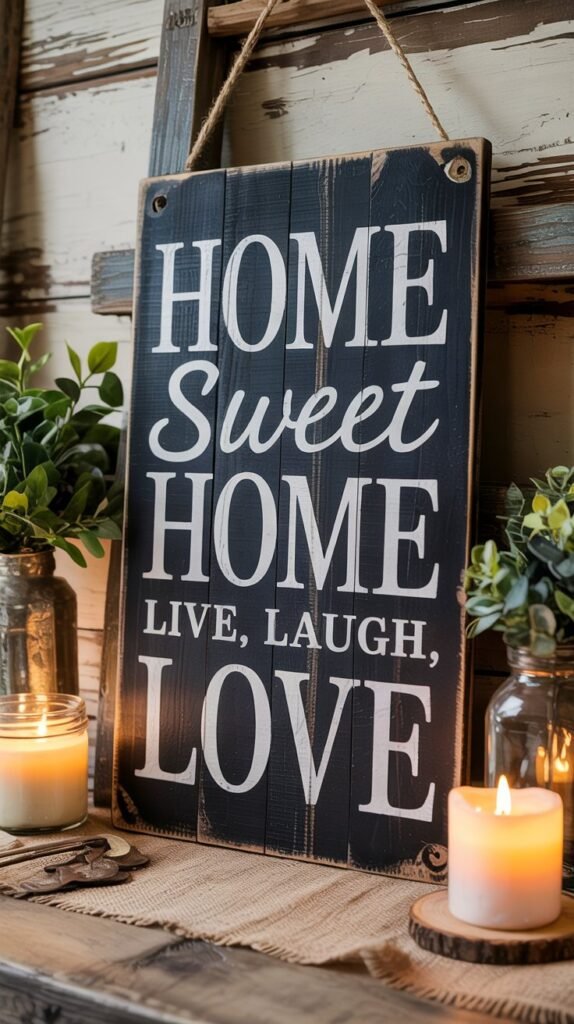
Materials Needed:
- Wooden plank or board
- White or cream acrylic paint for background (optional)
- Black or dark acrylic paint for lettering
- Colored paints for decorative elements
- Stencils or transfer paper (optional)
- Fine detail brushes
- Pencil
- Sandpaper
- Matte finish sealer
How to Create:
- Sand the wood and wipe clean
- Apply a base coat if desired (or leave natural)
- Lightly sketch your quote with pencil
- Paint the letters carefully with a fine brush
- Add decorative elements like flowers, arrows, or borders
- Let dry completely
- Lightly sand edges for a distressed look (optional)
- Seal with a matte finish
Popular quotes include “Home Sweet Home,” “Family,” “Love Grows Here,” or seasonal phrases. Personalize with names or special dates for meaningful gifts.
7. Botanical Prints on Wood
Delicate botanical illustrations bring natural beauty to wooden surfaces. Ferns, leaves, flowers, or herbs make elegant subjects that complement the organic quality of wood.
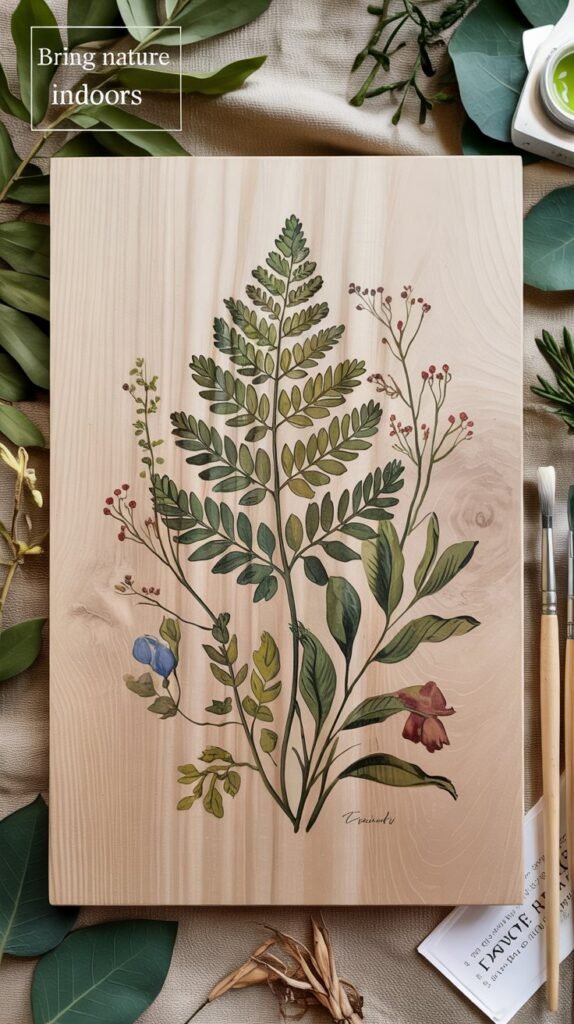
Materials Needed:
- Smooth wooden panel or board
- White or cream acrylic paint for base (optional)
- Acrylic paints in natural greens, browns, and flower colors
- Very fine detail brushes
- Botanical reference images
- Pencil for sketching
- Tracing paper (optional)
- Satin finish sealer
How to Create:
- Prepare your wood with light sanding
- Apply a wash of white or cream paint if desired
- Sketch your botanical design lightly
- Paint the main structures first (stems, leaves)
- Add details and shading with fine brushes
- Include scientific names for an authentic botanical look
- Seal with a satin finish to protect without too much shine
For a vintage look, add a tea-stained background or age the edges with brown paint. Group several botanical paintings together for a gallery wall effect.
8. Wood Slice Ornaments
Small wood slices make perfect ornaments for holidays or year-round decoration. Their natural shape and portable size make them ideal for gifting and seasonal crafts.

Materials Needed:
- Small wood slices (2-3 inches in diameter)
- Acrylic paints in festive colors
- Fine detail brushes
- Paint pens for intricate details
- Twine or ribbon for hanging
- Drill with small bit (if holes aren’t pre-drilled)
- Pencil
- Clear gloss sealer
How to Create:
- Sand the surface of each wood slice
- Drill a small hole near the top if needed
- Sketch your design lightly with pencil
- Paint your design using acrylic paints
- Add fine details with paint pens
- Let dry completely
- Seal with gloss finish on both sides
- Thread twine or ribbon through the hole
9. Galaxy and Aurora Scenes
The night sky offers endless inspiration for wooden paintings. Galaxy scenes with swirling nebulae or the dancing colors of the aurora borealis create magical effects on wood.
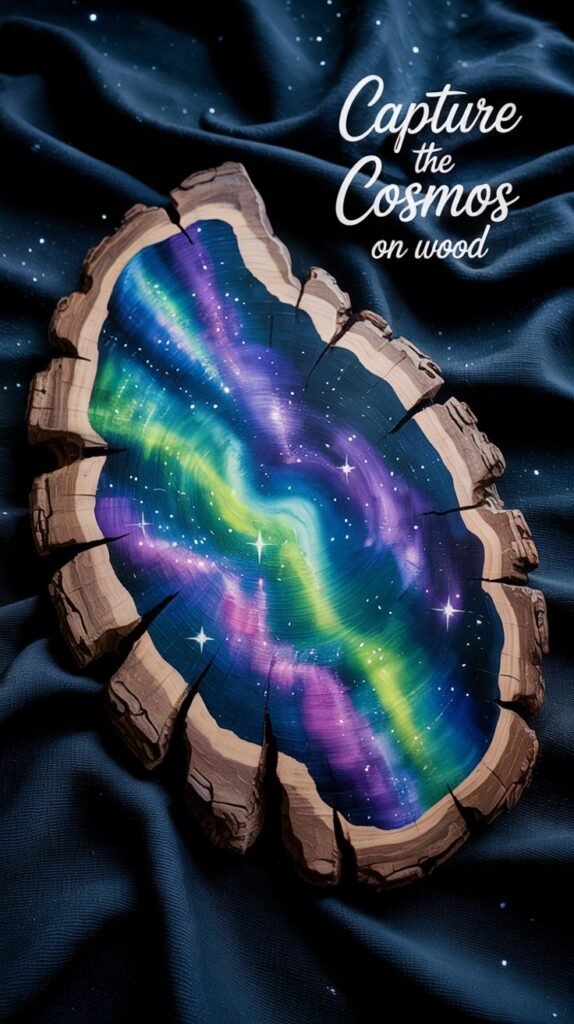
Materials Needed:
- Wood slice or panel
- Black acrylic paint for background
- Acrylic paints in blues, purples, pinks, greens
- White paint for stars
- Flat brush for background
- Soft brushes for blending
- Small detail brush or toothbrush for stars
- White gel pen (optional)
- High-gloss sealer
How to Create:
- Paint the entire surface black
- While still slightly wet, add dark blue in areas
- For galaxy: add swirls of purple, pink, and blue
- For aurora: add vertical streaks of green and purple
- Blend colors gently where they meet
- Add white dots of various sizes for stars
- Create stardust effects with diluted white paint
- Seal with high-gloss finish for depth
This technique creates stunning results even for beginners. The blending of colors creates a magical effect that’s different on every piece.
10. Painted Wooden Coasters
Functional art adds beauty to everyday life. Painted wooden coasters are both practical and decorative, making them perfect gifts or home accents.
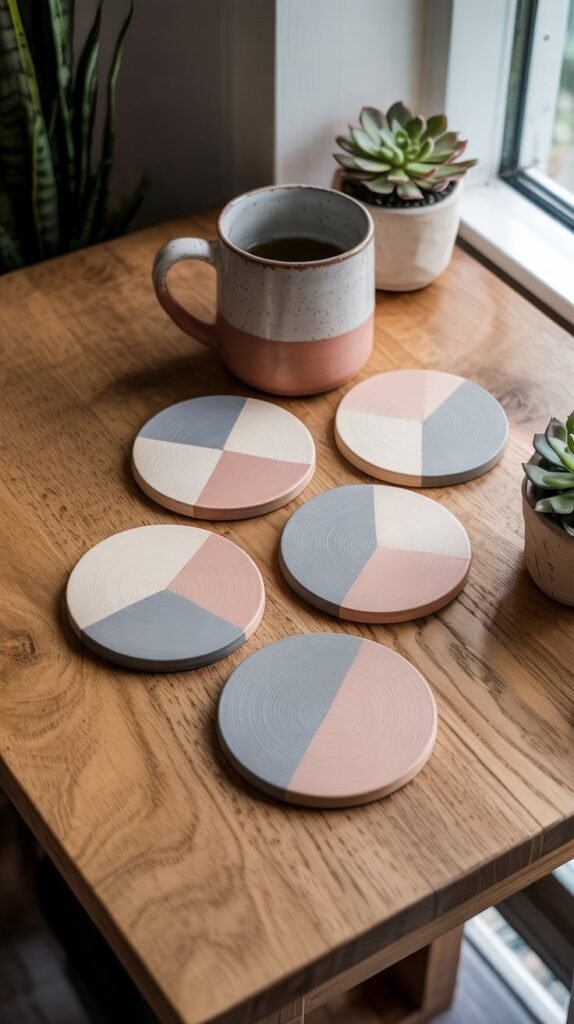
Materials Needed:
- Wooden coaster blanks (round or square)
- Acrylic paints in coordinating colors
- Painter’s tape for geometric designs
- Various brushes
- Pencil and ruler for patterns
- Metallic paint for accents (optional)
- Waterproof polyurethane sealer
How to Create:
- Sand coasters until smooth
- Design a pattern (geometric shapes work well)
- Use painter’s tape to create clean lines
- Paint sections in coordinating colors
- Remove tape while paint is still slightly wet
- Add details or accents with fine brushes
- Let dry completely
- Apply 3-4 coats of waterproof sealer, allowing drying time between coats
Create a set of 4-6 coasters with coordinating designs for a cohesive look. These make excellent housewarming or wedding gifts.
11. Painted Wooden Jewelry
Lightweight wooden pendants, earrings, and bracelets become wearable art when painted with intricate designs. These unique accessories combine natural materials with personal expression.
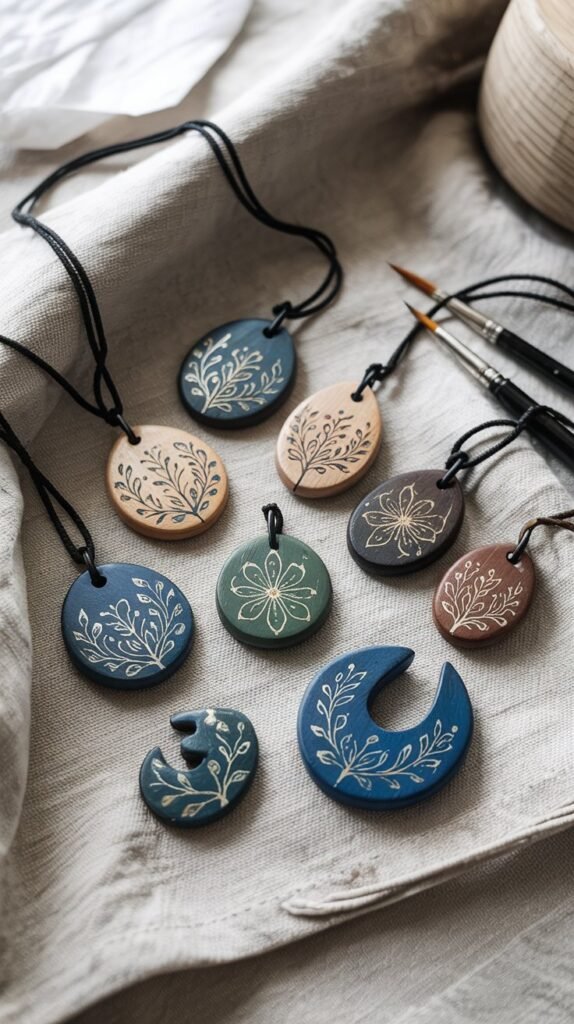
Materials Needed:
- Wooden jewelry blanks (pendants, earring shapes)
- Fine-grit sandpaper
- Acrylic paints in various colors
- Extremely fine detail brushes
- Paint pens for intricate details
- Jewelry findings (chains, earring hooks, jump rings)
- Jewelry pliers
- Clear jewelry-grade sealer
How to Create:
- Sand wooden pieces until very smooth
- Apply a base coat if desired
- Paint your design using tiny brushes
- Use paint pens for the finest details
- Let dry completely
- Apply 2-3 thin coats of jewelry sealer
- Attach findings using jewelry pliers
12. Whimsical Animal Portraits
Charming animal portraits bring personality and whimsy to wooden surfaces. From realistic to cartoonish styles, animals make delightful subjects for wooden art.

Materials Needed:
- Wood slice or panel
- Acrylic paints in animal colors and background shades
- Various brushes for different textures
- Reference photo of your chosen animal
- Pencil for sketching
- Black fine-tip paint pen for outlines (optional)
- White paint pen for highlights
- Matte or satin sealer
How to Create:
- Paint a background color if desired
- Sketch the basic shape of your animal
- Paint the main color areas of your animal
- Add details like eyes, nose, and fur texture
- Include decorative elements like flowers or patterns
- Add highlights and shadows for dimension
- Outline with black if desired for a graphic look
- Seal when completely dry
Popular animal choices include foxes, owls, cats, and woodland creatures. Give your animals personality with expressive eyes and playful poses.
13. Wooden Door Signs
Personalized door signs add character to any home. Whether for a child’s bedroom, home office, or front door, these custom wooden signs make spaces feel special.

Materials Needed:
- Wooden plaque or shaped sign blank
- Acrylic paints for background and design
- Lettering brushes or stencils
- Decorative elements related to the room theme
- Pencil for sketching
- Sandpaper
- Twine or ribbon for hanging
- Outdoor sealer if for exterior use
How to Create:
- Sand and prepare the wooden sign
- Paint the background color
- Sketch your text and design elements
- Paint the letters carefully
- Add decorative elements that match the room’s theme
- Let dry completely
- Distress edges for a rustic look (optional)
- Attach hanging hardware and ribbon
- Seal with appropriate finish for location
Customize with names, titles (“Kitchen,” “Garden”), or welcoming phrases. Add symbols that represent the room’s purpose for visual interest.
14. Painted Wooden Plant Markers
Bring artistic flair to your garden with painted wooden plant markers. These practical and pretty additions help identify herbs, vegetables, and flowers while adding charm to your garden.

Materials Needed:
- Wooden craft sticks or plant marker blanks
- White or light-colored acrylic paint for background
- Black or dark green paint for text
- Colored paints for plant illustrations
- Fine detail brushes
- Pencil
- Outdoor/waterproof sealer
- Sandpaper
How to Create:
- Sand the wooden markers smooth
- Paint the top portion white or a light color
- Write the plant names with pencil
- Paint over the pencil with black or dark green
- Add small illustrations of each plant
- Let dry completely
- Apply 2-3 coats of outdoor sealer
15. Painted Wooden Kitchen Utensils
Transform ordinary wooden spoons, cutting boards, and utensil holders into functional kitchen art. These practical pieces add color and personality to your cooking space.

Materials Needed:
- Wooden kitchen utensils (spoons, spatulas)
- Food-safe acrylic paints
- Painter’s tape for clean lines
- Various brushes
- Pencil for marking
- Sandpaper
- Food-safe sealer or mineral oil
How to Create:
- Sand utensils to remove any finish
- Wash and dry thoroughly
- Use tape to mark off sections (usually just the handles)
- Paint designs on the handles only
- Let dry completely (24+ hours)
- Apply food-safe sealer to the painted portions
- Treat the unpainted portions with mineral oil
Important: Only paint the handles or non-food-contact areas. Use food-safe paints and sealers, and inform recipients that painted items should be hand-washed only.
Tips for Successful Wooden Painting Projects
Preparation Tips
- Always sand wood thoroughly before painting
- Wipe with a tack cloth to remove dust
- Consider using a wood primer for better paint adhesion
- Sketch designs lightly in pencil before painting
- Test colors on scrap wood before applying to your project
Finishing Tips
- Allow paint to dry completely between layers
- Apply multiple thin coats of sealer rather than one thick coat
- Choose the right sealer for your project’s purpose
- Outdoor projects need UV-resistant sealers
- Food-related items require food-safe finishes

Proper preparation is key to successful wooden painting projects
Unleash Your Creativity with Wooden Painting
These 15 wooden painting ideas are just the beginning of what you can create. The natural beauty of wood combined with your artistic vision can result in truly unique pieces that bring joy to your home or as gifts for loved ones. Don’t be afraid to experiment with different techniques, colors, and designs to make each project your own.
Remember that wooden painting is accessible to all skill levels. Beginners can start with simple designs like geometric patterns or silhouettes, while more experienced artists might tackle detailed landscapes or portraits. The most important thing is to enjoy the creative process and let your personality shine through your art.