How to paint Scalloped Edge Mini Planters
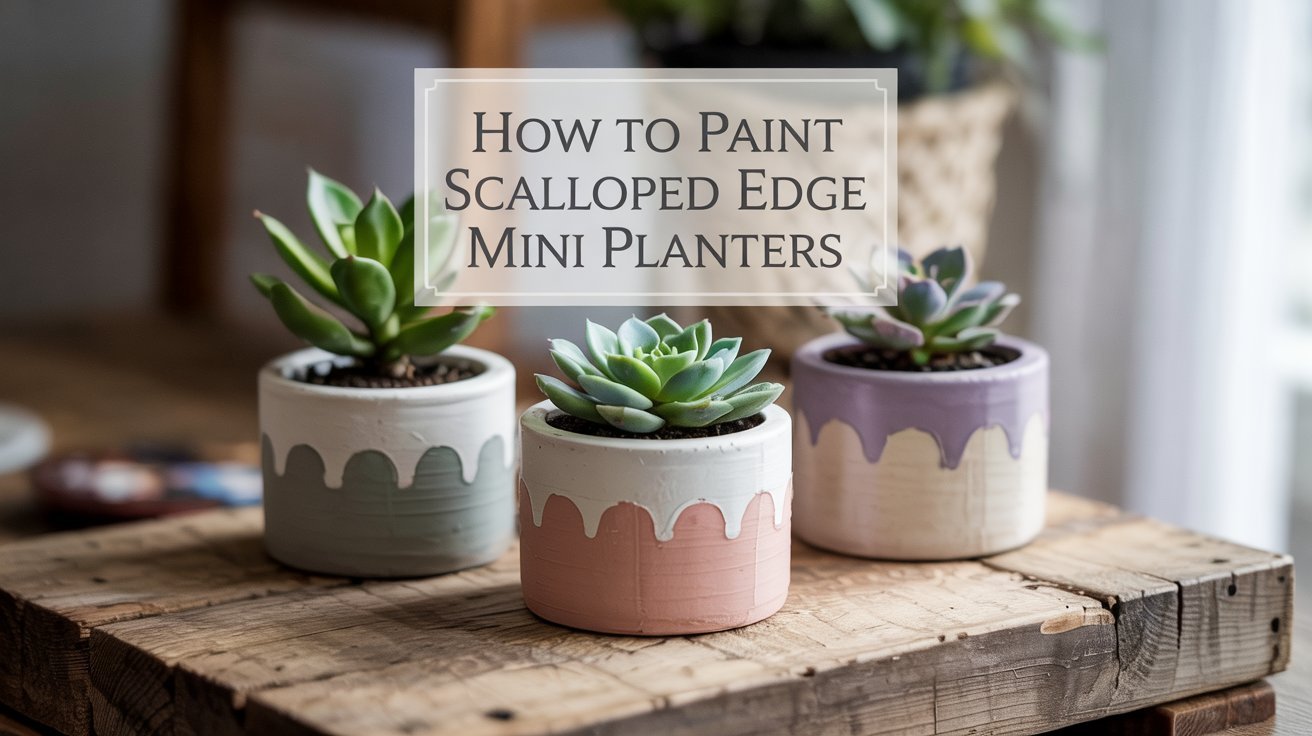
Scalloped edge mini planters are having a major moment on Pinterest and Instagram. These charming pots add a soft, whimsical touch to any space without the hefty price tag of store-bought designer planters. The best part is you can make them yourself in an afternoon with just a few simple materials.
This tutorial walks you through every step of creating beautiful scalloped edge mini planters. Whether you’re new to crafting or a seasoned DIY enthusiast, you’ll find this project approachable and rewarding. The technique is easier than it looks once you know the trick.
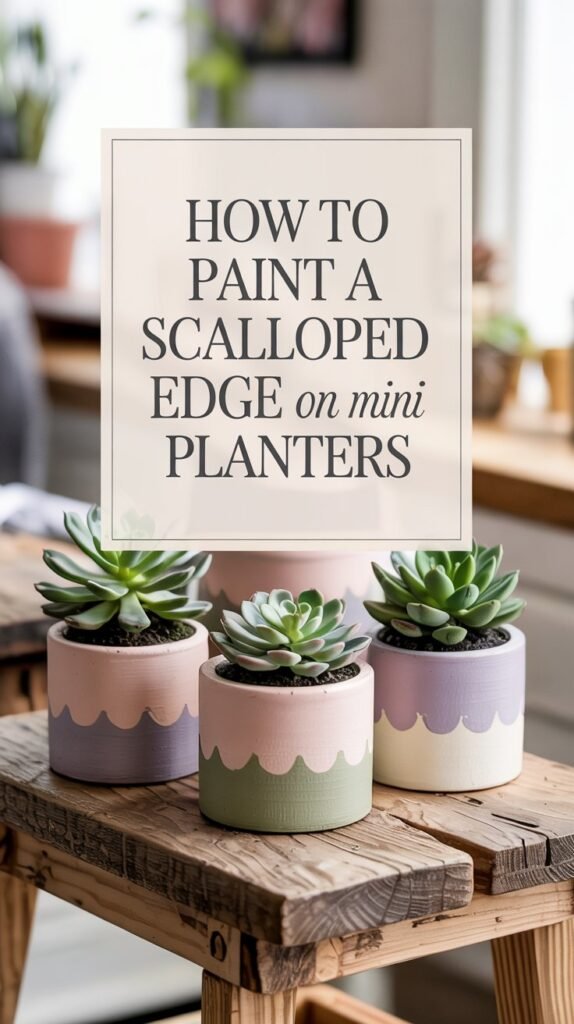
By the end of this guide, you’ll have a set of custom planters that look professionally made. They make perfect gifts, home decor pieces, or small business inventory items. Let’s get started.
What You’ll Need
Gathering your materials before you start makes the process smooth and enjoyable. Most items are available at craft stores or online. You probably already have some supplies at home.

Essential Materials
- Mini terracotta pots (2 to 4 inch diameter)
- Acrylic paint in 2 colors per pot
- Small round paintbrush with fine tip
- Regular pencil for marking
- Painter’s tape (optional for crisp lines)
- Matte sealer spray (optional but recommended)
- Succulents or faux plants
- Potting soil if using real plants
Pro Tip: Matte acrylic paint gives that soft Pinterest finish. Glossy paint tends to look more craft-store basic and doesn’t photograph as well for social media sharing.
Where to Get Your Supplies

Mini Terracotta Pots
Look for smooth-surface ceramic pots without texture. The 3-inch size works best for most projects. Check that each pot has a drainage hole if you’re planting real succulents.
Price range: Set of 6 pots for around twelve to eighteen dollars at most craft stores.

Acrylic Paint Set
Multi-surface acrylic paint works on ceramic and provides excellent coverage. Choose matte or satin finish instead of glossy. Two-ounce bottles give you enough paint for eight to ten mini planters.
Price range: Individual bottles run three to five dollars. Craft store paint sets offer better value.

Detail Brush Set
A size 2 or 3 round brush handles the scallop details perfectly. Synthetic brushes work well with acrylic paint and are easier to clean. Having multiple brushes lets you switch colors without washing.
Price range: Quality brush sets available for eight to fifteen dollars.
Step 1: Prep Your Pots

Proper preparation ensures your paint adheres smoothly and lasts longer. This step takes just a few minutes but makes a significant difference in the final result.
Cleaning Process
Wipe each pot with a dry cloth to remove dust and debris. New pots from the store often have a fine powder coating from manufacturing. If your pots feel particularly dusty or gritty, give them a light rinse under cool water.
Let ceramic pots dry completely before painting. Terracotta is porous and absorbs moisture quickly. Wait at least thirty minutes after rinsing to ensure the surface is bone dry. Painting on damp ceramic causes the paint to bead up and creates an uneven finish.
Checking Drainage
Turn each pot upside down and verify there’s a drainage hole in the bottom. Real plants need proper drainage to prevent root rot. If you’re using faux plants, the drainage hole isn’t necessary but won’t hurt.
Optional Base Coat
A thin white base coat makes your final colors appear more vibrant and true to bottle shade. This step is optional but recommended if you’re using light pastel colors over natural terracotta.
Apply one thin coat of white acrylic paint to the entire outer surface. Don’t worry about perfect coverage at this stage. Let it dry for fifteen to twenty minutes. The terra cotta color may still show through slightly, which is fine.
Avoid painting the inside of the pot unless you’re using it purely for display. Paint inside can interfere with drainage and isn’t necessary since it won’t be visible once planted.
Step 2: Paint the Bottom Color

The bottom color creates your color block base. This layer shows through the scalloped edge design and forms the foundation of your planter’s look.
Application Technique
Paint the bottom half of your pot with your chosen base color. Start at the drainage hole and work upward. Use smooth, even strokes that follow the curve of the pot. One thin coat is better than one thick coat.
Let the first coat dry for twenty minutes. Apply a second thin coat for solid, even coverage. Thin layers prevent drips and dry faster than heavy applications. Most acrylic paints achieve full opacity with two coats.
Trending Color Combinations

- Sage green bottom with cream scallops
- Terracotta bottom with beige scallops
- Olive green bottom with white scallops
- Clay brown bottom with soft pink scallops
- Blush pink bottom with cream scallops
- Beige bottom with white scallops
- Soft grey bottom with white scallops
- Cream bottom with light tan scallops
- Navy blue bottom with white scallops
- Black bottom with gold scallops
- Deep green bottom with cream scallops
- Rust orange bottom with cream scallops
Choose colors that complement your existing home decor or create a cohesive set with similar tone families. Neutral combinations work in any room and photograph beautifully for social media. Bold combos make statement pieces for entryways or as focal points.
Allow your base color to dry completely before moving to the scallop guide step. Touch the painted surface gently to ensure it’s fully dry. Rushing to the next step can smudge your careful work.
Step 3: Mark the Scallop Guide

This step is the secret to creating clean, evenly spaced scallops. Taking time to mark your guide prevents uneven or wonky curves that are difficult to fix later.
Planning Your Scallops
Count how many scallops will fit around your pot. For a three-inch pot, six to eight scallops work well. Smaller pots look better with five to six scallops. Larger four-inch pots can accommodate eight to ten scallops comfortably.
Use a pencil to lightly sketch half-circle shapes along the top edge of your painted section. Space them evenly around the pot. Each curve should connect smoothly to the next without gaps or overlaps.
The Shortcut Trick
Finding a circular object that matches your desired scallop size makes this process foolproof. The end of a paintbrush handle works perfectly for small scallops. A bottle cap from a water bottle or soda creates medium-sized curves.
Place your circular guide at the top edge of your painted section. Lightly trace around half of the circle to create one scallop shape. Move the guide along and repeat, making sure each new scallop connects smoothly to the previous one.
Spacing Tip: If your last scallop doesn’t quite meet the first one perfectly, adjust the spacing of all scallops slightly. It’s easier to make small adjustments now than to fix painted scallops later.
Step back and look at your marked scallops from different angles. Check that they appear evenly spaced and consistent in size. Make any adjustments now while it’s still just pencil marks. Light pencil lines will be covered completely by paint.
Step 4: Paint the Scalloped Edge

This step brings your design to life. Work slowly and steadily for the best results. The scalloped edge transforms a basic painted pot into something that looks professionally designed.
Painting Technique
Load your small round brush with paint but don’t overload it. Too much paint creates drips and uneven edges. Dip just the tip of the brush and wipe excess on the edge of your paint container.
Starting at one scallop, carefully fill in the half-circle shape you marked. Follow your pencil guide closely. Use the tip of your brush for the curved edges and the broader part of the brush to fill in the center.
Move around the pot painting each scallop. Keep your hand steady and your strokes smooth. Think of each scallop as a soft cloud shape floating on the pot. The curves should flow naturally without sharp angles or points.
Achieving Full Coverage
The first coat will likely look somewhat transparent. This is normal and expected with acrylic paint. Let the first coat dry for fifteen to twenty minutes before assessing coverage.
Apply a second coat to any areas that look thin or show the base color through too much. Two thin coats always look better than one thick coat. Thick paint can crack as it dries or create visible brushstroke texture.
Allow the scalloped edges to dry completely before handling the pot. Acrylic paint feels dry to the touch within thirty minutes but continues curing for several hours. Give it at least one hour before moving to touch-ups.
Step 5: Clean Up Edges (Optional)
This optional step elevates your planters from handmade to professionally crafted. Even experienced crafters benefit from edge touch-ups. Small corrections make a noticeable difference in the finished appearance.
Identifying Areas to Fix
Look at each scallop under good lighting. Natural window light works best for seeing imperfections. Check for uneven edges, paint that bled outside your pencil lines, or areas where the curves aren’t quite smooth.
Common issues include slightly wobbly lines, thin spots in coverage, or scallops that aren’t quite the same size. These small inconsistencies are easy to fix and won’t be noticeable once corrected.
Touch-Up Process
Use your base color to sharpen the bottom edges of your scallops. Carefully paint along the curves with a fine brush to create crisp lines. This technique essentially redraws the scallop shape from the opposite direction.
For scallops that look uneven in size, add a little more of your scallop color to the smaller ones. Build up thin layers rather than adding a lot of paint at once. Let each correction dry before assessing whether you need more.
If your scallop paint color looks thin or transparent in spots, add another light coat. Use a dabbing motion with your brush rather than brushing back and forth. This prevents disturbing the paint underneath.
Work on one or two scallops at a time rather than trying to fix everything at once. This approach prevents smudging wet paint as you work around the pot. Step back frequently to check your progress from a normal viewing distance.
Remember that handmade items have natural variations that add character. Aim for overall visual balance rather than mathematical perfection. Small imperfections often aren’t visible once the planter is filled and displayed with other items.
Step 6: Seal the Pot (Optional but Recommended)
Sealing protects your painted design from moisture, scratches, and UV fading. This step is especially important if your planters will hold real plants or live outdoors. Even indoor decorative pots benefit from sealer protection.
When to Seal Your Planters
You should definitely seal your pot if you plan to use real plants that need watering. Water droplets and humid soil conditions can cause unsealed acrylic paint to peel or become sticky over time.
Outdoor planters need sealer to withstand weather exposure. Rain, sun, and temperature changes break down acrylic paint quickly without protection. A good sealer extends the life of outdoor pieces by several years.
Indoor planters with faux plants don’t strictly require sealing. However, sealer adds a professional finish and protects against accidental bumps and scratches during normal handling. It also makes the surface easier to dust and clean.
Sealer Application
Important: Only apply sealer after your paint has fully cured for at least twenty-four hours. Sealing over partially dry paint can cause clouding or tackiness that never fully cures.
Work in a well-ventilated area or outdoors. Lay down newspaper or a drop cloth to protect your work surface. Hold the spray can eight to ten inches away from the pot. Apply thin, even coats using a sweeping motion.
Two to three light coats provide better protection than one heavy coat. Wait five to ten minutes between coats as recommended on your sealer can. The paint may look slightly darker when wet with sealer but will dry to its original color.
Let the sealed pot cure fully before planting. Most sealers cure to touch within one hour but need twenty-four to forty-eight hours for complete hardening. Check your product’s specific instructions for exact timing.
Matte finish sealer maintains that soft, modern aesthetic. Glossy sealer creates a shiny surface that photographs differently and can look less sophisticated. Satin finish offers a middle ground if you want slight sheen without full gloss.
Step 7: Add Your Plant
The final step brings your creation to life. Choosing the right plant completes the look and determines whether your planter becomes a living piece or a no-maintenance decoration.
Best Plants for Mini Planters
Living Plant Options
- Small succulents like echeveria or jade
- Mini cacti varieties
- Baby snake plants
- Small pothos cuttings
- Peperomia varieties
- Air plants (no soil needed)
Faux Plant Benefits
- Zero maintenance required
- Perfect for low-light rooms
- No watering or drainage concerns
- Ideal for office spaces
- Great for seasonal decorating
- Pet-safe alternative
Planting Real Plants
Add a layer of small pebbles or broken pottery pieces to the bottom of your pot. This improves drainage even if your pot has a drainage hole. About half an inch of drainage material works for these small pots.
Fill the pot about two-thirds full with cactus or succulent potting mix. This specialized soil drains quickly and prevents root rot. Regular potting soil retains too much moisture for succulents and cacti in small containers.
Remove your plant from its nursery pot and gently loosen the roots. Place it in your painted pot and add more soil around the sides. Leave about a quarter inch of space between the soil surface and the pot rim.
Water lightly after planting. For succulents, wait a few days before the first watering to let any damaged roots heal. Then water only when the soil feels completely dry. Overwatering kills more succulents than underwatering.
Styling with Faux Plants
Faux plants offer styling flexibility without plant care commitment. Choose high-quality artificial succulents that look realistic. Check customer reviews for feedback on appearance quality before purchasing from any seller.
Secure faux plants with floral foam or clay. Cut foam to fit snugly in your pot and push the plant stem into it. Cover the foam with decorative moss, small stones, or preserved moss for a natural look. This styling technique works for any size pot.
Faux arrangements let you create perfect groupings since you don’t need to consider light or water requirements. Mix different plant types and colors freely. Dust them occasionally with a soft brush to maintain their fresh appearance.
Common Mistakes to Avoid
Learning from common errors saves time and materials. These mistakes happen to everyone when starting out. Knowing what to watch for helps you create better results on your first attempt.
Paint Layer Problems
Applying thick paint layers is the most frequent beginner mistake. Heavy paint takes longer to dry and often cracks as it cures. The cracking happens because the outer surface dries while the inside remains wet.
Thick paint also shows visible brush strokes and creates texture. Multiple thin coats look smoother and more professional. Each thin layer dries in fifteen to twenty minutes rather than hours for thick application.
Rushing between coats causes another set of problems. Painting over tacky paint pulls up the bottom layer and creates a messy appearance. Always wait for complete dryness between coats even if it seems unnecessary.
Scallop Shape Issues
What Works
- Using a template or guide for consistent shapes
- Marking scallops lightly with pencil first
- Checking spacing before painting
- Making all scallops the same size
- Connecting scallops smoothly
What to Avoid
- Freehanding scallops without guides
- Making scallops different sizes
- Leaving gaps between scallops
- Creating pointed scallops instead of curves
- Skipping the planning step
Uneven scallops draw attention and make the piece look less polished. Take time to mark guides and use a template. The few extra minutes spent planning prevents having to repaint the entire pot.
Finish Selection Mistakes
Choosing glossy paint creates a different aesthetic than the soft modern look most people want. Glossy finish appears more like children’s craft projects. It also shows every brush stroke and imperfection more noticeably.
Matte or satin finishes photograph better and look more sophisticated. They hide minor flaws and create that coveted handmade-but-professional appearance. The finish affects the final impression more than most crafters expect.
Using outdoor paint for indoor projects isn’t necessary and often creates problems. Outdoor paints have different textures and may not cure properly in climate-controlled environments. Choose paint formulated for your intended use location.
Time Estimates and Planning
Understanding the time commitment helps you plan this project realistically. The active work happens quickly. Most time involves waiting for paint to dry between steps.
Active Work Time
Expect to spend thirty to forty-five minutes of hands-on work per pot. This includes cleaning, painting base coats, marking guides, painting scallops, and touch-ups. Creating multiple pots at once reduces time per pot since you can work on one while another dries.
First-time crafters usually take closer to forty-five minutes per pot. After making two or three planters, your speed increases as you develop technique. Many people complete a set of four pots in about ninety minutes of active work.
Drying and Curing Time
| Step | Drying Time | Can You Rush It? |
| Base coat (optional) | 15-20 minutes | No, must be fully dry |
| Bottom color (first coat) | 20 minutes | No, will smudge if damp |
| Bottom color (second coat) | 20-30 minutes | No, needs full cure before marking |
| Scalloped edge (first coat) | 15-20 minutes | No, assesses coverage when dry |
| Scalloped edge (second coat) | 30 minutes | No, must be dry for touch-ups |
| Sealer coat | 1-2 hours between coats | No, needs 24-48 hours before planting |
Total project time from start to finished planted planter runs about two to three hours including all drying time. Most of this is passive waiting rather than active work. The project fits perfectly into a weekend afternoon.
Best Project Timing
Start in the morning to take advantage of natural drying conditions and good lighting. Warm, dry days speed up paint drying. High humidity or cold temperatures extend drying times significantly.
Plan to seal and let cure overnight before planting if you want to use your planters the next day. Starting on Saturday morning means you can plant and display your finished pots by Sunday evening. Many craft stores experience higher traffic on weekends so shop for supplies on weekday evenings if possible.
Create an assembly line if making multiple pots. While one pot dries, prep or paint the next one. This approach maximizes efficiency and minimizes total project time. Most people find making three to four pots at once ideal for both time efficiency and variety.
Project Cost Breakdown
Understanding the current price for supplies helps you budget appropriately. This project remains very affordable compared to purchasing similar planters from home decor stores or online retailers.
Material Costs Per Planter
Budget Option
- Mini terracotta pot: two to three dollars
- Acrylic paint: one dollar per color (craft store)
- Paintbrush: two dollars (can reuse)
- Small succulent: three to four dollars
- Potting soil: one dollar (bag makes multiple)
Cost per planter: eight to ten dollars
Buying supplies at craft stores during sales reduces costs further. Many sellers offer forty percent off coupons regularly.
Premium Option
- Quality ceramic pot: four to five dollars
- Artist-grade paint: three dollars per color
- Professional brush set: ten dollars (reusable)
- Specialty succulent: five to seven dollars
- Premium soil mix: three dollars
Cost per planter: fifteen to twenty dollars
Premium materials last longer and provide better results but aren’t necessary for beautiful finished products.
Comparing to Store-Bought Options
Similar scalloped edge planters sell in home decor stores for twenty-five to forty dollars each. Designer versions from boutique retailers often cost fifty dollars or more. Making your own saves significant money while allowing complete customization.
The price difference becomes more dramatic when creating sets. A grouping of four store-bought designer planters costs one hundred to one hundred sixty dollars. Making the same set yourself runs thirty to forty dollars with budget materials.
Value Tip: Initial supply purchases seem higher because you’re buying full bottles of paint and complete brush sets. These supplies create eight to twelve planters, bringing your per-item cost down significantly.
Where to Find Good Prices
Local craft stores offer the best value during weekly sales. Check store websites for coupons before shopping. Many sellers provide email signup discounts for new customers that save twenty percent or more on your first purchase.
Online marketplaces sell supply sets specifically for this type of project. Sets include multiple pot sizes and coordinating paint colors. Read customer reviews and check seller ratings before purchasing craft supplies online. Delivery typically takes three to seven days for standard shipping.
Dollar stores carry basic terracotta pots and acrylic paint at the lowest prices. Quality varies but works fine for practice pots or gift projects. Save premium materials for pieces you plan to keep long-term.
Variations and Advanced Techniques
Once you master the basic technique, try these variations to create unique designs. These advanced approaches build on the same fundamental skills while adding creative elements.
Ombre Scallops
Create gradually lightening or darkening scallops around the pot. Start with your darkest shade on one scallop. Mix in a little white paint for each subsequent scallop to lighten the color progressively. This creates a beautiful gradient effect.
Ombre works especially well with blue to white transitions or pink to cream fades. Plan your color progression before starting. Mix all your shades at once to ensure consistent gradation around the entire pot.
Metallic Accents
Add thin metallic lines along the edges of your scallops for a luxe look. Gold or copper metallic paint creates an elegant border. Use a very fine detail brush and steady hand for this delicate work.
Metallic accents work beautifully on neutral base colors. Try gold lines on sage and cream planters or copper accents on terracotta and beige combinations. Less is more with metallic details.
Double Scallop Rows
Paint two rows of scallops in different sizes for added dimension. Create a row of larger scallops first, then add a row of smaller scallops overlapping the first row. This technique requires more time but creates stunning results.
Use three coordinating colors for double scallop designs. The base color, large scallops in a second color, and small scallops in a third color create beautiful depth. Keep colors in the same tone family for cohesive results.
Reverse Color Schemes
Instead of light scallops on a darker base, try dark scallops on a light base. Paint the bottom section in cream or white, then add navy, forest green, or black scallops. This reversal creates dramatic contrast.
Reverse schemes work particularly well for modern or masculine-styled spaces. The bolder look stands out more than traditional light-on-dark designs. Balance dark scallops with light-colored plants to prevent the pot from looking too heavy.
Textured Finishes
Experiment with textured paint or add-ins for unique surface effects. Mix fine sand into your base coat for subtle texture. Add texture paste to create dimensional scallops that stand out from the pot surface.
Textured techniques require practice and patience. Start with one practice pot before committing to a full set. Some texture additions may require adjusted drying times or specialized sealers.
Troubleshooting Common Issues
Even experienced crafters encounter occasional problems. These solutions fix the most common issues without starting over completely.
Paint Bleeding Under Edges
If paint bleeds under your scallop edges creating fuzzy lines, the paint was too thin or wet. Let it dry completely, then use your base color to repaint the bottom section right up to where the scallop should be.
Painter’s tape helps prevent bleeding on future pots. Apply thin strips of tape along your pencil guidelines before painting scallops. Remove tape immediately after painting while paint is still wet for cleanest lines.
Crackling or Peeling Paint
Cracking happens when paint is applied too thickly. If cracking occurs, let the paint cure completely for two days. Lightly sand the cracked area with fine-grit sandpaper. Wipe clean and repaint with thin coats.
Peeling indicates poor surface prep or painting over damp surfaces. Remove peeling sections completely by gently scraping. Clean the area thoroughly and let dry. Prime with a thin layer of white paint before repainting the design.
Uneven Color Coverage
Streaky or transparent-looking paint needs additional coats. Wait for complete drying, then apply another thin coat. Some paint colors require three coats for full opacity, especially yellows and light pastels over terracotta.
Stir paint thoroughly before each use. Paint settles in bottles, with pigment sinking to the bottom. Unstirred paint appears thin and transparent. Vigorous stirring for thirty seconds ensures proper consistency and coverage.
Sealer Clouding
Cloudy or milky appearance after sealing means you applied sealer over paint that wasn’t fully cured. Unfortunately, this usually requires repainting. Wait forty-eight hours after final paint layer before sealing.
Applying sealer in humid conditions or cold temperatures also causes clouding. Check weather conditions before sealing. Ideal application happens in low humidity with temperatures above sixty-five degrees.
Gift Ideas and Seasonal Variations
Scalloped edge mini planters make thoughtful handmade gifts for numerous occasions. Personalize colors and plant choices to match the recipient’s style and home decor preferences.
Occasions Perfect for Planter Gifts
- Housewarming presents with low-maintenance succulents
- Mother’s Day gifts in her favorite color palette
- Teacher appreciation with cheerful desk-sized planters
- Hostess gifts more memorable than wine or candles
- Bridesmaid thank-you gifts customized to wedding colors
- Birthday presents for plant-loving friends
- Get-well gifts that brighten hospital rooms
- Office Secret Santa exchanges under twenty dollars
Seasonal Color Schemes
- Soft pastels: blush, mint, lavender
- Fresh combinations: lemon yellow and white
- Garden-inspired: sage green and cream
- Coastal vibes: aqua blue and sand beige
- Warm neutrals: rust, cream, camel
- Cozy tones: burgundy and cream
- Forest themes: deep green and tan
- Holiday elegance: navy and gold
Gift Presentation Tips
Wrap planters in tissue paper and place in small gift boxes. The pot can serve as the gift container itself. Fill with decorative paper shred and nestle small treats or gift cards inside before adding the plant.
Include care instructions printed on nice cardstock. Recipients appreciate knowing how to care for their new plant, especially if they’re not experienced with succulents. Simple instructions prevent plant death and show your thoughtfulness.
Add a small tag with the plant name and basic care summary. Attach with natural twine or ribbon that complements your color scheme. This finishing touch elevates a handmade gift to boutique quality.
Storing Supplies and Workspace Setup

Proper storage extends the life of your materials and makes future projects easier. A dedicated workspace saves setup time and keeps supplies accessible when inspiration strikes.
Paint Storage Best Practices
Store acrylic paint bottles upside down when possible. This keeps paint from settling and reduces air exposure in the bottle. Tighten lids firmly after each use to prevent drying and skin formation.
Keep paints in a cool, dry location away from direct sunlight. Heat and light exposure changes paint consistency and color over time. A closet or cabinet works better than open shelving near windows. Most acrylic paint lasts one to two years with proper storage.
Label partially used paint bottles with the date opened. Paint thickens over time even with careful storage. Knowing when you opened a bottle helps you assess whether consistency issues are normal or indicate old product.
Brush Care and Cleaning
Clean brushes immediately after each use. Dried acrylic paint ruins brush bristles permanently. Rinse under warm water, work soap into the bristles, and rinse until water runs clear. Reshape the tip and lay flat to dry.
Never leave brushes standing upside down in water during projects. This bends bristles and loosens the glue holding them in the ferrule. Use a brush rest or lay brushes flat on a paper towel between paint coats.
Store dry brushes tip-up in containers or laid flat in a drawer. Hanging brush rolls keep bristles protected and organized. Replace brushes when bristles splay permanently or shed excessively during use.
Creating an Efficient Workspace
Essential Workspace Elements
- Protected work surface with washable covering
- Good task lighting from multiple angles
- Water container for rinsing brushes
- Paper towels within easy reach
- Lazy Susan or rotating platform for pots
- Comfortable seating at proper height
- Ventilation for sealer application

A rotating platform lets you turn pots easily while keeping your painting hand in a comfortable position. This simple tool significantly reduces hand fatigue and improves scallop consistency. A lazy Susan from the kitchen works perfectly.
Adequate lighting prevents eye strain during detail work. Position a desk lamp to illuminate your work without creating harsh shadows. Natural window light works well during daytime hours but needs supplementation for evening crafting.
Selling Your Planters
Many crafters turn this hobby into a small business opportunity. Scalloped edge mini planters sell well at craft fairs, online marketplaces, and through social media. Understanding pricing and marketing helps you succeed.
Pricing Your Work
Calculate material costs per planter including pot, paint, sealer, and plant. Add your time at a reasonable hourly rate. Beginning crafters often charge ten to fifteen dollars per hour while experienced makers command twenty to thirty dollars per hour.
Research competitor prices on Etsy and at local craft markets. Scalloped planters typically sell for twenty-five to forty-five dollars depending on size and complexity. Sets of three or four command premium pricing due to coordinated design.
| Item Type | Material Cost | Labor Time | Suggested Retail Price |
| Single 3-inch planter | Eight to ten dollars | Forty-five minutes | Twenty-five to thirty-two dollars |
| Set of three coordinating planters | Twenty-four to thirty dollars | Two hours | Seventy-five to ninety-five dollars |
| Custom color request | Ten to twelve dollars | One hour | Thirty-five to forty-five dollars |
| Premium with metallic accents | Twelve to fifteen dollars | One and a half hours | Forty to fifty-five dollars |
Where to Sell
Online marketplaces like Etsy attract customers specifically searching for handmade home decor. Create detailed listings with multiple photos showing different angles and styling options. Offer custom color combinations to differentiate from other sellers.
Local craft fairs and farmers markets provide face-to-face selling opportunities. Customers can see quality firsthand and appreciate the handmade nature. Set up an attractive booth display with grouped arrangements and clear pricing.
Instagram and Facebook serve as effective marketing tools. Post process videos showing planter creation. Use hashtags like handmadehome, plantersofinstagram, and diycrafts to reach interested buyers. Link to your shop in your bio.
Legal and Practical Considerations
Check local regulations about home-based businesses and craft sales. Some areas require business licenses even for small operations. Craft fair vendors often need temporary seller permits and insurance coverage.
Track expenses carefully for tax purposes. Keep receipts for all materials, booth fees, and business-related costs. Consult with an accountant about hobby versus business classification once sales become regular income.
Develop clear return and exchange policies. Shipping fragile ceramic items requires proper packaging materials and clear communication about potential transit damage. Consider offering local pickup options to reduce shipping complications.
Transform Your Space with Handmade Planters
Creating scalloped edge mini planters combines creative expression with practical home decor. This accessible project requires minimal supplies and produces professional-looking results. Whether you make one special planter or an entire collection, you’ve learned a technique that transforms ordinary terracotta pots into something beautiful.
The skills developed through this project apply to countless other craft endeavors. Paint techniques, color coordination, and attention to detail transfer to different creative pursuits. Many crafters discover a passion for DIY home decor through simple projects like these planters.
Your finished planters will bring joy every time you see them. They represent your creativity and effort. Display them proudly, give them as heartfelt gifts, or start a small business sharing your creations with others. The possibilities extend as far as your imagination.
Remember that every expert crafter started as a beginner. Your first attempt may not be perfect, but each planter you create improves your technique. Embrace the handmade quality that makes your pieces unique and special.